Vacation Message / Auto Responder Setup Instructions
The steps to add an auto responder are:
1. If you have not created the email user that you would like to have the autoresponder on, add it. The help on adding an email user is at: www.precisionwebhosting.com/siteadmin-demo
2. Once you have added the user (or if you have an existing email user account that you would like to add an autoresponder to) click on the envelope icon to the right or the user. From the email settings screen put a check mark next to “Vacation Message”. Then in the text box to the right, type in the message that you would like to be sent automatically. Then click the Save Changes button.
Once it is set up, and email sent to that address will get an automatic response emailed back. This can also be used for vacation messages / out of office messages.
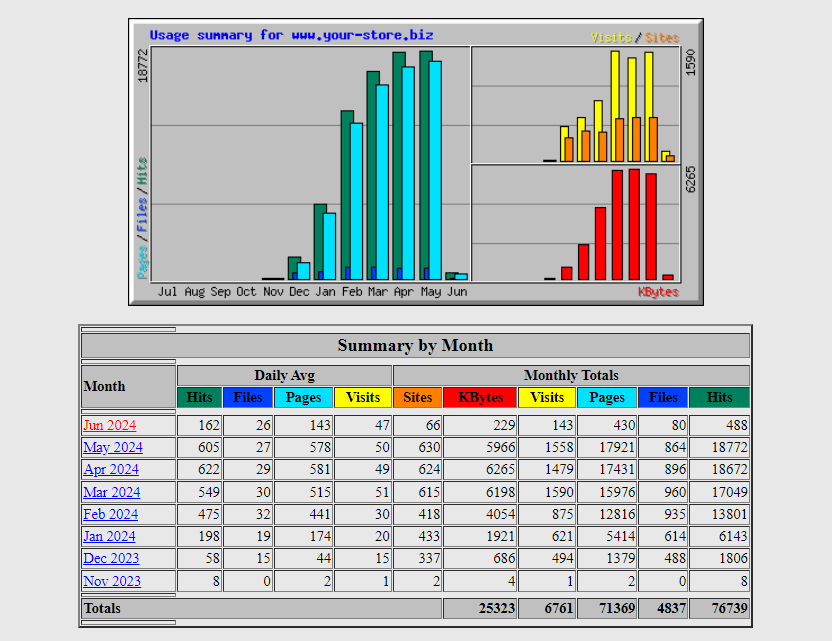
Where can I see site statistics
You will normally access your statistics at:
www.yourdomain.com/admin/ (where you would substitute your actual domain instead of “yourdomain.com”. The username and password to log in will be the same as for your siteadmin. You would click Usage –> Webalizer Those statistics will look something like those below.
How can I password protect a directory on my site?
We can manually protect any directory on your site using a .htaccess file; for this please submit a support request and we will do that for you. A more comprehensive solution would be to install WordPress and use their password protection option for pages, or a WordPress plugin.
How do Search Engines Find my site?
In general you will want to set up webmaster accounts with Google(about 90% market share) and Bing (about 4% market share). Submit your page/wordpress and shop/sitemap/sitemap.xml sitemaps to both Google and Bing. Also, in the robots.txt on your site you should have a directive to tell the search engines where your age/wordpress and shop/sitemap/sitemap.xml sitemaps.
Click here for more Information on search engines.
How can I see my domain from your servers before my domain is resolving there?
It is possible, running Notepad as administrator, to edit the hosts file that at: c:\windows\system32\drivers\etc\hosts and force your computer to see the site from a specific IP address. However, the easiest way is to have us set up the site at a temporary URL like your-name.secure-mall.com And create it from there; then when ready we can easily rename it.