Order Hosted Shopping Cart Only
Posted in: Uncategorized
Leave a Comment (0) →Author Archive
After creating your email account from the /siteadmin area, you can proceed through the steps below to set up the account in your Outlook email software. The steps below will show you how to set up an IMAP account; this is generally your best choice if you will be using multiple devices to check the same account.
The example below uses an example email account joe@your-store.biz
Steps:
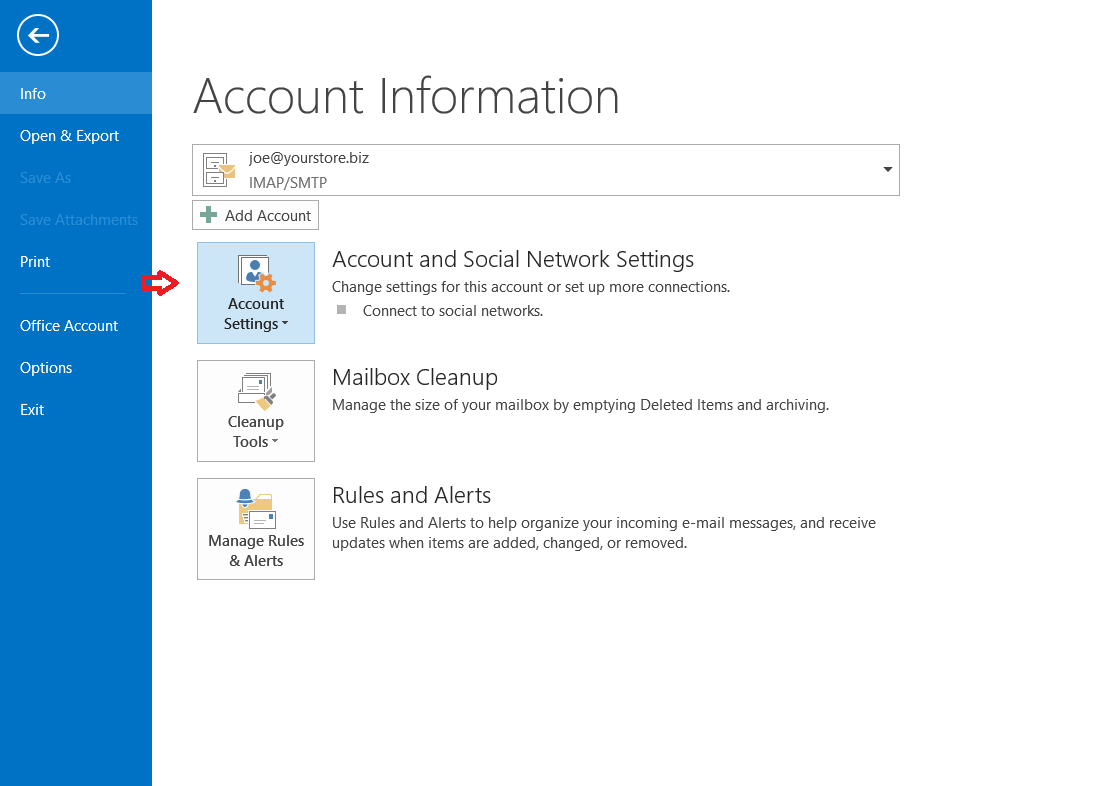
1. Click “File”. Or, in older Outlook versions, you may have to go to Tools –> Accounts

Then click Account Settings Button–> Account Settings (appears below button)
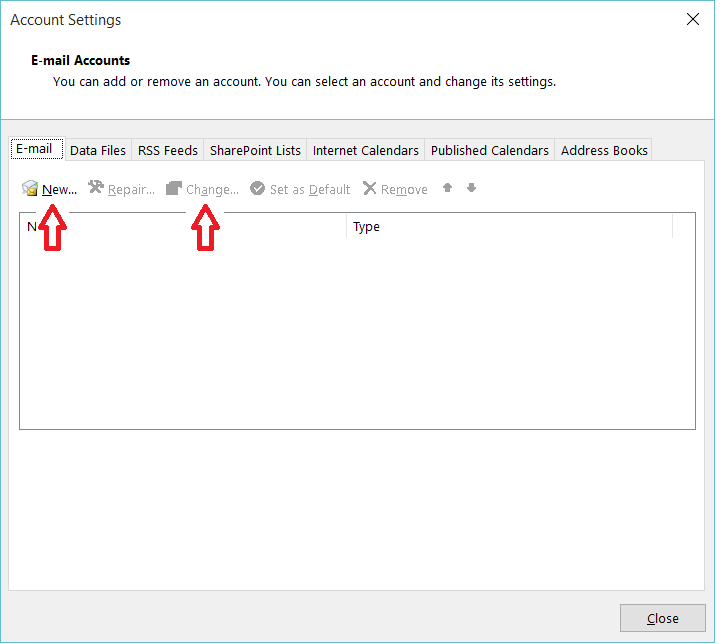
2. In the window that pops up, click the “New” to create a new account or “Change” to change your existing account. See screenshot below:
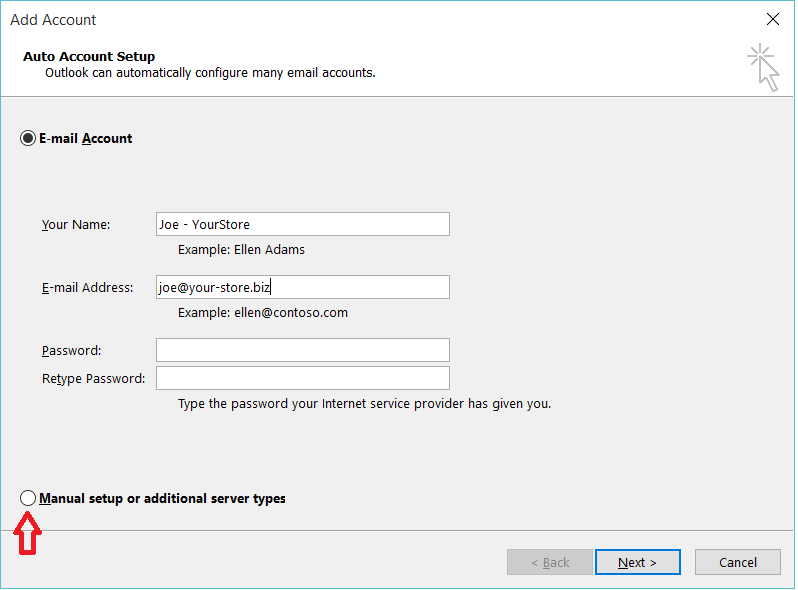
3. After clicking on “New”, you will see the screen below. Fill in your name, and your email address as you would like your customers to see it. Then select “Manual Setup” and the “Next” button; this will be the easiest way to get all the email settings right.
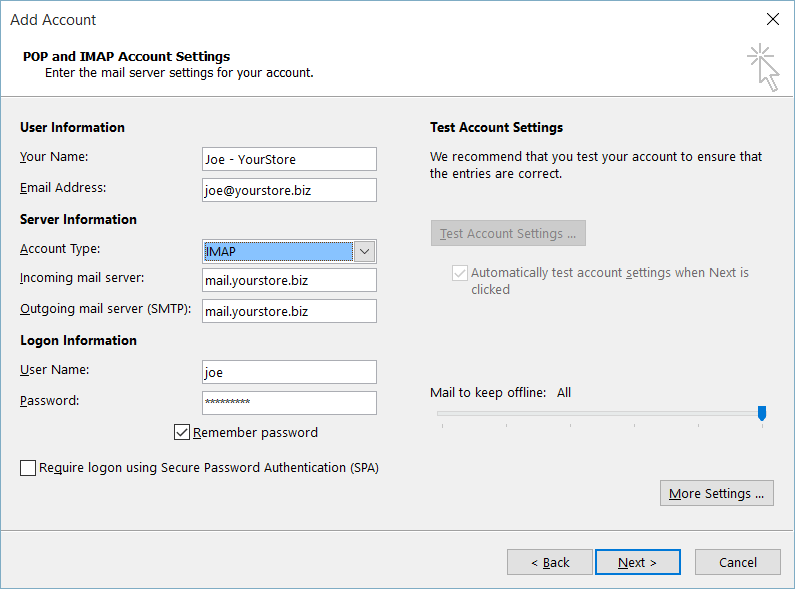
4. The next screen will give you three options Exchange, Outlook.com, or “POP or IMAP”. Go ahead and select the last option which is “POP or IMAP”. After that, the screen below will appear; on this screen (below)
a. Set the account type to IMAP
b. Type in the incoming and outgoing mail server to mail.[your actual domain]. So, following our example, set the mail servers to mail.your-store.biz
c. Optionally, you can also use the server name in the incoming and outgoing mail sever fields; the benefit of this is that it will match the SSL/TLS certificate name, so you will not get a security warning that the “Certificates do not match…” To see the server name of the server hosting your site, type in, for example, www.your-store.biz/admin (using your actual domain name) and see what it redirects to. Our example domain redirects to https://server105.secure-access.net:81/login.php The bold section of the url server105.secure-access.net is what you would use as the server name.
d. Set the username to just all lower case ‘joe” not “joe@your-store.biz”.
e. Type or paste in the password that you used for this account when you created it in your /siteadmin
f. Click “More Settings” button
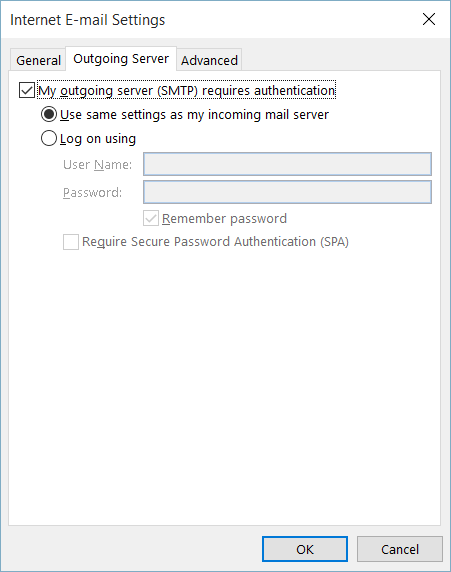
5. On the “More Settings” screen below, first click the “Outgoing Server” tab, and select “My Server Requires” authentication, and the default “Use same settings as my incoming mail server”. (Do not select SPA). Then click the “Advanced Tab on that screen.
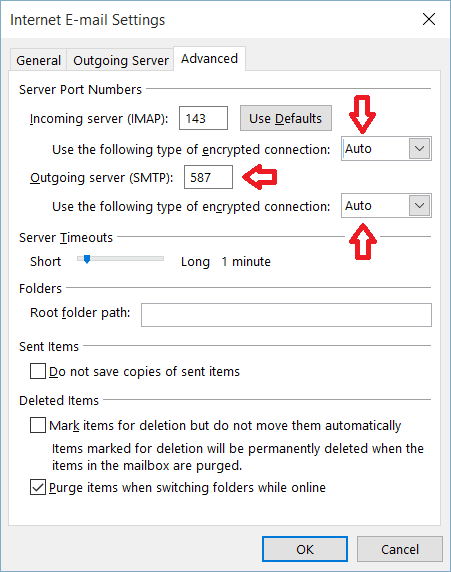
6. On the Advanced screen below:
a. Leave the IMAP port at the default port of 143
b. Select encryption to Auto for incoming and outgoing email.
c. Set the Outgoing SMTP port to 587
Many ISPs will block or redirect smtp connections on port 25; so you should set the SMTP port to 587
d. Click OK
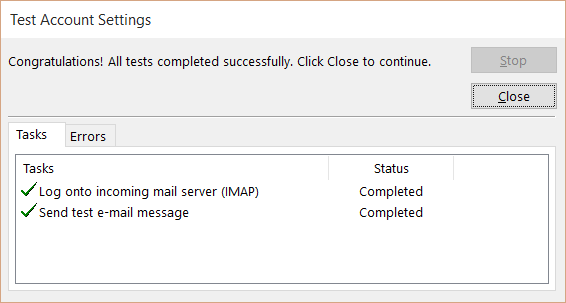
7. When you click Next, Outlook will text the account settings. It should show success on both.
Posted in: email-setup
Leave a Comment (0) →Import State, County and City tax rates from CSV file
‘Import tax rates from CSV’ allows you to add tax rates for your state, county, or city faster than adding the rates one by one on this page. Click import to the left to navigate to the screen which allows you to import using a CSV file format.
Country, State, County, City Based Tax
This is a good place to add tax rates for your country, state, county, or city.
Format:
Country — Select from the drop down bar
State — Abbreviation, ex. AZ
County — Enter the county name
City — Enter the city name
‘Tax Name’ is the field that the customer will see on the checkout page next just to the left of the tax percentage.
‘Tax Rate’ is the field that determines the tax rate used. The customer will see this number on the checkout page. Enter this number as percentage.
Charge Tax Based On
None — will not charge sales tax.
Billing Address — will charge sales tax based on customer’s billing address.
Shipping Address — will charge sales tax based on customer’s shipping address.
Billing or Shipping Address — will charge sales tax based on customer’s billing or shipping address, depending on which address has the indicated city, state, etc.
Location Settings
Location settings are important for what addresses you will accept at checkout. These settings are based on what states & countries arer listed at the bottom of the Sales Tax / Locations page.Allow any valid country or state whether it is listed below or not.
This is a good option to accept orders worldwide.Allow only countries and states that are listed below.
This is option allows you to specifically state which states and countries you prefer to sell to.Allow only countries that are listed below, but any states within those countries
This option allows you to speficy the counties you would like to sell to without having to enter in the state/province information.
IMPORT COUNTY AND CITY TAX RATES FROM A COMMA DELIMITED / CSV FILE USING THE SHOPPING CART’S “SALES TAX / LOCATIONS” PAGE FUNCTIONS. ALSO YOU CAN MODIFY THE TAX RATES AND THE LOCATIONS YOU WILL SELL TO.Click here for information on allowing/disallowing international shipping Navigation: |
|
| Sales Tax Rates You are able to charge sales tax based on rates for a particular Country, State, County, or City. 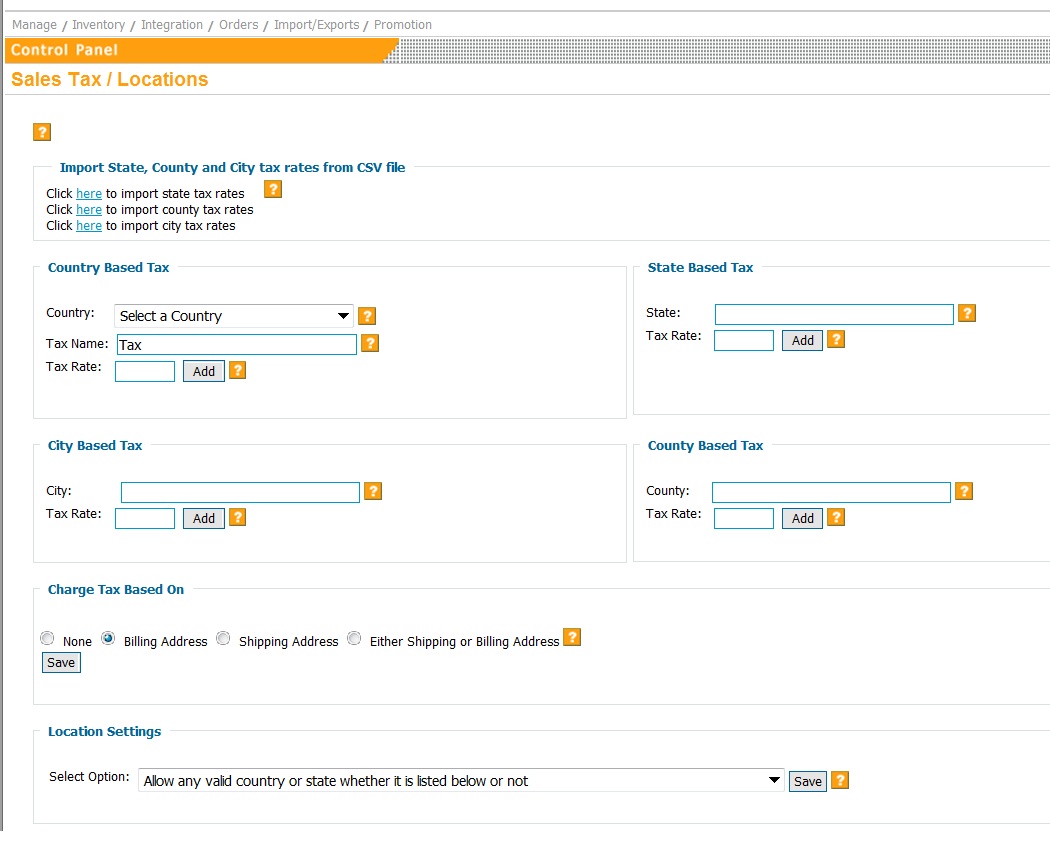 (click here for larger image)The sales tax rate used will be based on the information you input into the shopping cart system on this page. The shopping cart will then check the customer’s information for their City, County, State, and Country. The shopping cart will use the “lowest common denominator” for the sales tax rate meaning if the customer’s city matches a city put in below, it will use that tax rate for the customer’s order. If the customer’s city doesn’t not match a city put it below, then the shopping cart will use the county tax rate. If the customer’s county does not match put in below, then the shopping cart will use the state tax rate. If the customer’s state does not match a state below, then it will use the country tax rate. If you do not enter a sales tax rate for a City or County, the system will use the state tax rate. Example: United States has a 0% sales tax. You would enter: State Based Tax County Based Tax City Based Tax Based on this information input into the system: |
|
|
|
|
|
|
|
|
|
|
Posted in: shopmanual
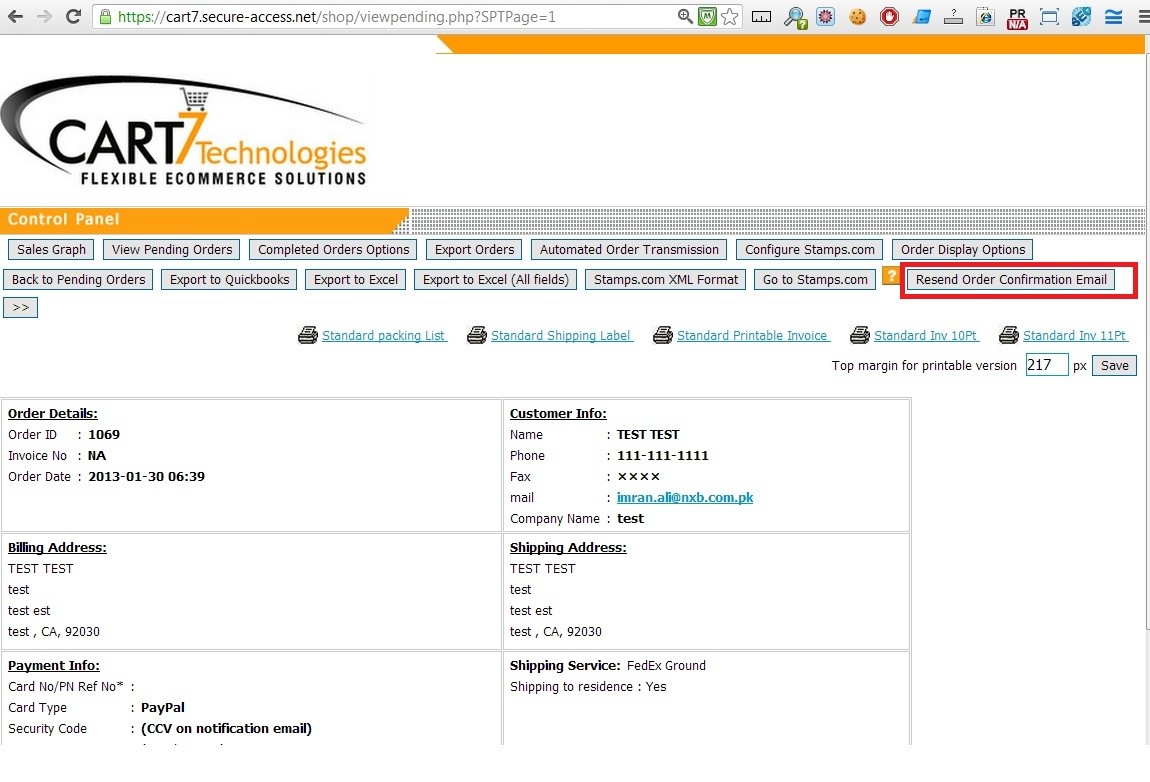
Leave a Comment (0) →If you ever have a problem with an order confirmation, you can click to have it re-sent in the Shopping Cart Owner area:
Orders > View (that particular order) > Resend Order Confirmation Email
Posted in: eCommerce Support
Leave a Comment (0) →See how to setup Windows Live Mail with IMAP:
Posted in: Help Videos, videos
Leave a Comment (0) →There are some new features for designers who want to integrate the shopping cart categories within their template. (more…)
Posted in: Shopping Cart Updates
Leave a Comment (0) →New feature in the Cart allows you to compare your 2012 sales to Previous years!
Posted in: Shopping Cart Updates
Leave a Comment (0) →


We are a premium hosting provider for eCommerce WordPress Hosting. Do you have a WordPress site? Now you can integrate the power of Precision’s Shopping Cart 7 with your WordPress theme.
We install WordPress on your Website free of charge. Wordpress is a Content Management System used to develop high-powered websites with lots of features due to the availability of plugins.
Access WordPress Templates
Wordpress has thousands of Free and Premium templates . If you need help with the customization, our Web Design Service Team can help. We can help you create a personal logo, and input it in the site or we can build your whole site for you. Payment Plans are available at a very reasonable cost (with payment plans available).
Standard WordPress Cart plugins are extremely limited in features, and if there’s a problem with their cart, the developers are slow to fix it. Precision Web’s shopping cart is constantly updated, and since we are the developer, you can get fast resolutions to any problem you may have.
Our Shopping cart comes free with your hosting package, and allows up to 1,000 items on the Standard plan.
[jbutton link=”https://www.precisionwebhosting.com/order_ecommerce_hosting.htm” color=”orange” size=”large”]Order Today[/jbutton]

(more…)
Your eCommerce Web Site will have new import format soon once the latest version of the shop is applied to your store. Due to the creation of 3 new fields (Alternate Description fields), the product import had to be accommodated with 3 new Columns in the Product Import for the Precision Web Shopping Cart. (more…)
Posted in: eCommerce Web Hosting Blog
Leave a Comment (0) →Precision web has an Award winning eCommerce Shopping Cart!
Posted in: Uncategorized
Leave a Comment (0) →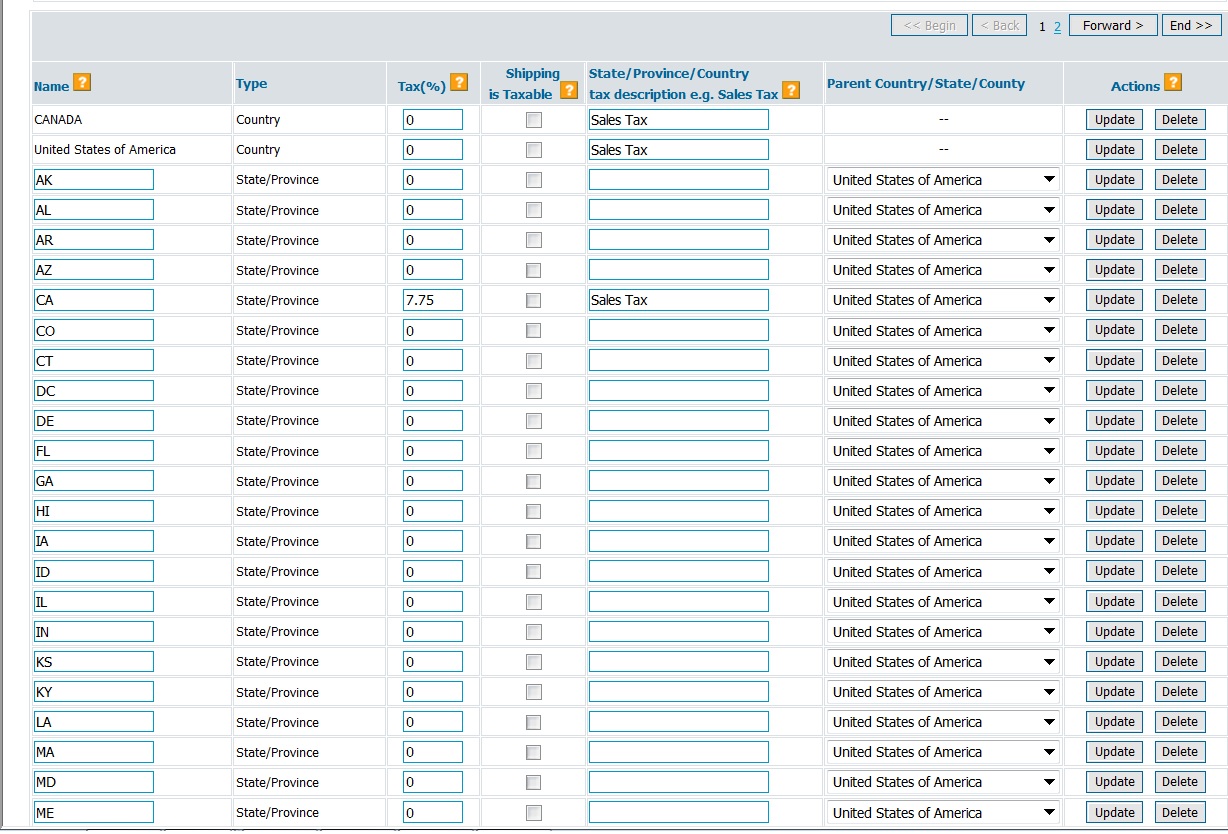