|
|
Shopping Cart Payment FAQ
|
|
• If you don’t find the shopping cart payment answers you are looking for here please contact us with any questions you have. |
|
|
|
Shopping Cart Payment Questions |
|
|
|
|
|
Which gateways will work with the Precision Web Shopping Cart System?
Currently our shopping cart will work with the shopping cart payment gateways from the providers below.
Generally all that is required to set up the shopping cart to use a particular gateway is to log in to the shop/owner Control panel, then select Manage –> submenu item Checkout Type. On the Checkout Type screen select the gateway from the dropdown, then enter in the required fields that appear below that.
1. Blue Pay Payment Gateway Easy Payment Gateway Integration
2. Authorize.net gateway with Merchant Account by GotMerchant.com
3. Elavon using Virtual Merchant or Elavon using the www.viaKLIX.com gateway. (Available from CostCo.)
4. Google Checkout
5. SkipJack
6. CardService International [Using their Linkpoint HTML/Basic interface only].
7. WorldPay.com “Junior Select” for Stores Based Outside the U.S.
8. Paypal‘s Payflow Link Payment Gateway (Previously Verisign Payflow Link)
9. CentralBancard using the E-xact gateway.
10. ChronoPay gateway for companies based in Europe
11. Paypal Payments Pro
12. Paypal Payments Standard (IPN)
13. Transact-Secure
14. IonGate
15. ICommerce
16. Fast Transact
17. NMI Gateway Services
18. Innovative Merchant Services / Intuit
19. Checkcare Payment
20. Net1 / Verus
21. EWay Australian Gateway, EWay New Zealand Gateway, EWay UK Gateway
 Back to Top – Shopping Cart Payment Page Back to Top – Shopping Cart Payment Page
|
|
|
|
|
Virtual Merchant 1.) Click on the Checkout Type link from your shop/owner page. On the Checkout Type page, select Virtual Merchant from the dropdown list.2.) Fill in the Merchant ID and Pin number in the fields provided.3. Within your Virtual Merchant account, select “Enable HTTP Transaction”.4. Proceed to your shop and place a test order.
Back to Top – Shopping Cart Payment Page |
|
|
|
|
CardService International Linkpoint Basic Shopping Cart Payment Gateway- How do I set up my shopping cart to work with it?1.) Simply click on the Checkout Type link from your shop/owner page, and select “Use Linkpoint” from the drop down menu.2.) In the “Credit Card System Username” field, type in your LinkPoint store number.3.) The following changes will have to be made from the LinkPoint Central
interface. You will log in at: https://www.linkpointcentral.com4.) Click on the Customization menu item, then on the Customization page there should be a section called: “Customize LinkPoint Connect”. Find the Configure your LinkPoint Connect link within that section, and click on it. If your LinkPoint account does not contain a “LinkPoint Connect” section, you will need to ask Linkpoint to enable your account with the LinkPoint Connect.
5. Set Order Submission Form URL to the correct url from below. Make sure to substitute the actual raq number for the XX. (You can see what raq you are on by going to your billing or checkout pages and noting the number, e.g. raq37, raq87 etc.) You can also add more than one separated by a space:
https://raqXX.secure-access.net/shop/checkout_lp.php
6. Set “Thank You” Page URL to the url below but make sure to replace the XX with the actual number of the raq you are on.
https://raqXX.secure-access.net/shop/finished_secure.php
[replaced with the appropriate shop URL].
Enable “Check here if this url is a CGI script” and enable “Check if you
wish to automatically display specified URL after the LinkPoint HTML receipt
page”
7. Set “Sorry” Page to the url below but make sure to replace the XX with the actual number of the raq you are on.
https://raqXX.secure-access.net/shop/finished_secure.php
[replaced with the appropriate shop URL].
Enable “Check here if this url is a CGI script” and enable “Check if you
wish to automatically display specified URL after the LinkPoint HTML receipt
page”
Back to Top – Shopping Cart Payment Page |
|
|
|
|
Authorizenet – How do I set up my shopping cart payment page to work with my Authorizenet credit card processing account?The steps to set up the shopping cart to work with the Authorize.net AIM method would be:1. Log into your Authorize.net account at https://secure.authorize.net
a. Click Settings
b. In the Transaction Submission section click on the “Password Required” link.
Click the “Require Password for ALL Transactions” checkbox to enable it, then click the Submit button.
c. Click the Settings link to get to the Settings section again. Then scroll to the Transaction Response
section and verify that your response version is set to 3.1
d. Scroll down to the Security section and click on the “Obtain Transaction Key” link.
e. Copy the Transaction Key (an alphanumeric code) that will be generated.2. Log into your shopping cart control panel at yourdomain.com/shop/owner
a. Enter the password we have supplied you in the “Web Site Settings” email.
b. Click the Checkout Type link
c. From the Checkout Type dropdown menu select the “Authorize.net (AIM)” method.
d. Below that type in your authorize.net API login username.
e. And one field down, in that same section enter in your authorize.net Transaction Key in the field provided for that.
(This is the code you would have copied in step one above.)
f. Click the Submit button at the bottom of the page.3. Place a test order to make sure it works. Then, if necessary, log into your authorize.net account and void it.
Back to Top – Shopping Cart Payment Page
|
|
|
|
BluePay – How do I set up my shopping cart payment page to work with my BluePay Version 2 credit card processing account?The steps to set up the shopping cart to work with the www.bluepay.com Version 2 would be:1. Log into your BluePay.com account at: https://secure.bluepay.com/login
a. From their menu select: Administration –> Accounts –> List
b. Highlight and Copy the number appearing under the “Account ID” column.
c. In another window, open your shop/owner General Settings page and go to the checkout section.
Then paste the Account ID in the “Credit Card System Username/ID: ” field.
d. Within the window open to your BluePay account, to the right on that same page, click the small round icon with two eyes. That will take you to their Account Information page. There you should see the text “Secret Key:” and immediately to the right of that a 32 digit jumble of letters and numbers. If you don’t see the secret key, click on their “Create Key” button.
e. Highlight and Copy that secret key. Then toggle back to the window you have open to the shop/owner General Settings page, and paste the secret key into the field titled “Verisign Partner ID/ECHO Merchant PIN/Authorise.Net Transaction key (AIM)/E-xact Password / Bluepay Secret Key (2.0) “
2. On your /shop/owner General Settings page
a. From the Checkout Type dropdown menu select the “Bluepay 2” method.
b. Click the Submit button at the bottom of the page.
3. Place a test order to make sure the checkout works. Then, if necessary, log into your https://secure.bluepay.com/login account and void your test order.
Back to Top – Shopping Cart Payment Page |
|
|
|
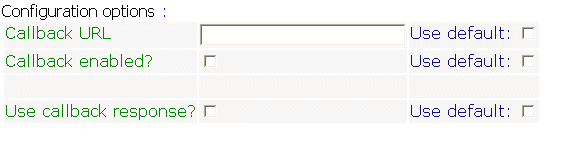
Worldpay – How do I set up my shopping cart payment page to work with my Worldpay credit card processing account?The steps to set up the shopping cart to work with the Worldpay JR Select method would be:1. Log into your Worldpay account at https://support.worldpay.com/admin/
a. Near the bottom of the screen, in the “Installations for (Your Name)” section, click the Configuration Options arrow
b. On the Configuration Options screen fill in the fields below:
– store-builder: if other – please specify [ precisionweb.net ]
– callback URL [https://raqxx.secure-access.net/shop/finished_secure.php]
(substitute the server number of the server that your site is actually on, in place of the “xx” in the url)
– callback enabled? [x]
– use callback response? [x]
– Click here for screenshot.
c. Click the Submit Changes Arrow/button at the bottom of the page.2. Log into your shopping cart control panel at yourdomain.com/shop/owner
a. Enter the password we have supplied you in the “Web Site Settings” email.
b. Click the General Settings button.
c. On the General Settings page click the Checkout Type link to bring you to the correct section of the page.
d. From the Checkout Type dropdown menu select the “worldpay” method.
e. In that same section enter in your worldpay username in the field provided for that.
f. Click the Submit button at the bottom of the page.3. Place a test order to make sure it works. If WorldPay requires you to place a test transaction before changing your account to Live status, please let us know so that we can manually change the line of code on the checkout page.
Back to Top – Shopping Cart Payment Page
|
|
|
|
|
How do I set up my shopping cart payment / checkout to work with my Verisign Payflow credit card processing account?1. Click on the General Settings button from your shop/owner page, scroll down to the “Checkout Type” section, and select “Use Payflow” from the drop down menu.2. In the “Credit Card System Username” field, type in your Payflow username.3. In the Partner ID field, type in the partner ID that your credit card processor has supplied you with: E.g. WFB or Verisign4. Log in to your Payflow account (https://manager.paypal.com/login/login.cfm).
- a. Click on the “Account Info” link near the upper left of your screen.
- b. The page that it takes you to will have links at the left. Click on each
one of those links and fill in the information as desired. One of the links
is titled “Payflow Link Info”, click on that link.
- c. On the Payflow Link Info page there are many options that you can set as
desired. Below are the ones that need to be set specifically so that
the shopping cart and Payflow will work together properly. Also, make sure to not set any fields as required, the shopping cart itself will set the necessary fields as required.
5. Set the return URL method to “Link”
6. Set the return URL to http://your-actual-domain.com/ where you would substitute
your actual domain name for your-actual-domain.com.
7. Enable the Silent Post URL and set it to https://raqXX.secure-access.net/shop/finished_secure.php where you would substitute(where raqXX is the raq number your site is hosted on. You can find this raq number by going through the checkout process to the page where you enter your credit card information. You will see in the address bar the secure server raq number)
.
Click Here for a screen shot of the Payflow page.
8. Make the Name, Address, City, State, Zip, Country, Phone, and Email
fields required by placing a check mark in the boxes next to each.
9. Set the “Transaction Process Type” to “Live”.
10. Under the Email Options section, set “Email receipt to customer” to
“No”
11. Set the “AVS” to “Medium” or “Full”
Back to Top – Shopping Cart Payment Page |
|
|
|
|
PayPal: How do I set up my shopping cart to accept payments by PayPal?1. Sign up for a PayPal business account at http://www.paypal.com2. Log into your shop administration at http://your-actual-domain.com/shop/owner/3. Click on the Checkout Type link or menu option from your shop/owner area. On the Checkout Type page select “Use PayPal Payments Standard (IPN)” from the drop down menu.4. In the “Paypal Email Address” field, type in your PayPal email address.
Also, you can have the shopping cart use the Paypal checkout in addition to your regular checkout. For example, you could have Authorize.net as your checkout type and then also enable PayPal as a 3rd payment option. To do that you would:
1. Go to your shop/owner Checkout page.
2. Find the “Allow Pay-Pal as the third payment option” and select it to Yes.
3. Then type in your paypal email address in the “User Name for Pay-Pal as the third payment option” field.
Back to Top – Shopping Cart Payment Page |
| |
|
|
PayPal Pro: How do I set up my shopping cart to accept payments PayPal Pro?
|
|
|
|
|
Where do I get my merchant account for offline processing? If you have a regular storefront for your business then you probably already have a credit card terminal and merchant account. You can use your existing merchant account and enter in the credit card information offline.
You can get a virtual terminal from: Authorize.net:To learn more about the Authorize.net Integrated Payment Service and to apply for an account, Click Here $149.00 setup
$29.95 a month gateway fee
$0.35 per transaction plus 2.39%
$0.95 per eCheck transactionFor offline processing, you of course may use any credit card / merchant account provider you like.
Back to Top – Shopping Cart Payment Page |
|
|
|
|
When my customers go to the checkout what happens to their order from there? How is the payment handled?If you have set the shopping cart checkout to use a real time credit card processing provider, then when your customer goes to the check out their payment will be transferred to the processors secure server. The customer will input their billing information for processing, verification and payment. The payment will automatically be deposited into your bank account. Both you and the customer will automatically receive a confirmation of the order.If you are not using a real time credit card processing provider, you will receive a notification that an order has been placed; then you will log into your shop/owner module and click on the “View Pending Orders” button to securely view the order and payment information using SSL security. The customer will receive email verification of the order also. Back to Top – Shopping Cart Payment Page |
|