Web Hosting Help

How do I edit pages using FTP?
Click the links below to go to the FTP tutorial you wish to view:

  • How to configure WSFTP
  • How to transfer using WSFTP
  • How to manage using WSFTP
  • Or, FTP using your Internet Explorer browser
    You can also FTP to your site and upload, download, and delete files using the FTP function within Internet Explorer. The steps to FTP using Internet Explorer would be:
    1. Type  ftp://www.your-store.biz   into the IE address bar (where the web site url is normally shown).
    Substitute your actual domain name in place of  your-store.biz
    2. When prompted for your username and password, type in the username and password that we sent your in your web site settings email. The FTP site will open.

    3. From the Internet Explorer menu select Page, then “Open FTP Site in Windows Explorer”, and enter your login username and password once more.

    4. Now you will be able to paste files or drag files into the Windows Explorer FTP window that you have opened. You will also be able to delete and rename files.

    The directory that you will want to put your files into is the /web directory. Any files that you put in /web will show up on your site. For example, if you upload somefile.jpg to /web then the file will be visible at http://www.your-store.biz/somefile.jpg (not http://www.your-store.biz/web/somefile.jpg)

    How do I edit pages using Dreamweaver?
    Click the links below for the DreamWeaver tutorial you wish to view:

  • Configure new site in DreamWeaver MX
  • FTP using DreamWeaver MX
  • Create a NavBar in DreamWeaver MX
  • Create a form in DreamWeaver MX
  • Page Layout in DreamWeaver MX
  • Create rollover in DreamWeaver MX
  • Create a table in DreamWeaver MX
  • Create a template in DreamWeaver MX
  • How do I edit pages using Microsoft Publisher?
    The steps to publish with Microsoft Publisher 2003 are:
    1. Click File –> Save
    That will save your Publication on your computer; that will normally be in your Documents folder.2. Then click File –> Publish to Web
    Where it asks you for the file name put your web site address like http://www.your-store.bizMake sure to substitute your actual domain name in place of your-store.bizWhen it prompts you for a user and password you will enter “webmaster” as the username.
    The username and password would be the same as you would use for publishing using FrontPage.
    user: webmaster
    Password: same as your FTP passwordAfter that password prompt disappears, the the file name shows “index”; leave that and click Save
    When I publish my pages, the changes don't seem to show up?

    When you FTP files to your site or publish Using FrontPage, the changes are made immediately on the server.
    However you might not see the changes for 2 reasons:
    1. Your browser is showing you an old page that it has cached on your local hard drive. To force the browser to reload the current page form the server, hold down the <SHIFT> key while you click on the Reload button (Netscape) or Refresh button (Internet Explorer). Or, if you are using the built in AOL browser, hold down the <CTRL> key while you click on the Refresh button (Normally just to the left of the address bar and Home Icon).2. Another possible reason you are not seeing your changes: If you are working on your home page and your home page was named index.html but you now have it named index.htm of Default.htm, you might be changing the index.htm page but still seeing the index.html page. index.html has a higher preference than index.htm as a home page. To resolve this, just rename your home page to index.html

    How do I setup an Auto Responder?
    Auto Responder Setup Instructions

    The steps to add an auto responder are:

    1. If you have not created the email user that you would like to have the autoresponder on, add it. The help on adding an email user is at: www.precisionwebhosting.com/siteadmin-demo.htm
    2. Once you have added the user (or if you have an existing email user account that you would like to add an autoresponder to)  click on the envelope icon to the right or the user. From the email settings screen put a check mark next to “Vacation Message”. Then in the text box to the right,  type in the message that you would like to be sent automatically. Then click the Save Changes button.

    Once it is set up, and email sent to that address will get an automatic response emailed back. This can also be used with information request forms to automatically have the information mailed to the customer.

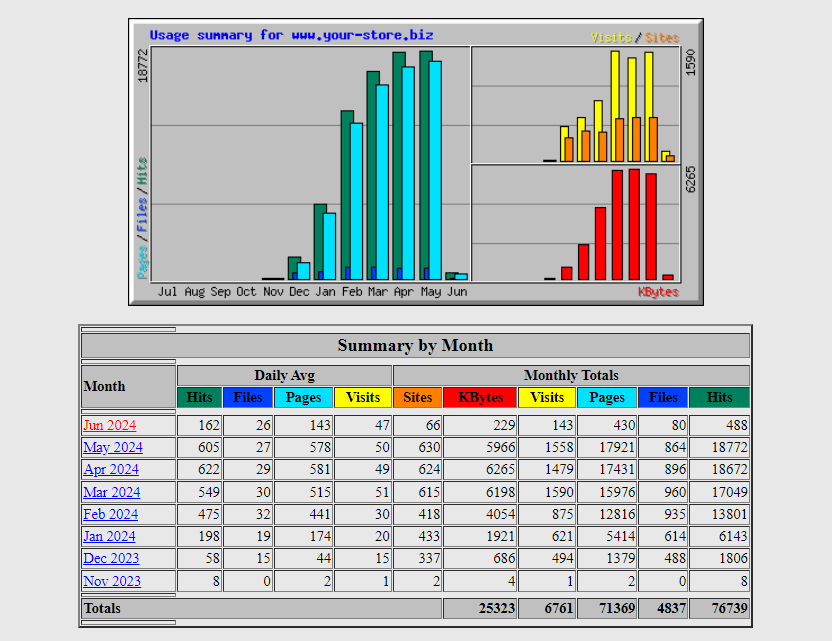
    Where can I see site statistics?

    You will normally access your statistics at:
    www.yourdomain.com/admin/    (where you would substitute your actual domain instead of “yourdomain.com”The username and password to log in will be the same as for your siteadmin. You would click Usage –> Webalizer or AWStatsMain Headings
    Hits represent the total number of requests made to the server during the given time period (month, day, hour etc..).Files represent the total number of hits (requests) that actually resulted in something being sent back to the user. Not all hits will send data, such as 404-Not Found requests and requests for pages that are already in the browsers cache.Tip: By looking at the difference between hits and files, you can get a rough indication of repeat visitors, as the greater the difference between the two, the more people are requesting pages they already have cached (have viewed already).

    Sites is the number of unique IP addresses/hostnames that made requests to the server. Care should be taken when using this metric for anything other than that. Many users can appear to come from a single site, and they can also appear to come from many ip addresses so it should be used simply as a rough gauge as to the number of visitors to your server.

    Visits occur when some remote site makes a request for a page on your server for the first time. As long as the same site keeps making requests within a given timeout period, they will all be considered part of the same Visit. If the site makes a request to your server, and the length of time since the last request is greater than the specified timeout period (default is 30 minutes), a new Visit is started and counted, and the sequence repeats. Since only pages will trigger a visit, remotes sites that link to graphic and other non- page URLs will not be counted in the visit totals, reducing the number of false visits.

    Pages are those URLs that would be considered the actual page being requested, and not all of the individual items that make it up (such as graphics and audio clips). Some people call this metric page views or page impressions, and defaults to any URL that has an extension of .htm, .html or .cgi.

    KByte (KB) is 1024 bytes (1 Kilobyte). Used to show the amount of data that was transferred between the server and the remote machine, based on the data found in the server log.

    Common Definitions

    Site is a remote machine that makes requests to your server, and is based on the remote machines IP Address/Hostname.

    URL – Uniform Resource Locator. All requests made to a web server need to request something. A URL is that something, and represents an object somewhere on your server, that is accessible to the remote user, or results in an error (ie: 404 – Not found). URLs can be of any type (HTML, Audio, Graphics, etc…).

    Referrers are those URLs that lead a user to your site or caused the browser to request something from your server. The vast majority of requests are made from your own URLs, since most HTML pages contain links to other objects such as graphics files. If one of your HTML pages contains links to 10 graphic images, then each request for the HTML page will produce 10 more hits with the referrer specified as the URL of your own HTML page.

    Search Strings are obtained from examining the referrer string and looking for known patterns from various search engines. The search engines and the patterns to look for can be specified by the user within a configuration file. The default will catch most of the major ones.

    Note: Only available if that information is contained in the server logs.

    User Agents are a fancy name for browsers. Netscape, Opera, Konqueror, etc.. are all User Agents, and each reports itself in a unique way to your server. Keep in mind however, that many browsers allow the user to change it’s reported name, so you might see some obvious fake names in the listing.

    Note: Only available if that information is contained in the server logs.

    Entry/Exit pages are those pages that were the first requested in a visit (Entry), and the last requested (Exit). These pages are calculated using the Visits logic above. When a visit is first triggered, the requested page is counted as an Entry page, and whatever the last requested URL was, is counted as an Exit page.

    Countries are determined based on the top level domain of the requesting site. This is somewhat questionable however, as there is no longer strong enforcement of domains as there was in the past. A .COM domain may reside in the US, or somewhere else. An .IL domain may actually be in Israel, however it may also be located in the US or elsewhere. The most common domains seen are .COM (US Commercial), .NET (Network), .ORG (Non-profit Organization) and .EDU (Educational). A large percentage may also be shown as Unresolved/Unknown, as a fairly large percentage of dialup and other customer access points do not resolve to a name and are left as an IP address.

    Response Codes are defined as part of the HTTP/1.1 protocol (RFC 2068; See Chapter 10). These codes are generated by the web server and indicate the completion status of each request made to it.

    How can I password protect a directory on my site?

    Your domain is set up with the FileMan software which allows you among other functions, to password protect a directory. The steps would be:1. Log into the FileMan software at your-store.biz/cgi-bin/fileman/fileman.cgi (substitute your actual domain name in place of your-store.biz)
    The login username and password will be the same as you use for FTP and your siteadmin login.

    2. Once logged in, if you see a web directory link, you should click it. (The software may automatically start you off in the /web directory)

    3. Browse to the directory that you want to protect, or create that directory.

    4. Click on the “Protect” link near the top of your screen. Then, near the bottom of the screen, fill in the desired values in  the username and password fields and click the “Add User” button.

    If you are using FrontPage, then the directory ownership might not let the FileMan software create the .htaccess file necessary for password protection. In that case you may want to use the FrontPage built in password protection function.

    To use FrontPage to password protect a directory:

    1. From within FrontPage, log in to your Web server.
    2. Create the directory you want to password protect.
    3. Right-click the new directory and select Convert to Web. Click Yes when prompted to confirm.
    4. With the “sub web” selected, on the Tools menu select Security > Permissions. The Permissions dialog box appears.
    5. Select the Use unique permissions for this web option and then click Apply.
    6. Select the Userstab.
    7. Select the Only registered users have browse access option.
    8. Click Add. Enter a user name and password for accessing this directory and then confirm the password.
    9. Select the permission to grant to this user name.
    10. Click OK.
    11. Repeat steps 8 through 10 for each user name and password you want to create. When you are finished, click OK on the Permissions dialog box.
    How do I register with the search engines?
    For Information on registering your site with the search engines click here.
    How do I find out what these Internet Terms mean?

    What are the meanings of all those internet terms? Click here to find out.

    What do the error codes mean?

    100 Continue
    101 Switching Protocols200 OK
    201 Created
    202 Accepted
    203 Non-Authoritative Information
    204 No Content
    205 Reset Content
    206 Partial Content300 Multiple Choices
    301 Moved Permanently
    302 Moved Temporarily
    303 See Other
    304 Not Modified
    (304 means the file was loaded from the browser cache instead of being resent by the server)
    305 Use Proxy400 Bad Request
    401 Unauthorized
    402 Payment Required
    403 Forbidden
    404 Not Found 405 Method Not Allowed
    406 Not Acceptable
    407 Proxy Authentication Required
    408 Request Time-Out
    409 Conflict
    410 Gone
    411 Length Required
    412 Precondition Failed
    413 Request Entity Too Large
    414 Request-URL Too Large
    415 Unsupported Media Type500 Server Error
    501 Not Implemented
    502 Bad Gateway
    503 Out of Resources
    504 Gateway Time-Out
    505 HTTP Version not supported

    PHP Help

    PHP Tutorials

    How can I see my domain from your servers before my domain is resolving there?

    Open up the hosts file on your computer using Notepad. If you are using Windows Vista, you will need to right click on the Notepad selection from your programs menu and select “Run As Administrator” then click “Continue” when prompted. Then browse to that directory, and select to view “all files” not just .txt files.
    The hosts file that you will need to edit is generally at: c:\windows\system32\drivers\etc\hosts
    NOTE: hosts is the name of the hosts file and not another directory name. It does not have an extension (extensions are the .exe, .txt, .doc, etc. endings to filenames) and so appears to be another directory in the example above. The 2 lines that you will need to add to the end of your hosts file are below. (Make sure to type in your actual domain name instead of yourdomain.com, and instead of typing in 209.216.xx.xxx you’d type in the actual server IP address.
    # The 2 lines to insert are below 209.216.xx.xxx www.yourdomain.com 209.216.xx.xxx yourdomain.comIf you do not have a Hosts file already, you may simply create one.After making the changes, save the file, then close any browser windows that you may have had open, and restart Internet Explorer. If the changes took effect you should now see your site from our servers at www.yourdomain.comYou can check this by going to the url below (make sure to substitute your actual domain name instead of yourdomain.com) www.yourdomain.com/hosted-by/Note: once you have changed the DNS/nameserver information for your domain, it should start resolving ot our servers within 1-24 hours after that time. Once it is resolvig to our servers you should remove the entries you have made in the hosts file on your computer.

    Once you make the changes above you will be able to publish your pages/files/images to your site on our servers using FrontPage.