| Export Orders Navigation: Orders > Export Orders |
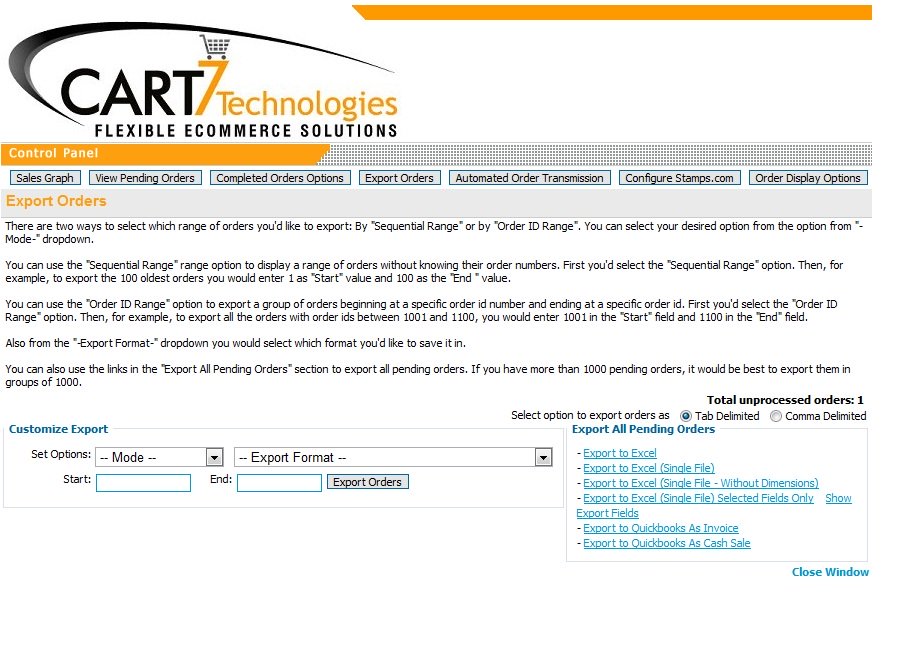 Export Mode Options There are two ways to select which range of orders you’d like to export: By “Sequential Range” or by “Order ID Range”. You can select your desired option from the option from “-Mode-” dropdown. Sequential Range You can use the “Sequential Range” range option to display a range of orders without knowing their order numbers. First you’d select the “Sequential Range” option. Then, for example, to export the 100 oldest orders you would enter 1 as “Start” value and 100 as the “End ” value. Order ID Range You can use the “Order ID Range” option to export a group of orders beginning at a specific order id number and ending at a specific order id. First you’d select the “Order ID Range” option. Then, for example, to export all the orders with order ids between 1001 and 1100, you would enter 1001 in the “Start” field and 1100 in the “End” field. Export Format Options Export to Excel Export Mode Options There are two ways to select which range of orders you’d like to export: By “Sequential Range” or by “Order ID Range”. You can select your desired option from the option from “-Mode-” dropdown. Sequential Range You can use the “Sequential Range” range option to display a range of orders without knowing their order numbers. First you’d select the “Sequential Range” option. Then, for example, to export the 100 oldest orders you would enter 1 as “Start” value and 100 as the “End ” value. Order ID Range You can use the “Order ID Range” option to export a group of orders beginning at a specific order id number and ending at a specific order id. First you’d select the “Order ID Range” option. Then, for example, to export all the orders with order ids between 1001 and 1100, you would enter 1001 in the “Start” field and 1100 in the “End” field. Export Format Options Export to Excel
This function allows you to save to excel seperating 2 files (customer details, order details). Export to Excel (Single File) This function allows you to save a single file with to excel with dimensions. Export to Excel (Single File – Without Dimensions) This function allows you to save a single file with to excel without dimensions. Export to Excel (Single File) Selected Fields only This function allows you to save a single file with to excel. Export to QuickBooks As Invoice This function allows you to save 3 files to import into QuickBooks, and the transactions are saved as an invoice transaction Export to QuickBooks As Cash Sale This function allows you to save 3 files to import into QuickBooks, and the transactions are saved as a cash sale transaction Other Options You can also use the links in the “Export All Pending Orders” section to export all pending orders. If you have more than 1000 pending orders, it would be best to export them in groups of 1000. You can choose whether to save the file as tab delimited or comma delimited. |
| Configure Stamps.com/strong> Navigation: Orders > Configure Stamps.com |
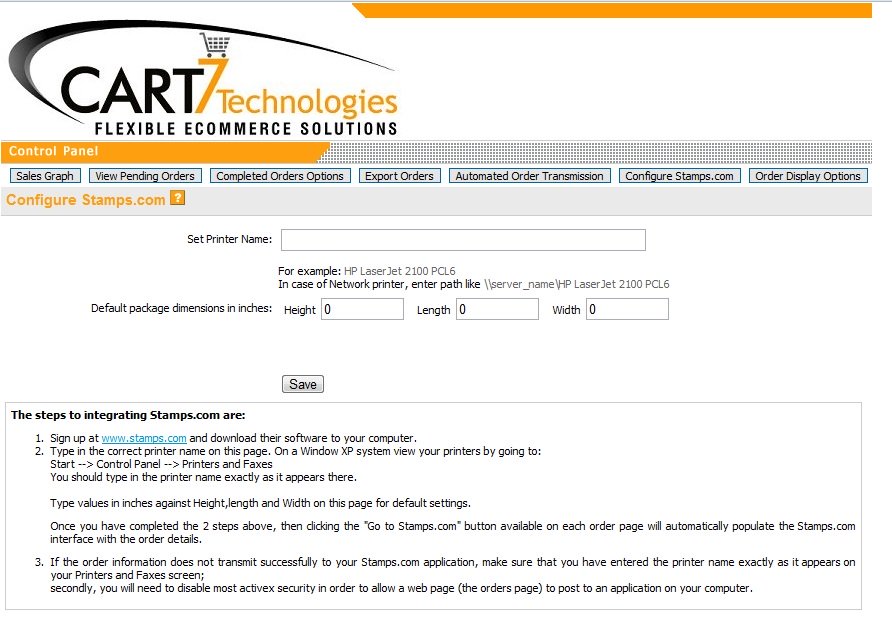 There are 2 ways to export you orders to Stamps.com. Method 1 — “Go to Stamps.com” The first way uses the “Configure Stamps.com” page. Enter your printer name: For example: HP LaserJet 2100 PCL6 In case of Network printer, enter path like \\server_name\HP LaserJet 2100 PCL6 Enter the default dimensions in inches, and click save. This method requires that you disable protected mode in Internet Explorer. Once you have turned off protected mode, you then are able to use the “Go to Stamps.com” function. The “Go to Stamps.com” function is found in on the individual order page. To view an an individual order, click on ‘View’ to the right of the order you would like to view. On this page, you would click “Go to Stamps.com” and a window should appear that says “Accept”. You then will be able to import that order into Stamps.com Method 2 — “Export Order to Excel” View the following video to see how to import multiple orders at once: https://www.precisionwebhosting.com/videos/Stamps/Stamps.html This method is preferred for a few reasons. 1. You do not have to disable protected mode, 2. You can use any browser, 3. You can import multiple orders (rather than a one order at a time). There are 2 ways to export you orders to Stamps.com. Method 1 — “Go to Stamps.com” The first way uses the “Configure Stamps.com” page. Enter your printer name: For example: HP LaserJet 2100 PCL6 In case of Network printer, enter path like \\server_name\HP LaserJet 2100 PCL6 Enter the default dimensions in inches, and click save. This method requires that you disable protected mode in Internet Explorer. Once you have turned off protected mode, you then are able to use the “Go to Stamps.com” function. The “Go to Stamps.com” function is found in on the individual order page. To view an an individual order, click on ‘View’ to the right of the order you would like to view. On this page, you would click “Go to Stamps.com” and a window should appear that says “Accept”. You then will be able to import that order into Stamps.com Method 2 — “Export Order to Excel” View the following video to see how to import multiple orders at once: https://www.precisionwebhosting.com/videos/Stamps/Stamps.html This method is preferred for a few reasons. 1. You do not have to disable protected mode, 2. You can use any browser, 3. You can import multiple orders (rather than a one order at a time). |
| Automated Orders Navigation: Orders > Automated Order Transmission |
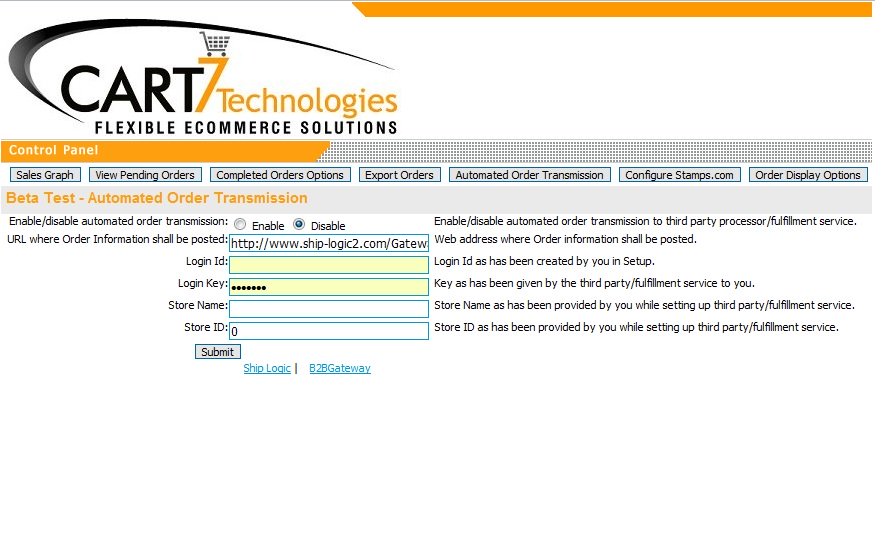 Beta Test – Automated Order Transmission The automated order transmission allows you to post orders to an outside source. This is useful if you use an automated fulfillment service. Beta Test – Automated Order Transmission The automated order transmission allows you to post orders to an outside source. This is useful if you use an automated fulfillment service. |
| Sales Graph page Navigation: Orders > View |
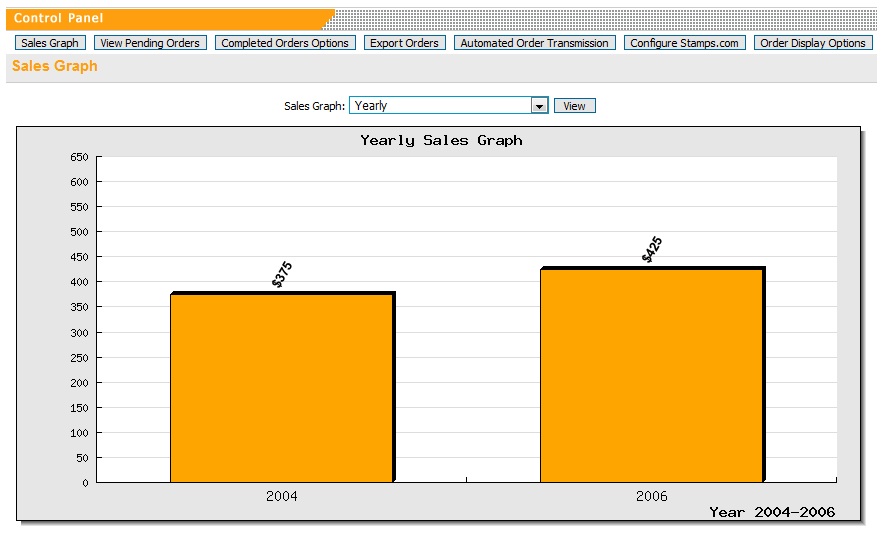 Sales Graph Page The Sales Graph allows you to see your sales on a monthly or yearly basis. Sales Graph Page The Sales Graph allows you to see your sales on a monthly or yearly basis. |
| View Order Page Navigation: Orders > View |
 Overview of the Orders Page Viewing an order allows you to see all the customer’s information relating to an order including Order Details, billing address & shipping address, payment information, shipping options, & products on the order. If you are using the “Secure Checkout” method for payment to manually process cards, please take note that the payment information is truncated after 30 days. Overview of the Orders Page Viewing an order allows you to see all the customer’s information relating to an order including Order Details, billing address & shipping address, payment information, shipping options, & products on the order. If you are using the “Secure Checkout” method for payment to manually process cards, please take note that the payment information is truncated after 30 days. |
| Orders Page Navigation: Orders |
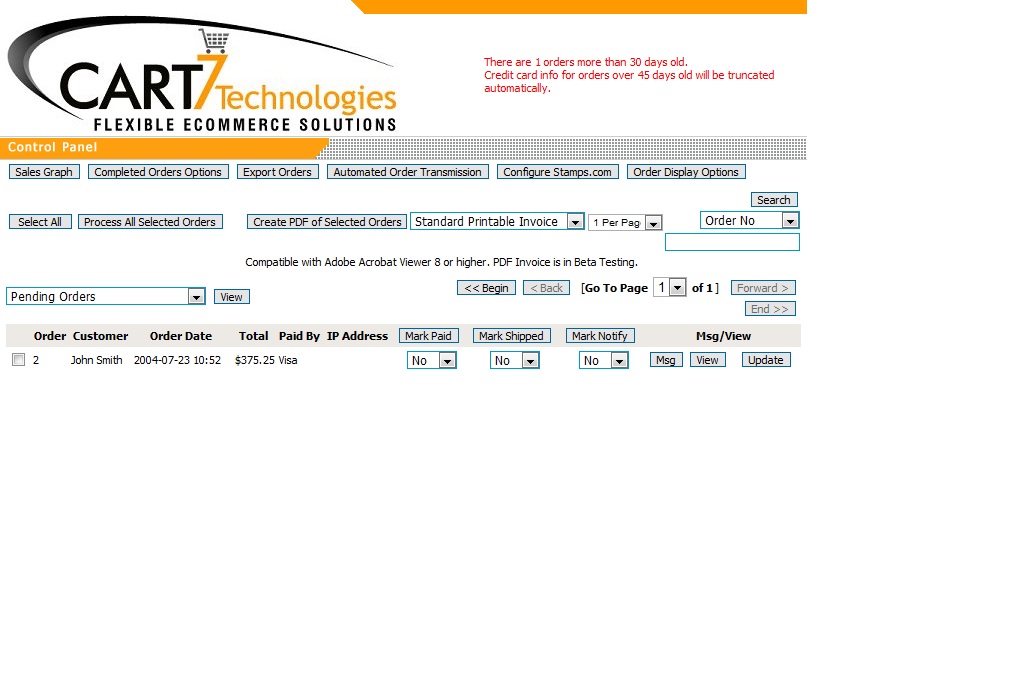 Overview of the Orders Page The orders page let’s you see a snapshot of the all your orders that have been placed. Shop owners can update the order status, create printable PDF’s of invoices or packing slips , and create a Message (Msg) that is sent along with the shipment confirmation email. They can also filter the orders in the drop down bar with several options: All Ordes Pending Orders Orders Paid but not shipped Orders Not Paid and not shipped Orders Completed (Paid & Shipped) Update Order Status To mark completed: Set the following to ‘Yes’: Mark Paid (if your cards are not processed in real-time), Mark Shipped, Mark Notify (if you would like to send a shipment confirmation email) Along with this email you can send a message (seen in the top pat of the email). Many shop owners use this feature to send tracking #. Once you have made these chanes, you are able to click the “The “Update” button. View The “View” button allows you to look at the details for an order. If you process cards through the ‘Secure Checkout’ form of checkout, you would be able to view the card details here. Search There is also a search function which allows you search by Order Number, Invoice Number, Customer Email, or Last Name. Overview of the Orders Page The orders page let’s you see a snapshot of the all your orders that have been placed. Shop owners can update the order status, create printable PDF’s of invoices or packing slips , and create a Message (Msg) that is sent along with the shipment confirmation email. They can also filter the orders in the drop down bar with several options: All Ordes Pending Orders Orders Paid but not shipped Orders Not Paid and not shipped Orders Completed (Paid & Shipped) Update Order Status To mark completed: Set the following to ‘Yes’: Mark Paid (if your cards are not processed in real-time), Mark Shipped, Mark Notify (if you would like to send a shipment confirmation email) Along with this email you can send a message (seen in the top pat of the email). Many shop owners use this feature to send tracking #. Once you have made these chanes, you are able to click the “The “Update” button. View The “View” button allows you to look at the details for an order. If you process cards through the ‘Secure Checkout’ form of checkout, you would be able to view the card details here. Search There is also a search function which allows you search by Order Number, Invoice Number, Customer Email, or Last Name. |
| Keyword Search Report Navigation: Promotion > Search Report |
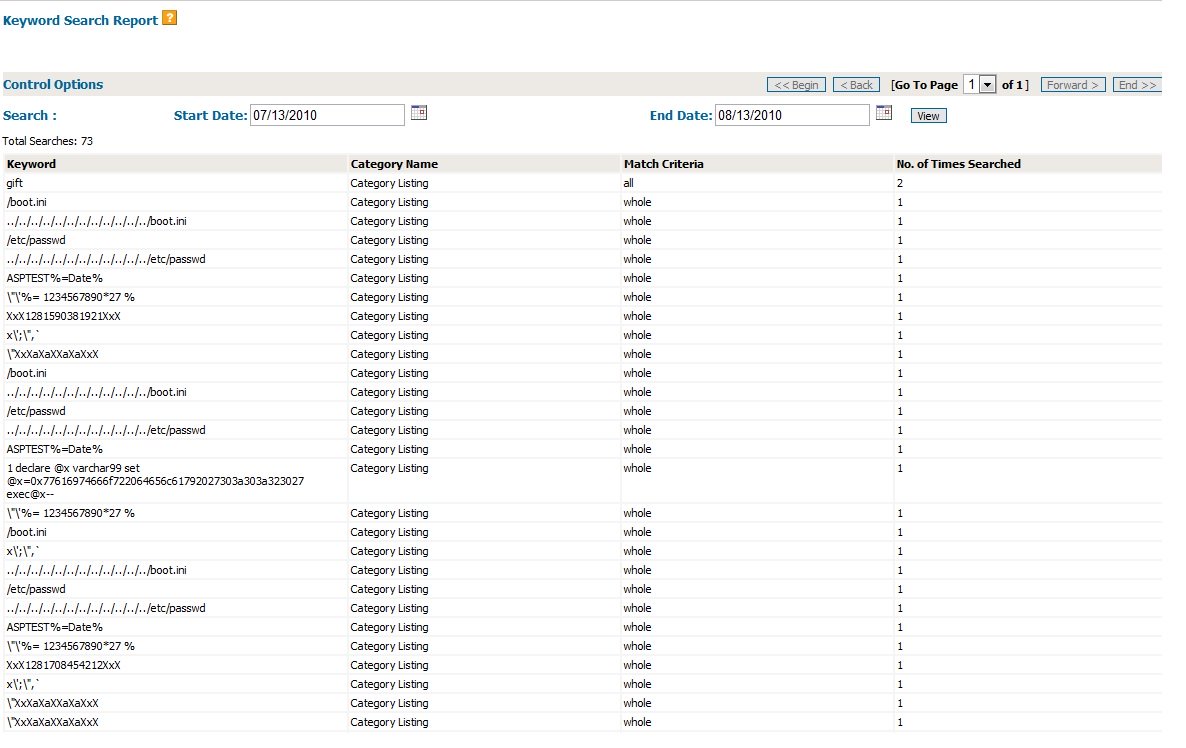 The Keyword Search Report page lets you view the searches that your customers have made within your shopping cart. Using this feature may help you determine what your customers are looking for that you do not currently sell, or may indicate which items should be more prominent on your site. The default search time period is for the last 30 days. If you would like to search in other time periods, select the start and end dates for your search from the small calendar icons to the right of each date field. Each subject heading is clickable and will change the display to soft by the clicked heading. Generally you will find that the “No. of Times Searched” heading will be the most useful since that will display first the items most needing your attention. The Keyword Search Report page lets you view the searches that your customers have made within your shopping cart. Using this feature may help you determine what your customers are looking for that you do not currently sell, or may indicate which items should be more prominent on your site. The default search time period is for the last 30 days. If you would like to search in other time periods, select the start and end dates for your search from the small calendar icons to the right of each date field. Each subject heading is clickable and will change the display to soft by the clicked heading. Generally you will find that the “No. of Times Searched” heading will be the most useful since that will display first the items most needing your attention. |
| Keyword Search Report Navigation: Promotion > Search Report |
| The Keyword Search Report page lets you view the searches that your customers have made within your shopping cart. Using this feature may help you determine what your customers are looking for that you do not currently sell, or may indicate which items should be more prominent on your site. The default search time period is for the last 30 days. If you would like to search in other time periods, select the start and end dates for your search from the small calendar icons to the right of each date field. Each subject heading is clickable and will change the display to soft by the clicked heading. Generally you will find that the “No. of Times Searched” heading will be the most useful since that will display first the items most needing your attention. |
| Google Product Search A great way to increase visibility on the Google search engine is to set up a Google Product Search data feed. It’s a free service from Google. Navigation: Promotion > Export Google Product Search |
The steps to set your Google Feed up are: 1. On your item pages, fill in the Brand, Condition, and Product Type fields for your Products. For more information on specifying your “Product Type” click herehttp://www.google.com/support/merchants/bin/answer.py?hl=en&answer=160081 2. On this page, make sure all your categories are selected, then click the “Export & Save to Site” button (preferred method). That will create a product listing at [https://shopdemo2.precisionweb.net/shop/sitemap/googleproductfeed.txt ] 3. From the Google page at http://www.google.com/intl/en_us/products/submit.html click the “Start A Data Feed” button. (You will not need to start a new data feed each time). That will take you to the New data feed page.br>4. On that New Data Feed page type in your data feed name ( We suggest googleproductfeed.txt ), and then click the Save Changes button. 5. Now you will be at their “Data feeds” page which will list your feed(s). Under the “Upload schedule” column click the “Create” link (This is easier than the manual upload or FTP methods). That will pop up a small window where you can specify the frequency and url of your feed. We suggest a weekly frequency. In the url field paste in the following url: To save the information you just input click the “Schedule” button. 66. Now as you save an item you will want to occasionally select the option to update your Google Product Search feed. Or come to this page after a large number of updates and resave your feed file to the site. 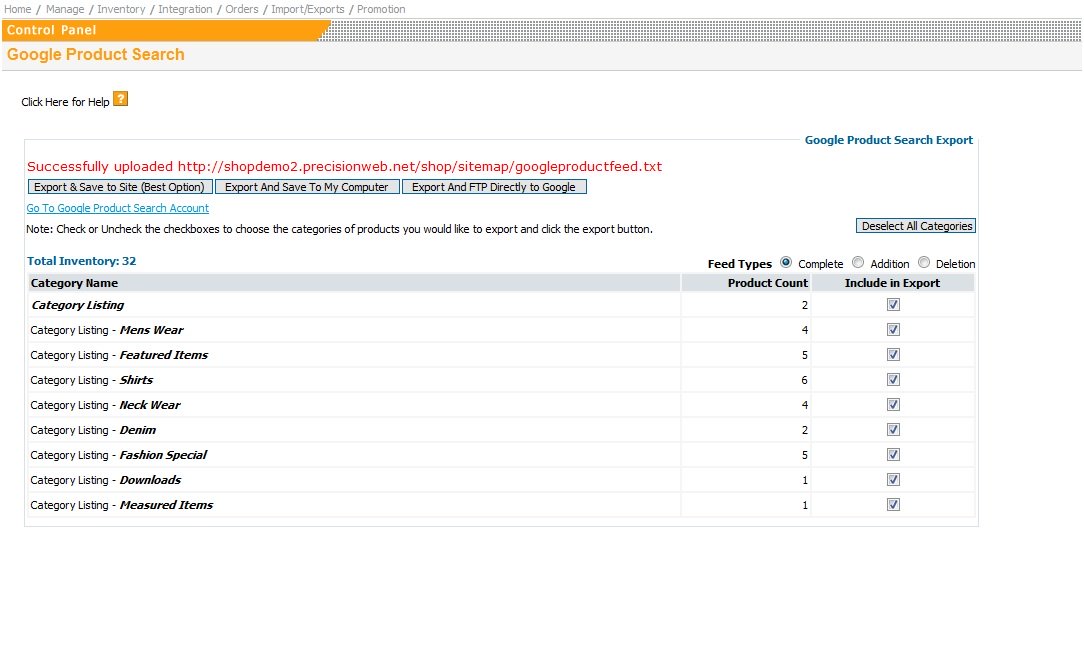 Save to Site Option This option allows you to pull your Google feed from a file saved on a webpage (the url is given after you click save to site). Once you have saved a file to this URL, you are able to use this URL in your Google Feed Settings. This is the preferred method to use. Save to Site Option This option allows you to pull your Google feed from a file saved on a webpage (the url is given after you click save to site). Once you have saved a file to this URL, you are able to use this URL in your Google Feed Settings. This is the preferred method to use. 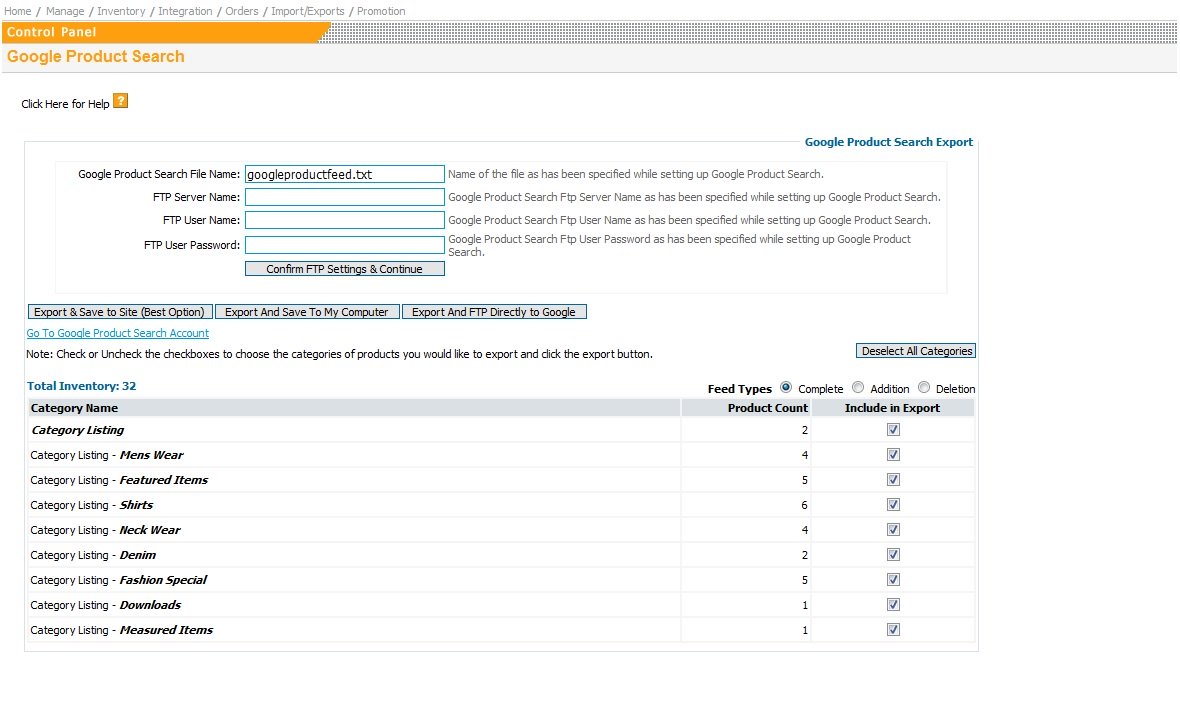 Save to FTP This option allows you to FTP directly to your Google Feed. Once you have entered the appropriate settings, you are able to connect with your Google Feed. Save to My Computer This option allows you to pull your Google feed from a file saved on you computer. Once you have saved a file to your desktop, you are able to use this file in your Google Feed Settings. Save to FTP This option allows you to FTP directly to your Google Feed. Once you have entered the appropriate settings, you are able to connect with your Google Feed. Save to My Computer This option allows you to pull your Google feed from a file saved on you computer. Once you have saved a file to your desktop, you are able to use this file in your Google Feed Settings. |
| Create Sitemapbr> Google Sitemaps is an easy way for you to submit all your URLs to the Google index and get detailed reports about the visibility of your pages on Google. With Google Sitemaps you can automatically keep Google informed of all your web pages. Navigation: Promotion > Manage Affiliates |
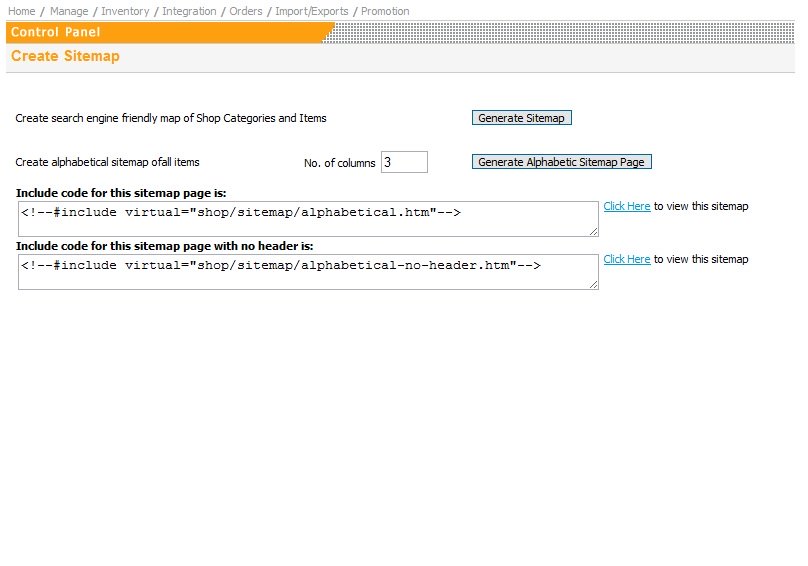 Generate Sitemap This function allows you to generate a sitemap with the items listed in the order they are listed in the shop. The include code listed allows you to insert the html in your webpages. Otherwise, you can click on ‘Click here’ to view sitemap and you will find a URL already created for you. Generate Sitemap This function allows you to generate a sitemap with the items listed in the order they are listed in the shop. The include code listed allows you to insert the html in your webpages. Otherwise, you can click on ‘Click here’ to view sitemap and you will find a URL already created for you.  Generate Alphabetic Sitemap Page This function allows you to generate a sitemap with the items listed in the alphabetical order. The include code listed allows you to insert the html in your webpages. Otherwise, you can click on ‘Click here’ to view sitemap and you will find a URL already created for you. Generate Alphabetic Sitemap Page This function allows you to generate a sitemap with the items listed in the alphabetical order. The include code listed allows you to insert the html in your webpages. Otherwise, you can click on ‘Click here’ to view sitemap and you will find a URL already created for you. |
| Manage Affiliates Navigation: Promotion > Manage Affiliates |
 An affiliate link is useful for tracking where your clicks came from. When someone clicks on the link, the shopping cart sets a cookie to keep track of them and know the “source”. To use the affiliate link you would, for example: 1. Create an affiliate named “Google” 2. Set up the links within your Google Adwords account to use that link e.g. https://shopdemo2.precisionweb.net/shop/?source=google 3. When someone clicks on that link from Google and places an order, then the affiliate code “Google” will show up on that customers order on your orders page. Steps to creating an affiliate source link: 1. Type in a source name in the source field: For example: “googleadwords” or “googleadwords-campaign1” or “someothersite.com” 3. Use that link in your Google Adwords campaign or give that link to the other site that has agreed to put a link to you on their site. 3. You can also create a link to a specific category or item. Create the link as above but also fill in the category or item id, and / or the redirect url fields. If you would like the person clicking on the link to end up on a page outside of the shop, then type in the complete url beginning with http:// in the Redirect URL field. An affiliate link is useful for tracking where your clicks came from. When someone clicks on the link, the shopping cart sets a cookie to keep track of them and know the “source”. To use the affiliate link you would, for example: 1. Create an affiliate named “Google” 2. Set up the links within your Google Adwords account to use that link e.g. https://shopdemo2.precisionweb.net/shop/?source=google 3. When someone clicks on that link from Google and places an order, then the affiliate code “Google” will show up on that customers order on your orders page. Steps to creating an affiliate source link: 1. Type in a source name in the source field: For example: “googleadwords” or “googleadwords-campaign1” or “someothersite.com” 3. Use that link in your Google Adwords campaign or give that link to the other site that has agreed to put a link to you on their site. 3. You can also create a link to a specific category or item. Create the link as above but also fill in the category or item id, and / or the redirect url fields. If you would like the person clicking on the link to end up on a page outside of the shop, then type in the complete url beginning with http:// in the Redirect URL field.
Affiliate Source Name The Affiliate Source Name can be any single word. Try not to use non-alphabetic characters in your Affiliate Source Name. As an example of how to use the different Affiliate Source Names that you can create, you might want place three advertisements with an online publication that deals with your industry. You’d like to know how many orders you get from that each different ad on their site. To do that you could create three new Affiliate Source Names like magazineadFreeshipping magazineadTenpercent magazineadCutepuppypic And then link each of the 3 different ads to your shop using the different affiliate codes. When someone clicks on the link in one of the three ads, comes to your site, and places an order, then on the order page you will see which ad they clicked by looking at the affiliate source. Redirect to Category You would use “Redirect To Category” option to show a specific category of items to the shoppers who click on a particular affiliate link. To use the “Redirect To Category” select the category from the dropdown menu. If you use the “Redirect To Category” feature, then do not fill in the Item or URL redirect fields since the link can only redirect to one of the three alternatives. Redirect to Inventory Item Id You would use the “Redirect to Inventory Item Id” option to show a specific item to the shoppers who click on the affiliate link. To use this option, click the “Select An Item Id” button. That will display a dropdown list of categories below. Select the category which contains the item you want to link to. Then click the “Show Items In This Category” button. The shopping cart will show you an item list of items in that category; click the link next to the item that you’d like to display when the affiliate link is clicked. If you use the “Redirect To Inventory Item Id” feature, then do not select a category redirect (above) or URL redirect fields since the link can only redirect to one of the three alternatives. Redirect to URL This option would redirect the shoppers who click on a particular affiliate link to a specific URL outside of the shopping cart. The redirect url should be a fully specified url beginning with http:// Add Affiliate Source If you use the “Redirect To URL” feature, then do not select a category or item redirect above since the link can only redirect to one of the three alternatives. |
| Customer Newsletter View Subscribers Navigation: Promotion > Customer Newsletter > View Subscribers |
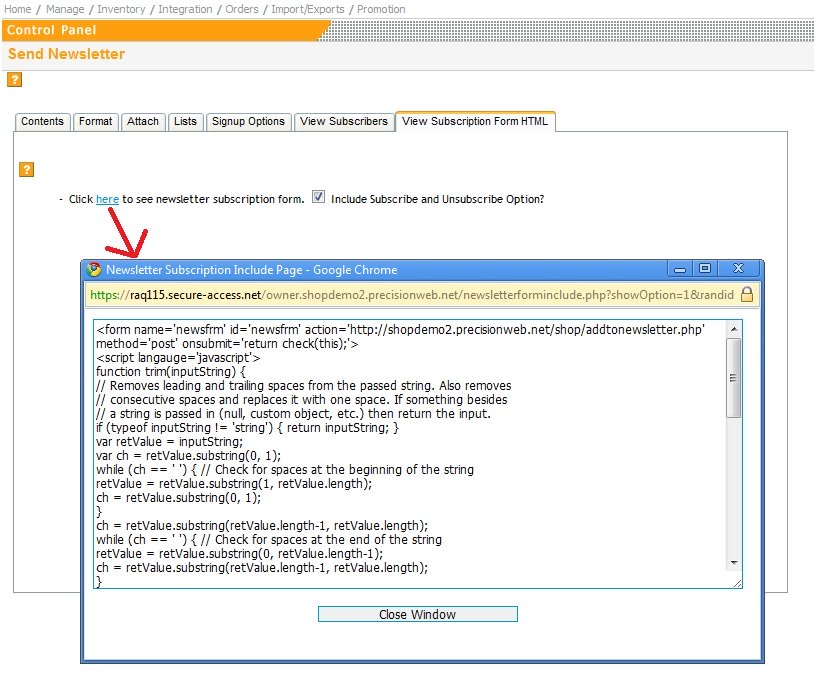 View Subscription Form HTML This option allows you to view the html code for the newsletter subscription. The HTML code can be included in your email or in your website. This is a good way to put the Newsletter subscription form in more places in your website. View Subscription Form HTML This option allows you to view the html code for the newsletter subscription. The HTML code can be included in your email or in your website. This is a good way to put the Newsletter subscription form in more places in your website. |
| Customer Newsletter View Subscribers Navigation: Promotion > Customer Newsletter > View Subscribers |
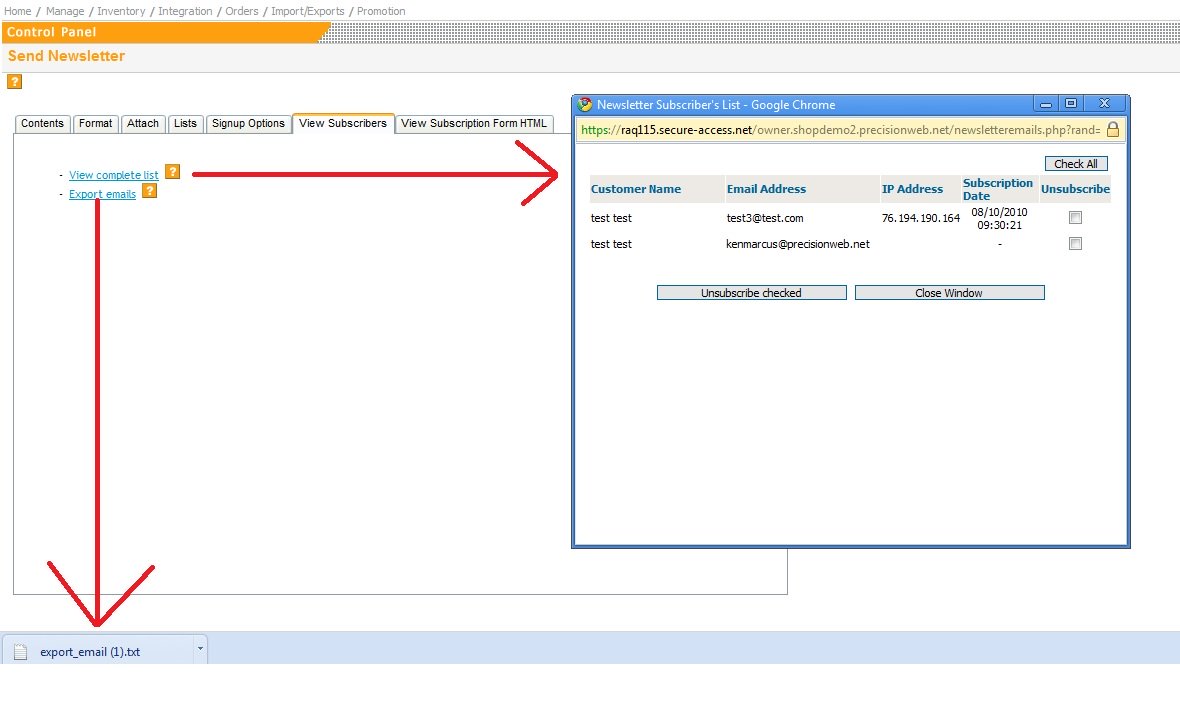 View Complete list This option allows you to see the customer’s name, email, ip address, and subscrition date. You are also able to manually unsubscribe customers through this function. Export emails This option allows you to export the customer list to a tab deliminated format. View Complete list This option allows you to see the customer’s name, email, ip address, and subscrition date. You are also able to manually unsubscribe customers through this function. Export emails This option allows you to export the customer list to a tab deliminated format. |
| Customer Newsletter Lists Navigation: Promotion > Customer Newsletter > Lists |
 The Signup Options tab allows you to change signup options on the account page, whether you would like to be notified of newsletter sign up, and what the customer sees when they subscribe to the newsletter. Show Newsletter Signup: Displays or hides the newsletter option from appearing on the account page. Notify Shop Admin: The Signup Options tab allows you to change signup options on the account page, whether you would like to be notified of newsletter sign up, and what the customer sees when they subscribe to the newsletter. Show Newsletter Signup: Displays or hides the newsletter option from appearing on the account page. Notify Shop Admin:
Notify shop admin when a subscription is submitted. Edit Confirmation Notice: Edit the confirmation notice people receive when they subscribe to the newsletter. |
| Customer Newsletter Lists Navigation: Promotion > Customer Newsletter > Lists |
 The Lists tab allows you to select who will receive the newsletter. You may send the newsletter to email addresses you choose (only customers), to the shop administrator, or to the complete list of customers who had signed up for your newsletter. This list is viewable under the ‘View Subscribers’ tab. The Lists tab allows you to select who will receive the newsletter. You may send the newsletter to email addresses you choose (only customers), to the shop administrator, or to the complete list of customers who had signed up for your newsletter. This list is viewable under the ‘View Subscribers’ tab. |
| Customer Newsletter Overview The Contents tab is where you are able to create and send the Newsletter. Navigation: Promotion > Customer Newsletter |
 The Newsletter page allows you to create/send a newsletter to your current customers. The shopping cart’s billing page has an option for customers to opt in as subscribers to the newsletter, and you are able to view the complete list of subscribers under the “View Subscribers Tab”. To select the recipients of the Newsletter click on the “Lists” tab. To create and send the Newsletter, click on the “Contents” tab. To send a message, the steps are: 1. Click the Lists tab, and select “Send to shop administrator” and de-select “Send to complete list”. This will allow you to send a test message to just yourself, before sending it to the complete list. 2. Under the “Contents” tab (this page) you need something in the subject line and also in the “Newsletter Contents” field. Make sure the “From Name” and “From Email” appear as you desire. 3. Copy your content from a web page, and paste it in to the “Newsletter Contents” field (This is the easiest way). Or create your content directly in the “Newsletter Contents” field. 4. Send the newsletter to yourself to test it. 5. If all looks good, then under the Lists tab select “Send to complete list”, then back on this page, click the “Send Newsletter” button. The Newsletter page allows you to create/send a newsletter to your current customers. The shopping cart’s billing page has an option for customers to opt in as subscribers to the newsletter, and you are able to view the complete list of subscribers under the “View Subscribers Tab”. To select the recipients of the Newsletter click on the “Lists” tab. To create and send the Newsletter, click on the “Contents” tab. To send a message, the steps are: 1. Click the Lists tab, and select “Send to shop administrator” and de-select “Send to complete list”. This will allow you to send a test message to just yourself, before sending it to the complete list. 2. Under the “Contents” tab (this page) you need something in the subject line and also in the “Newsletter Contents” field. Make sure the “From Name” and “From Email” appear as you desire. 3. Copy your content from a web page, and paste it in to the “Newsletter Contents” field (This is the easiest way). Or create your content directly in the “Newsletter Contents” field. 4. Send the newsletter to yourself to test it. 5. If all looks good, then under the Lists tab select “Send to complete list”, then back on this page, click the “Send Newsletter” button. |
| Customer Newsletter “Attach” Navigation: Promotion > Customer Newsletter > Attach |
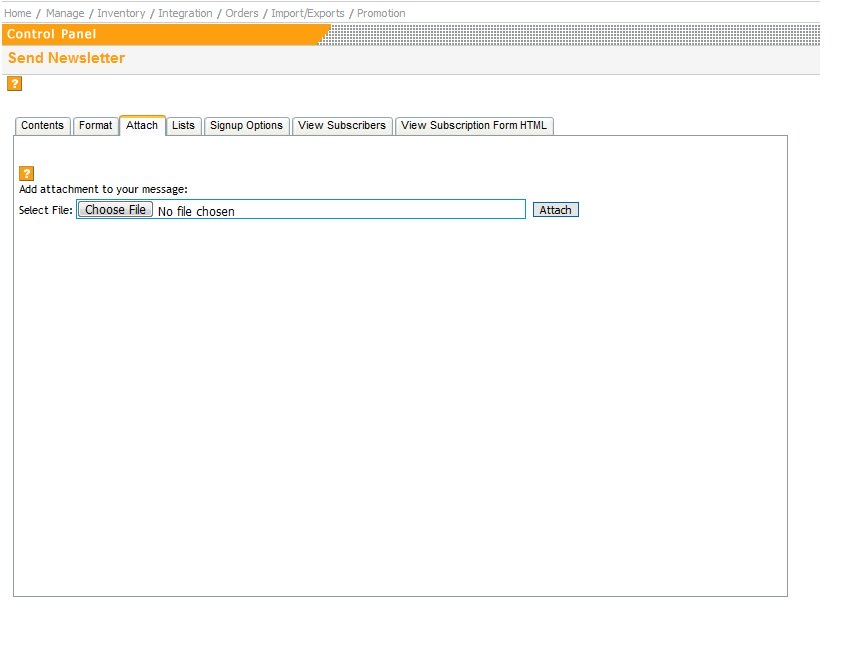 Attach The Attach Tab allows you to send an attachment with your newsletter. Choose the file from your computer that you would like to attach by clicking “Choose File”. Once selected, click “Attach” Attach The Attach Tab allows you to send an attachment with your newsletter. Choose the file from your computer that you would like to attach by clicking “Choose File”. Once selected, click “Attach” |
| Customer Newsletter “Contents” The Contents tab is where you are able to create and send the Newsletter. Navigation: Promotion > Customer Newsletter > Contents Tab |
| Contents The easiest way to create your newsletter is to copy & paste from your website or word editor to Newsletter Contents field below. You also can create the newsletter from scratch below, but we recommend copying & pasting from your website. The Newsletter Contents pane allows you to create your newsletter using a word editor. Some of its functions include modification of text, insertion of tables, and insertion of images. The steps to insert an image into your newsletter are: In your browser, browse to a page on your website that shows the image you want. 1. Right click on the Image and select “Properties”. 2. Select the image url text from the popup by selecting it with your mouse. Then copy that selected url with <Control> C. 3. On the newsletter page click the image insert icon. 4. Click in the image url field, then paste the copied URL using <Control> V. 5. Click the insert button on the popup. Options From Name The person or company the newsletter is from. Customers will often see this next to the subject line of their email. From Email Customers will see this as the email address the newsletter is from. Subject The subject of the newsletter. Customers will see this as the subject line in the email they receive. Send Newsletter This sends the newsletter to the customers selected under the “Lists” tab. |
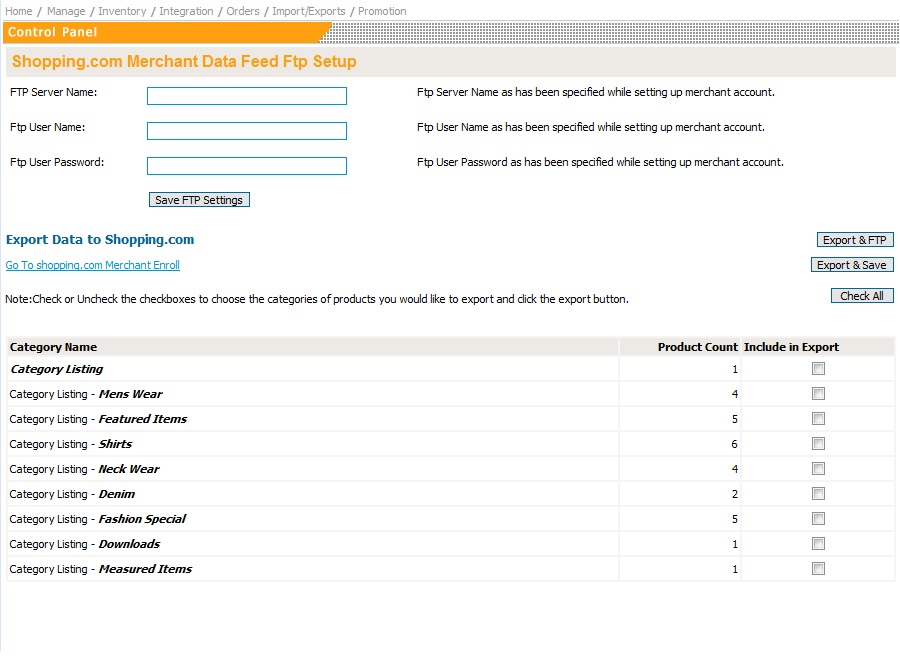 Shopping.com Merchant Data Feed Ftp Setup There are two ways to link to you shopping.com account. Method 1 Use the Export & FTP. Do use this method, please update the Ftp Server Name, Ftp User Name, and the Ftp password as has been specified while setting up merchant account (with Shopping.com). Next you would check the categoies you would like to export, and then you would click “Export & FTP”. Method 2 “Export & Save”. First select the categoies you would like to export, and then click “Export & Save”. This method allows you to save a file which you can then upload into Shopping.com Shopping.com Merchant Data Feed Ftp Setup There are two ways to link to you shopping.com account. Method 1 Use the Export & FTP. Do use this method, please update the Ftp Server Name, Ftp User Name, and the Ftp password as has been specified while setting up merchant account (with Shopping.com). Next you would check the categoies you would like to export, and then you would click “Export & FTP”. Method 2 “Export & Save”. First select the categoies you would like to export, and then click “Export & Save”. This method allows you to save a file which you can then upload into Shopping.com |
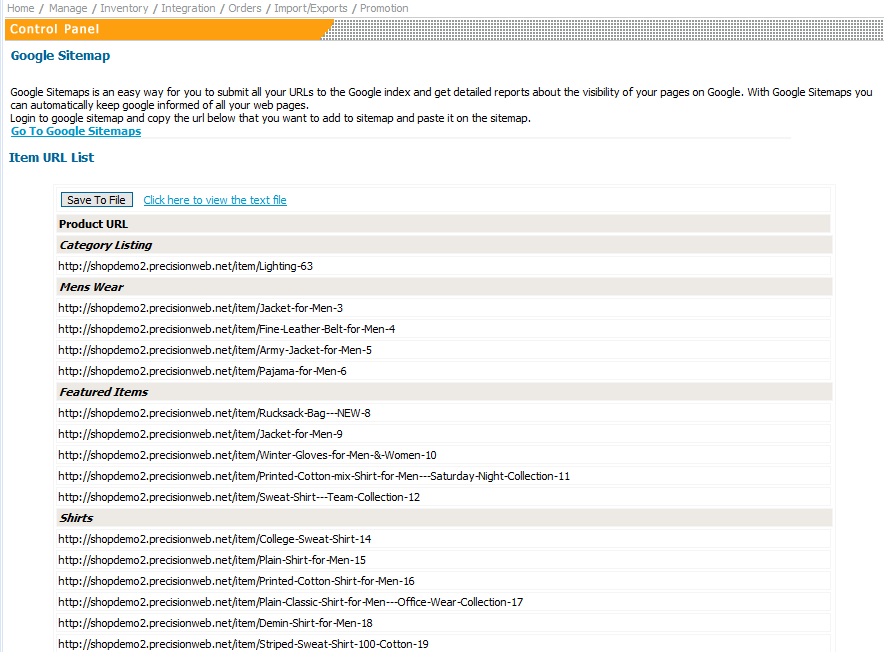 What’s a good use of the URL list? One good use of the URL list is Google Sitemaps. You can download this list to a .txt format and use it for your Google Sitempas. Google Sitemaps is an easy way for you to submit all your URLs to the Google index and get detailed reports about the visibility of your pages on Google. With Google Sitemaps you can automatically keep google informed of all your web pages. Login to google sitemap and copy the url you would like to add to sitemap and paste it on the sitemap. Go To Google Sitemaps What’s a good use of the URL list? One good use of the URL list is Google Sitemaps. You can download this list to a .txt format and use it for your Google Sitempas. Google Sitemaps is an easy way for you to submit all your URLs to the Google index and get detailed reports about the visibility of your pages on Google. With Google Sitemaps you can automatically keep google informed of all your web pages. Login to google sitemap and copy the url you would like to add to sitemap and paste it on the sitemap. Go To Google Sitemaps |
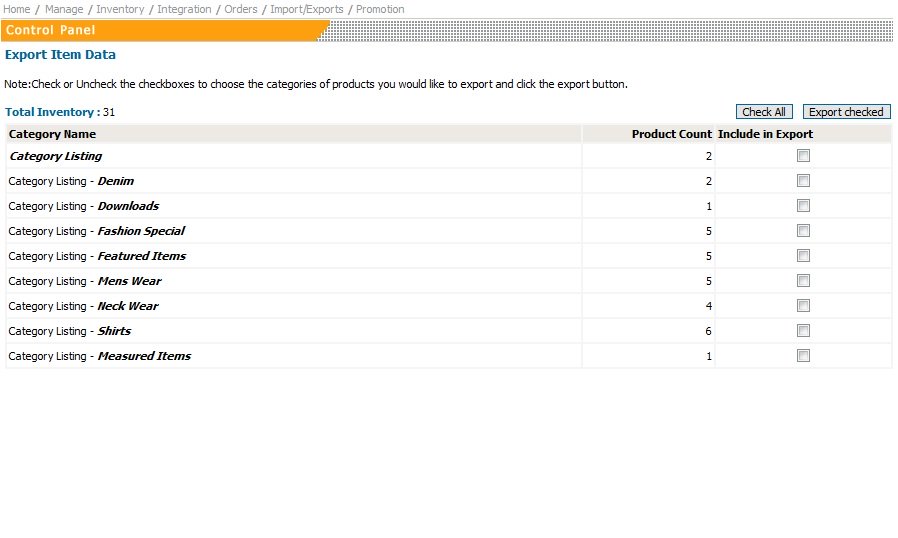 How do I export data from my shopping cart? Check or Uncheck the checkboxes to choose the categories of products you would like to export and click the export button. A .txt file will be saved to your computer. To make it easy to find, you could save it directly to your desktop. A good way to view / edit the .txt file is to use Microsoft Excel, Open Office, or any other popular spreadsheet software. To save this file using Open Office select Save As “Text CSV”, and then select the option to “Edit Filter Settings”. When you proceed the “Edit Filter Settings” window will come up; in that window leave Character Set at the default; Field Delimiter should be Tab; Text Delimiter should be blank (not “); Fixed Column width should not be checked. How do I export data from my shopping cart? Check or Uncheck the checkboxes to choose the categories of products you would like to export and click the export button. A .txt file will be saved to your computer. To make it easy to find, you could save it directly to your desktop. A good way to view / edit the .txt file is to use Microsoft Excel, Open Office, or any other popular spreadsheet software. To save this file using Open Office select Save As “Text CSV”, and then select the option to “Edit Filter Settings”. When you proceed the “Edit Filter Settings” window will come up; in that window leave Character Set at the default; Field Delimiter should be Tab; Text Delimiter should be blank (not “); Fixed Column width should not be checked. |
 How do I import data into my shopping cart? How do I import data into my shopping cart?From this import page, browse to the file on your local hard drive, upload, preview, and import it. Sometimes your Excel software may still have the file open when you are trying to upload it; this will cause an incorrect file type error. If you get the "wrong file type" error, open up the file using WordPad, then use the Save As to save it as a text file under another name.
Additional file format information:
The product database file you would like to import should be seperated by a tab , and should have the following values in the following order:
- ID – [ANY NUMBER]
- SKU NO – [TEXT VALUE – Leave blank if none]
- PRODUCT NAME – [TEXT VALUE]
- PRODUCT DESCRIPTION – [TEXT VALUE]
- IMAGE URL(Note image urls should be fully specified and begin with http://) – [TEXT VALUE – Leave blank if none] to add: Use a comma between multiple images.
- PRICE (in $) – [ANY NUMBER]
- REGULAR PRICE(in $) – [ANY NUMBER]
- PRODUCT SEQUENCE – [ANY NUMBER]
- TAXABLE – [0,1] (0= No, 1 =Yes)
- DISPLAY PRODUCT IN CART – [Y,N]
- CATEGORY – [PARENT CATEGORY TEXT VALUE&CATEGORY1 TEXT VALUE&&PARENT CATEGORY TEXT VALUE&CATEGORY2 TEXT VALUE]
- PRODUCT BRAND – [TEXT VALUE – Leave blank if none]
- PRODUCT CONDITION – [new,used,refurbished]
- PRODUCT TYPE – [TEXT VALUE – Leave blank if none]
- DOWNLOADABLE ITEM URL – [TEXT VALUE – Leave blank if none]
- HTML TO DISPLAY ON CART PAGE – [TEXT VALUE – Leave blank if none]
|
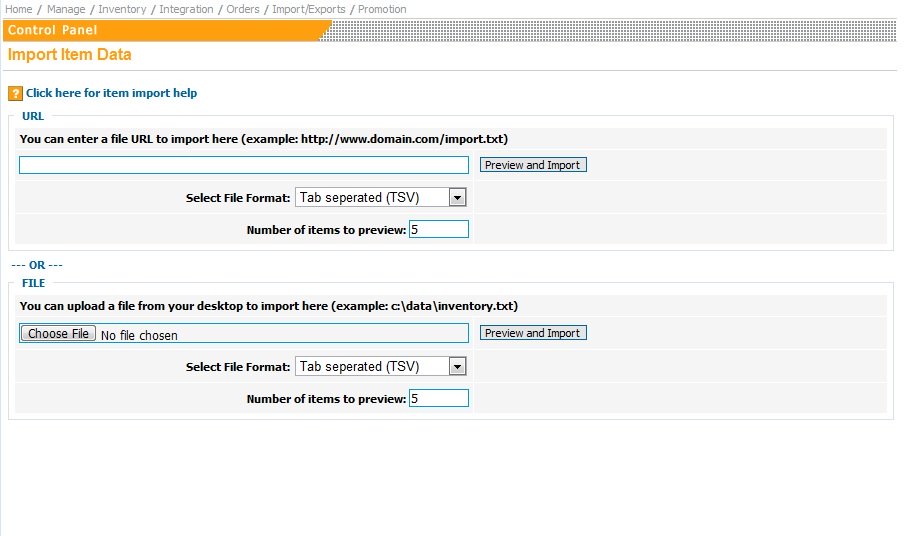
How do I import data into my shopping cart?
The easiest way to do create an importable file is to:
- From the shop/owner Categories page, create a few categories.
- From the Inventory page, create a few items for sale
- Now proceed to the item Export Item Data page, select the categories containing your items and then click the Export Checked button. This will save a file named export.txt. To make it easy to find, save it directly to your desktop. Or Click here for an example file to save to your desktop.
- Start up Microsoft Excel, or Open Office, or any other popular spreadsheet software; and open up the export.txt file you have just exported from the shop.
- Using this file as a template will help you to create the file in the correct format, add the items that you’d like to import by typing or pasting the information into the correct fields.
- After you have finished adding the item information to the spreadsheet, select to Save it as a text file.
If you are using Open Office select Save As “Text CSV”, select the option to “Edit Filter Settings”. When you proceed the “Edit Filter Settings” window will come up; in that window leave Character Set at the default; Field Delimiter should be Tab; Text Delimiter should be blank (not “); Fixed Column width should not be checked.
- From this import page, browse to the file on your local hard drive, upload, preview, and import it. Sometimes your Excel software may still have the file open when you are trying to upload it; this will cause an incorrect file type error. If you get the “wrong file type” error, open up the file using WordPad, then use the Save As to save it as a text file under another name. Or, FTP the file (in ASCII mode) to your site and specify the url to import it from.
Additional file format information:
The product database file you would like to import should be seperated by a tab , and should have the following values in the following order:
- ID – [ANY NUMBER]
- SKU NO – [TEXT VALUE – Leave blank if none]
- PRODUCT NAME – [TEXT VALUE]
- PRODUCT DESCRIPTION – [TEXT VALUE]
- IMAGE URL(Note image urls should be fully specified and begin with http://) – [TEXT VALUE – Leave blank if none] to add: Use a comma between multiple images.
- PRICE (in $) – [ANY NUMBER]
- REGULAR PRICE(in $) – [ANY NUMBER]
- CUSTOM TEXT (Specify multiple custom texts separated by ‘:’) – [TEXT VALUE – Leave blank if none]
- PRODUCT SEQUENCE – [ANY NUMBER]
- TAXABLE – [(0,N,No) / (1,Y,Yes)] (case insensitive)
- IS GIFT CERTIFICATE – [(0,N,No) / (1,Y,Yes)] (case insensitive)
- CHARGE SHIPPING – [(0,N,No) / (1,Y,Yes)] (case insensitive)
- DISPLAY PRODUCT IN CART – [Y,N]
- CATEGORY – [PARENT CATEGORY TEXT VALUE&CATEGORY1 TEXT VALUE&&PARENT CATEGORY TEXT VALUE&CATEGORY2 TEXT VALUE]
- STOCK QTY – [ANY NUMBER]
- SHIPPING – [ANY NUMBER]
- WEIGHT(in lbs) – [ANY NUMBER]
- PRODUCT LENGTH – [ANY NUMBER – Leave blank if none]
- PRODUCT WIDTH – [ANY NUMBER – Leave blank if none]
- PRODUCT HEIGHT – [ANY NUMBER – Leave blank if none]
- PRODUCT BRAND – [TEXT VALUE – Leave blank if none]
- PRODUCT CONDITION – [new,used,refurbished]
- PRODUCT TYPE – [TEXT VALUE – Leave blank if none]
- PRODUCT OPTIONS & LEVELS – [TEXT VALUE – Leave blank if none]
- ITEM IDs TO SUGGEST AT CHECKOUT – [TEXT VALUE – Leave blank if none] to add: Use a comma between multiple IDs
- HTML TO DISPLAY ON CART PAGE – [TEXT VALUE – Leave blank if none]
|
| Create Thumbnail For All Items |
Thumbnails are are reduced-size versions of your item pictures. This link allows you to create thumbnails for multiple items that already have a main image or have been imported. The reason you would use this is to have smaller images for customers to see when they are browsing through products, and a larger image which they could view on the item page. |
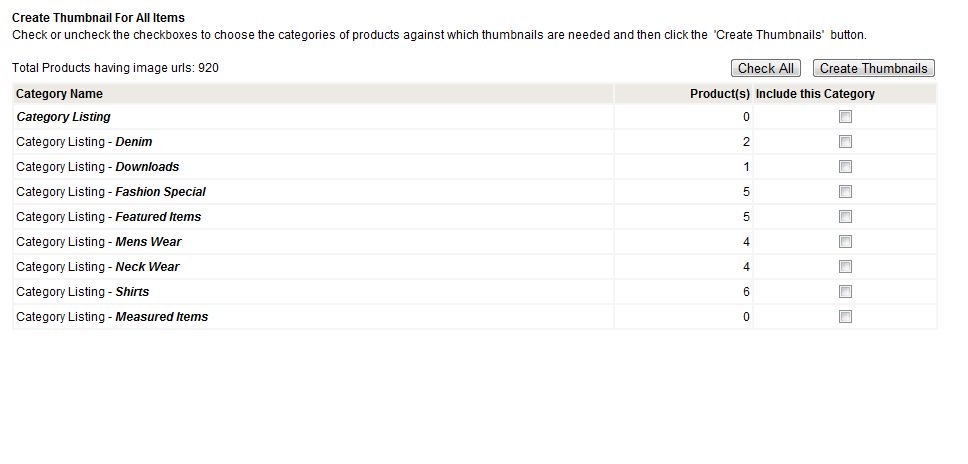 Create Thumbnail Options Choose the categories of products by checking the box next to the category you would like to create thumbnails for. Next, click the ‘Create Thumbnails’ button. Create Thumbnail Options Choose the categories of products by checking the box next to the category you would like to create thumbnails for. Next, click the ‘Create Thumbnails’ button. |
| Multiple Item Delete This page allows you to delete multiple items at the same time. |
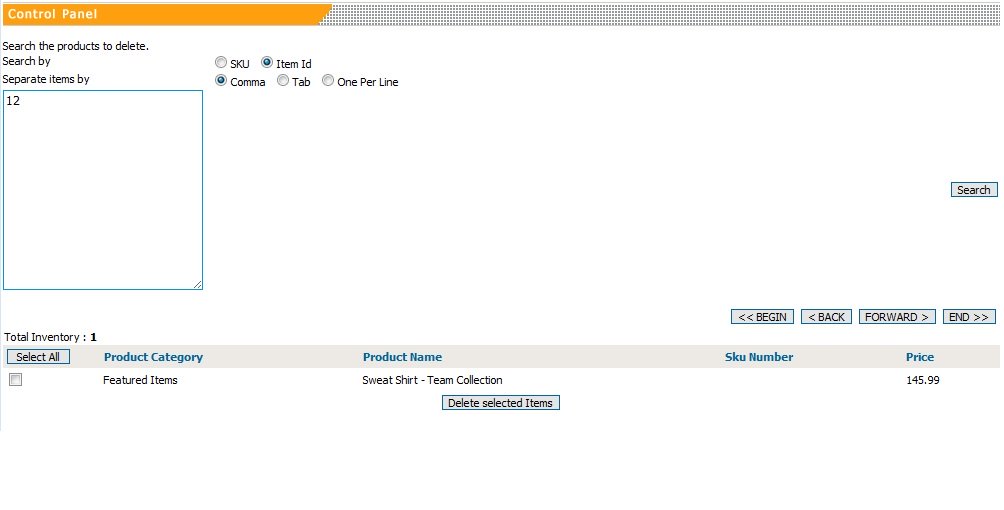 Enter your products by SKU or Item ID, and then click search. Select the items you would like to delete and then click ‘Delete’. If you need to delete an entire category worth of items, it is easier to delete the items under Manage > Categories > Remove Category > Select the Category’s items you would like to delete and then select Remove Category and Items or Remove Items Only Enter your products by SKU or Item ID, and then click search. Select the items you would like to delete and then click ‘Delete’. If you need to delete an entire category worth of items, it is easier to delete the items under Manage > Categories > Remove Category > Select the Category’s items you would like to delete and then select Remove Category and Items or Remove Items Only |
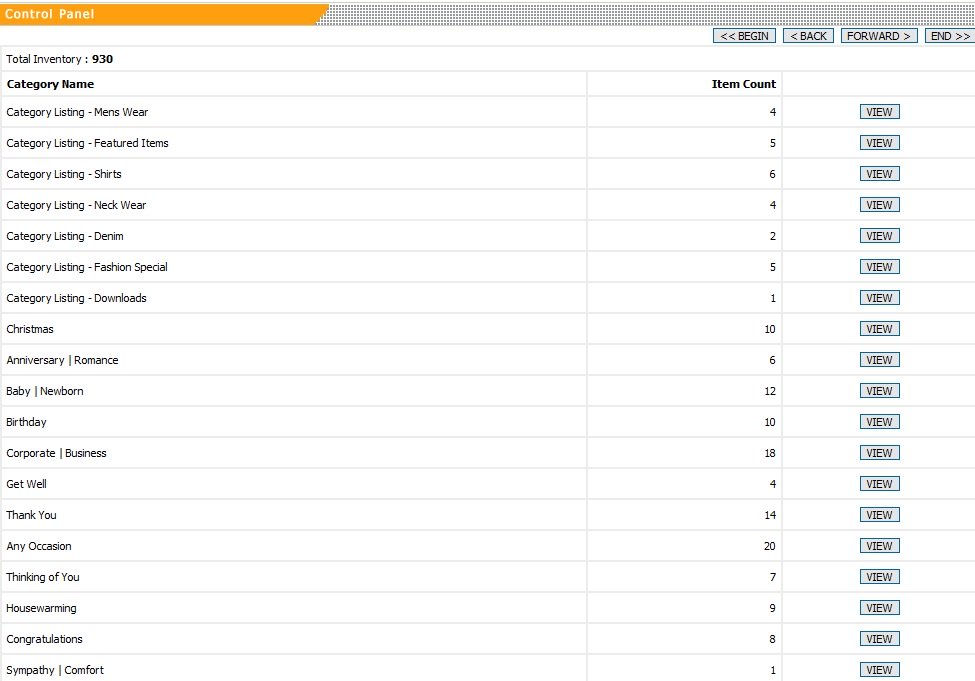
| View Unique Item Counts This page allows you to view the amount of items in a category. To view items within a category, click ‘View’. |
 |
| Add Gift Certificate The Gift Certificate page allows you to create gift certificates for sale in your shopping cart. When a customer buys a gift certificate, the shopping cart will give them the gift certificate code on a certificate (for printing out) both on the confirmation page and in the email they receive. When the customer who purchased the gift certificate gives this gift certificate code to the final recipient, then that recipient is able to use that code on your checkout page to receive a credit for the gift certificate amount. |
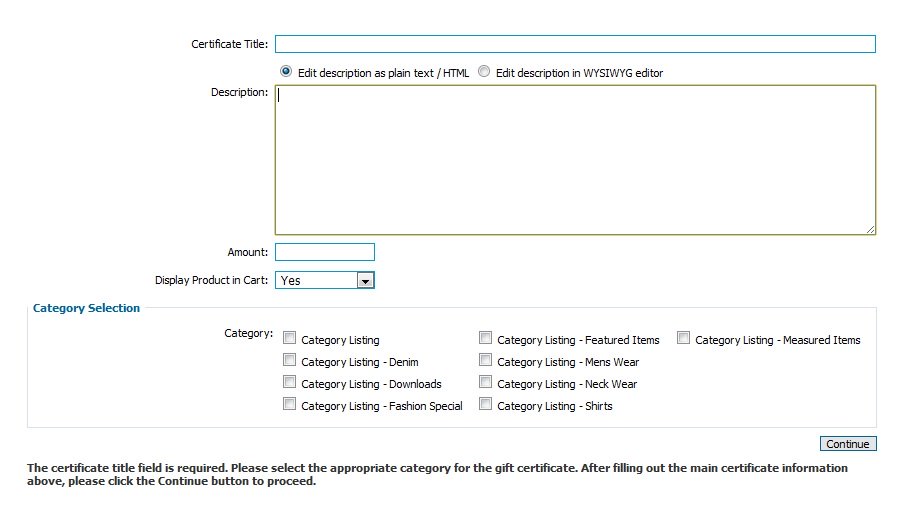 Add Gift Certificate Options Certificate Title Create the Gift Certificate title. Description Enter the description of your product this field. The plain text / HTML option will allow you to enter plain text or HTML code. The WYSIWYG editor give you the option to edit the text in HTML format. Amount The price for your downloadable item. Display Product in Cart If set to ‘No’, this item is – Not searchable – Not in the item’s category – Available if people have the link – Available if the link shows up in search engine – Available if the item html shows up elsewhere on the site If option is set to ‘Yes, this item is available throughout the shopping cart software. Category Selection Select the category(ies) you would like to associate with your item. Categories are helpful for the customer to locate your items. Google Product Search Values For help on Google product search: http://www.google.com/support/merchants/bin/answer.py?hl=en&answer=160081 Add Gift Certificate Options Certificate Title Create the Gift Certificate title. Description Enter the description of your product this field. The plain text / HTML option will allow you to enter plain text or HTML code. The WYSIWYG editor give you the option to edit the text in HTML format. Amount The price for your downloadable item. Display Product in Cart If set to ‘No’, this item is – Not searchable – Not in the item’s category – Available if people have the link – Available if the link shows up in search engine – Available if the item html shows up elsewhere on the site If option is set to ‘Yes, this item is available throughout the shopping cart software. Category Selection Select the category(ies) you would like to associate with your item. Categories are helpful for the customer to locate your items. Google Product Search Values For help on Google product search: http://www.google.com/support/merchants/bin/answer.py?hl=en&answer=160081 |
| Add Downloadable Item On the Add Downloadable Item page you can create downloadable items for sale. Some example file types are: MP3 files, e-books, PDF files, images, zip files, and more. When a customer buys the downloadable item file, they are given a link to the php download script along with a password. From there they can download the file for a limited time. The customer will not know the file’s actual location on your site. |
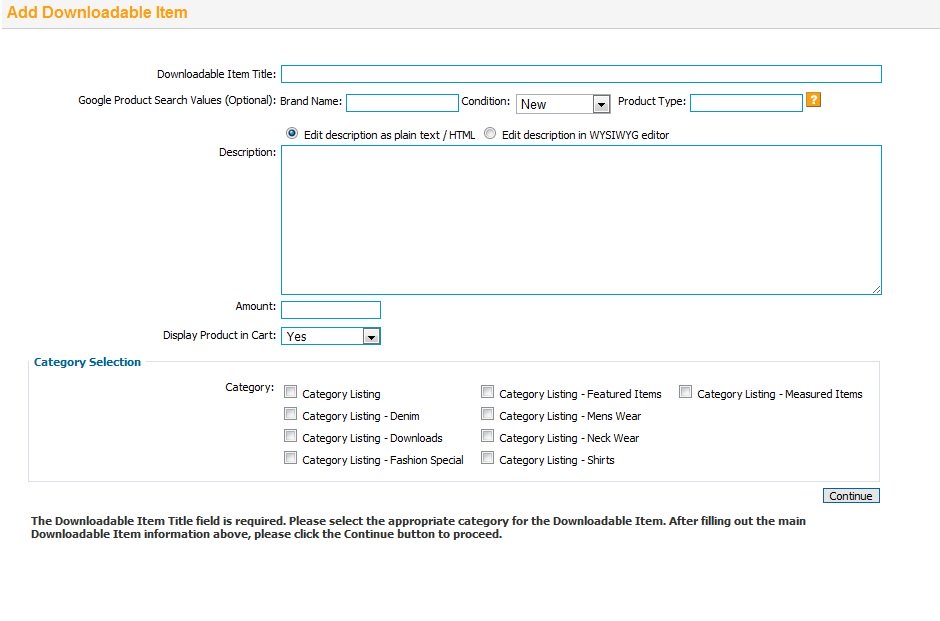 Add Downloadable Item Options Downloadable Item Title Create the item title. Description Enter the description of your product this field. The plain text / HTML option will allow you to enter plain text or HTML code. The WYSIWYG editor give you the option to edit the text in HTML format. Amount The price for your downloadable item. Display Product in Cart If set to ‘No’, this item is – Not searchable – Not in the item’s category – Available if people have the link – Available if the link shows up in search engine – Available if the item html shows up elsewhere on the site If option is set to ‘Yes, this item is available throughout the shopping cart software. Category Selection Select the category(ies) you would like to associate with your item. Categories are helpful for the customer to locate your items. Google Product Search Values For help on Google product search: http://www.google.com/support/merchants/bin/answer.py?hl=en&answer=160081 Add Downloadable Item Options Downloadable Item Title Create the item title. Description Enter the description of your product this field. The plain text / HTML option will allow you to enter plain text or HTML code. The WYSIWYG editor give you the option to edit the text in HTML format. Amount The price for your downloadable item. Display Product in Cart If set to ‘No’, this item is – Not searchable – Not in the item’s category – Available if people have the link – Available if the link shows up in search engine – Available if the item html shows up elsewhere on the site If option is set to ‘Yes, this item is available throughout the shopping cart software. Category Selection Select the category(ies) you would like to associate with your item. Categories are helpful for the customer to locate your items. Google Product Search Values For help on Google product search: http://www.google.com/support/merchants/bin/answer.py?hl=en&answer=160081 |
| Add “Fill-In” Price Item The Fill-in price item allows shopper to specify the amount they will be paying. This is useful for donations, auction payments, or anywhere you need to provide a secure method for accepting variable payment amounts. |
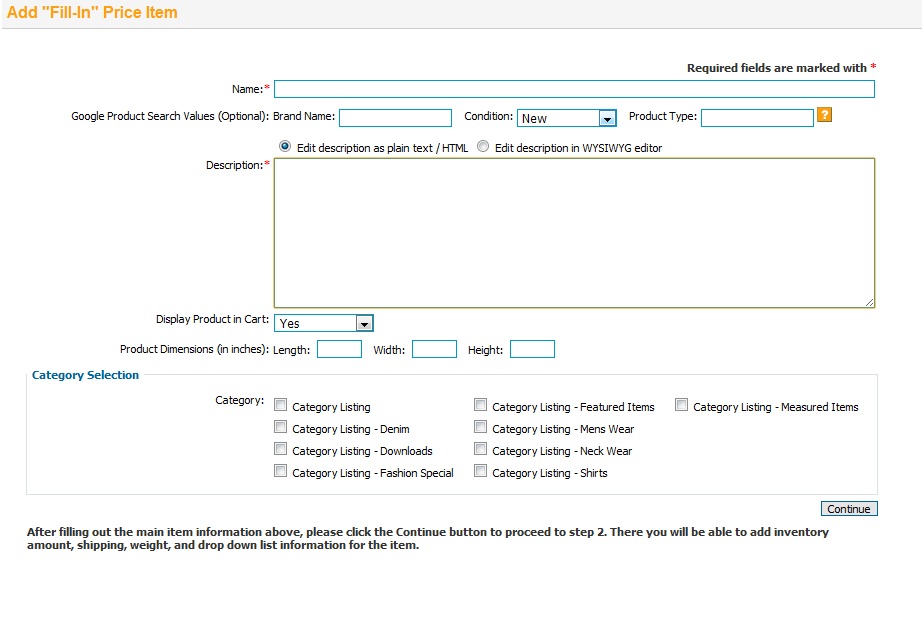 Add “Fill-In” Price Item Name Create the item name. Description Enter the description of your product this field. The plain text / HTML option will allow you to enter plain text or HTML code. The WYSIWYG editor give you the option to edit the text in HTML format. Display Product in Cart If set to ‘No’, this item is – Not searchable – Not in the item’s category – Available if people have the link – Available if the link shows up in search engine – Available if the item html shows up elsewhere on the site If option is set to ‘Yes, this item is available throughout the shopping cart software. Product Dimensions Enter the product dimensions you would use for shipping the product. Typically you would use the box dimensions for shipping that particular product Category Selection Select the category(ies) you would like to associate with your item. Categories are helpful for the customer to locate your items. Google Product Search Values For help on Google product search: http://www.google.com/support/merchants/bin/answer.py?hl=en&answer=160081 Add “Fill-In” Price Item Name Create the item name. Description Enter the description of your product this field. The plain text / HTML option will allow you to enter plain text or HTML code. The WYSIWYG editor give you the option to edit the text in HTML format. Display Product in Cart If set to ‘No’, this item is – Not searchable – Not in the item’s category – Available if people have the link – Available if the link shows up in search engine – Available if the item html shows up elsewhere on the site If option is set to ‘Yes, this item is available throughout the shopping cart software. Product Dimensions Enter the product dimensions you would use for shipping the product. Typically you would use the box dimensions for shipping that particular product Category Selection Select the category(ies) you would like to associate with your item. Categories are helpful for the customer to locate your items. Google Product Search Values For help on Google product search: http://www.google.com/support/merchants/bin/answer.py?hl=en&answer=160081 |
| Drop Down Lists Selection Navigation: Inventory Control > Edit Item > DropDown Lists Selection |
| DropDown Lists Selection Name Create the item name. Google Product Search Values For help on Google product search: http://www.google.com/support/merchants/bin/answer.py?hl=en&answer=160081 Description Enter the description of your product this field. The plain text / HTML option will allow you to enter plain text or HTML code. The WYSIWYG editor give you the option to edit the text in HTML format. Actual Price in Cart This is the price the customer will see as the item price. Normal Retail Price This is the price the customer sees next to the actual price if the ‘Display Regular Pricing & Sale Price’ is set to ‘Both’ under General Settings > Misc. Options Display Product in Cart If set to ‘No’, this item is – Not searchable – Not in the item’s category – Available if people have the link – Available if the link shows up in search engine – Available if the item html shows up elsewhere on the site If option is set to ‘Yes, this item is available throughout the shopping cart software. Product Dimensions Enter the product dimensions you would use for shipping the product. Typically you would use the box dimensions for shipping that particular product Category Selection Select the category(ies) you would like to associate with your item. Categories are helpful for the customer to locate your items. |
Google Product Search Values For help on Google product search: http://www.google.com/support/merchants/bin/answer.py?hl=en&answer=160081
| Drop Down Lists Selection Navigation: Inventory Control > Edit Item > DropDown Lists Selection |
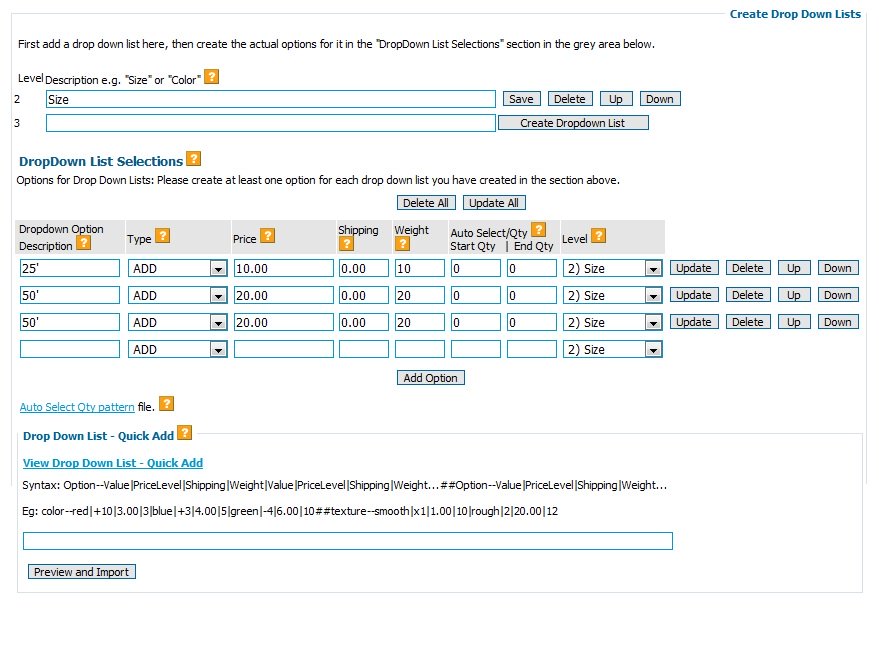 DropDown Lists Selection Level Description DropDown Lists Selection Level Description
The ‘Level Description’ is the title associated that will be associate with dropdown option descriptions. Create the level description first, then the option description(s). For example, “Color” would be the level description, and the dropdown option description would be “Red” or “Green”. Drop Down Lists Selections This function allows you to create dropdown lists for this item only. If you would like to use the same dropdown list for another item, you can use the copy item function under Inventory > Inventory Main > ‘Copy Item’ (to the right of an item). The other option is to export this item’s category under: Import/Exports > Export Item Data. Open the data to a spreadsheet to find the item’s drop down list syntax. Then use that syntax in the ‘View Drop Down List – Quick Add’. Dropdown Option Description This is the description seen by customers as an option under the drop down bar. If this item was a t-shirt and you had a color green, you would enter ‘Green’. If you also had color blue, you first need to finish filling out the option for color green, and then click ‘Add Option’. You then would be able to add color blue. Type This is the type of adjustment you would like to make for a drop down item. If you have no adjustment for price or shipping, it won’t matter what you select in this column. Select ‘Add’ to have the the drop down option’s price, shipping, and weight added to the current item price (Actual Price in Cart). Select ‘Subtract’ to have the the drop down option’s price, shipping, and weight subtracted from the current item price (Actual Price in Cart). Select ‘Override’ to have the the drop down option’s price, shipping, and weight override the current item price (Actual Price in Cart). Select ‘Multiply’ to have the the drop down option’s price, shipping, and weight multiplied by the current item price (Actual Price in Cart). — An example of a website that uses the multiply feature is a mattress company. When the size of the mattress increases in thickness, they can multiply the price by 2, 3, 4, etc. Price The price adjustment of the dropdown option. Input ‘0’ to disable. Shipping The shipping cost to be adjusted for the dropdown option. Input ‘0’ to disable. For this to take effect, you would have to use the Shipping option “Base + Charge specified by items”. To edit this setting navigate to: Manage > Shipping. Weight The weight of the dropdown option to be adjusted. Input ‘0’ to disable. The weight will affect the item’s shipping cost if you are using one of these settings: “Base + Calculate Rate UPS, USPS, FedEx or DHL (based on zip codes & weight)” “Base + Weight” To edit this setting navigate to: Manage > Shipping. Auto Select/Quantity These two columns allow you to give quantity discounts on one specific item. View the ‘Auto Select Qty pattern’ file below for an example. IIf a customer purchases the required quantity and the quantity discount in place, they will automatically receive the appropriate discount without having to select the quantity in the drop down option bar (hence the title ‘Auto Select’) Level Choose the Level you would like associated with the dropdown description. You can create this under ‘Create Down Down Lists’ — Level Description. Drop Down List Quick Add This function allows you to import drop down list options and values. One way to create a custom syntax is to navigate to: Import/Exports > Export Item Data. Export a category with an item you have created by manually adding your drop down list. Open the data in a spreadsheet to find the item’s drop down list syntax. Then use that syntax in the field below. |
| Item Images Sectionbr> Navigation: Inventory Control > Edit Item > Item Images |
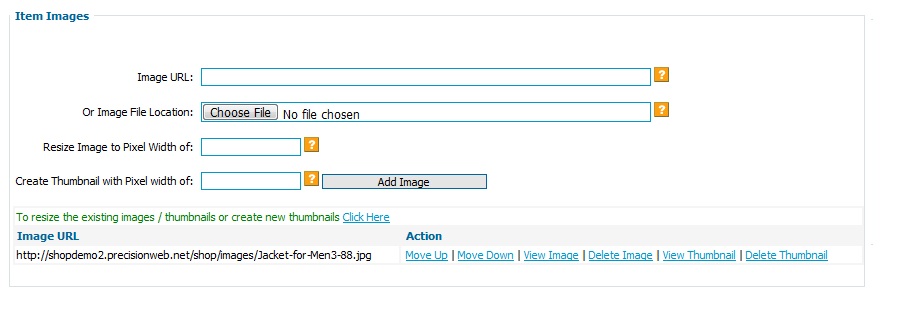 Item Images Item Images are the images associated with an item. You are able to have multiple images, and you can create thumbnails (smaller images) for customers to see your item description better. Thumbnails also can be used for better browsing of items. Options for thumbnails are found on the ‘General Settings’ page. Options Image URL You are able to associate an image with an item by loading it from your website. Load an image to a unique page anywhere on your website (ex. www.store.com/image/picture.jpg) and input that image URL into this field. This will load the image to the shopping cart. Or Image File Location: To load an image that is on your hard drive, click ‘Browse’, find the file, and click open. When you click ‘Add Image’ below, you will upload the the image. Resize Image to Pixel Width of: If you would like to resize your image, you are able to do so here. This is not a required field. Choose the pixel width, and the shopping cart will resize the image keeping the same proportion. Create Thumbnail with Pixel width You are able to create a thumbnail of the image which is typically a smaller version of the image. Using the thumbnail allows you to have a smaller version of the image for when customers search for an item. You are able to edit your thumbnail settings under, Manage > General Settings > Thumbnail Options If you are looking to create thumbnails for multiple items that already have an image or have been imported, click on the link to the right of the green text. Item Images Item Images are the images associated with an item. You are able to have multiple images, and you can create thumbnails (smaller images) for customers to see your item description better. Thumbnails also can be used for better browsing of items. Options for thumbnails are found on the ‘General Settings’ page. Options Image URL You are able to associate an image with an item by loading it from your website. Load an image to a unique page anywhere on your website (ex. www.store.com/image/picture.jpg) and input that image URL into this field. This will load the image to the shopping cart. Or Image File Location: To load an image that is on your hard drive, click ‘Browse’, find the file, and click open. When you click ‘Add Image’ below, you will upload the the image. Resize Image to Pixel Width of: If you would like to resize your image, you are able to do so here. This is not a required field. Choose the pixel width, and the shopping cart will resize the image keeping the same proportion. Create Thumbnail with Pixel width You are able to create a thumbnail of the image which is typically a smaller version of the image. Using the thumbnail allows you to have a smaller version of the image for when customers search for an item. You are able to edit your thumbnail settings under, Manage > General Settings > Thumbnail Options If you are looking to create thumbnails for multiple items that already have an image or have been imported, click on the link to the right of the green text. |
| Item Images Section Navigation: Inventory Control > Edit Item > Item Images |
| Item Images Item Images are the images associated with an item. You are able to have multiple images, and you can create thumbnails (smaller images) for customers to see your item description better. Thumbnails also can be used for better browsing of items. Options for thumbnails are found on the ‘General Settings’ page. Options Image URL You are able to associate an image with an item by loading it from your website. Load an image to a unique page anywhere on your website (ex. www.store.com/image/picture.jpg) and input that image URL into this field. This will load the image to the shopping cart. Or Image File Location: To load an image that is on your hard drive, click ‘Browse’, find the file, and click open. When you click ‘Add Image’ below, you will upload the the image. Resize Image to Pixel Width of: If you would like to resize your image, you are able to do so here. This is not a required field. Choose the pixel width, and the shopping cart will resize the image keeping the same proportion. Create Thumbnail with Pixel width You are able to create a thumbnail of the image which is typically a smaller version of the image. Using the thumbnail allows you to have a smaller version of the image for when customers search for an item. You are able to edit your thumbnail settings under, Manage > General Settings > Thumbnail Options If you are looking to create thumbnails for multiple items that already have an image or have been imported, click on the link to the right of the green text. |
| View Suggested Items Section Navigation: Inventory Control > Edit Item > View Suggested Items Selection |
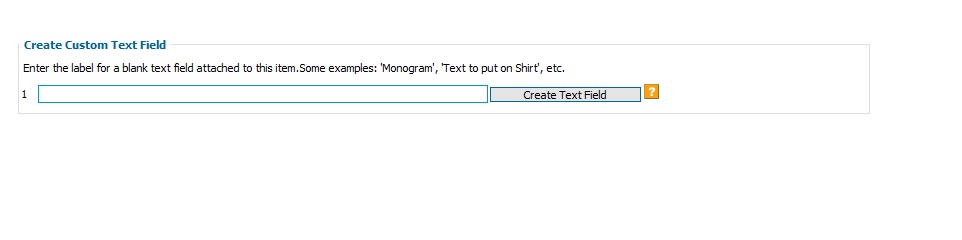 Create Custom Text Field This field labels the blank text field attached to this item. This is useful for custom items where the customer needs to input text. The customer will see this field on the item page before they add the item to cart. Some examples would be if you are selling t-shirts: ‘Text to put on Shirt’, etc. click on the image below to see this feature in action. Create Custom Text Field This field labels the blank text field attached to this item. This is useful for custom items where the customer needs to input text. The customer will see this field on the item page before they add the item to cart. Some examples would be if you are selling t-shirts: ‘Text to put on Shirt’, etc. click on the image below to see this feature in action. 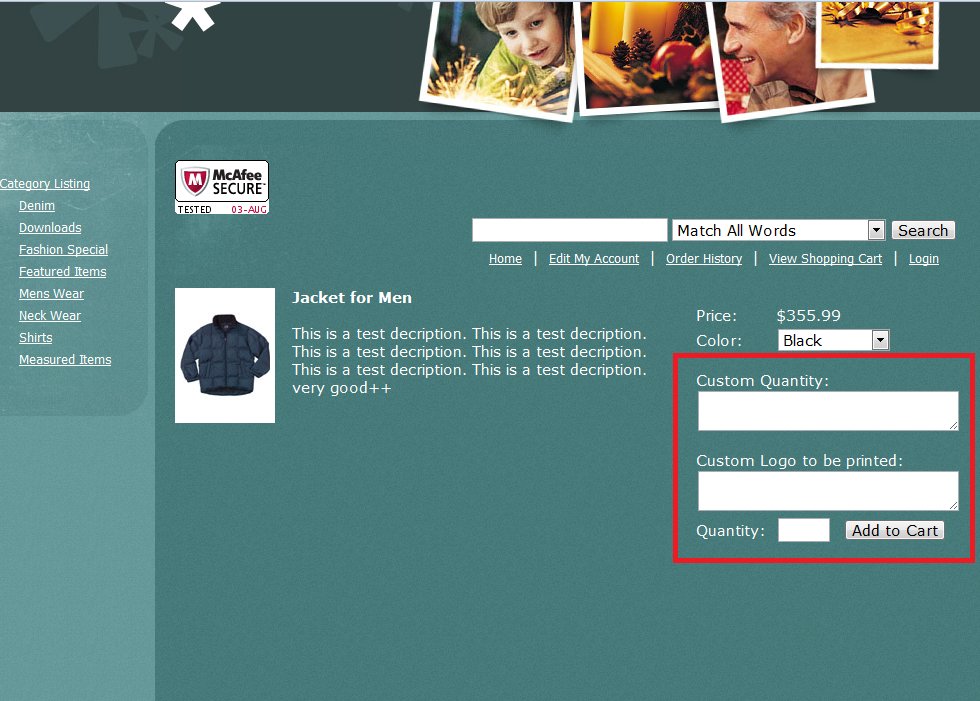 |
| View Suggested Items Section Navigation: Inventory Control > Edit Item > View Suggested Items Selection |
 View Suggested Items Section Suggesting Items to your customers is a great way to let your customers know about other products that they may be interested in. An example would be if you had an item like a pair of shorts, you could recommend the matching t-shirt. Your sales for the matching t-shirt are likely to increase. To begin, click the ‘View Suggested Items Section’ to suggest items to your customers which will be seen on the /shop/cart.php and/or on the item page itself. You can suggest items manually by product ID, or you can add them by searching by category. The best way is usually to find the category containing the product you would like to select, and then click ‘Show Items In this Category.’ You would then click on the item desired. To suggest more than one item, repeat this process, and then when finished click ‘Update Item Data’. Options HTML to Display on Cart Page When This Item is Purchased This is the text or HTML that the customer will see on the cart page after adding this item to cart. Example: Thank you for purchasing this book. Item IDs The Item IDs field allows you to manually suggest items through the ‘View Suggested Item Ids’. * Suggested Ids should be comma separated like 1,3,25,100 Typically this field is used for viewing purposes only, as it is usually easier to add items through the ‘Show Items In This Category’ button below. Item Names The ‘Item Names’ field is for viewing purposes only. You will see this updated automatically if you add the items via the ‘Show Items In This Category’. If you enter the items manually under the Item IDs field, this field will not be updated until you click ‘Update Item Data’ below. Item Suggestion Options: Items listed here will appear on the cart page after a shopper adds this item to their cart. To create a suggested items list, select a category from the dropdown, then click the “Show Items In This Category” button. Then click the links of the items you wish to suggest. The item IDs of the clicked items will automatically appear in the suggestion list text box. You have the option to select where the suggested items are seen: – Just the cart.php page or – Both the item details page and cart.php page View Suggested Items Section Suggesting Items to your customers is a great way to let your customers know about other products that they may be interested in. An example would be if you had an item like a pair of shorts, you could recommend the matching t-shirt. Your sales for the matching t-shirt are likely to increase. To begin, click the ‘View Suggested Items Section’ to suggest items to your customers which will be seen on the /shop/cart.php and/or on the item page itself. You can suggest items manually by product ID, or you can add them by searching by category. The best way is usually to find the category containing the product you would like to select, and then click ‘Show Items In this Category.’ You would then click on the item desired. To suggest more than one item, repeat this process, and then when finished click ‘Update Item Data’. Options HTML to Display on Cart Page When This Item is Purchased This is the text or HTML that the customer will see on the cart page after adding this item to cart. Example: Thank you for purchasing this book. Item IDs The Item IDs field allows you to manually suggest items through the ‘View Suggested Item Ids’. * Suggested Ids should be comma separated like 1,3,25,100 Typically this field is used for viewing purposes only, as it is usually easier to add items through the ‘Show Items In This Category’ button below. Item Names The ‘Item Names’ field is for viewing purposes only. You will see this updated automatically if you add the items via the ‘Show Items In This Category’. If you enter the items manually under the Item IDs field, this field will not be updated until you click ‘Update Item Data’ below. Item Suggestion Options: Items listed here will appear on the cart page after a shopper adds this item to their cart. To create a suggested items list, select a category from the dropdown, then click the “Show Items In This Category” button. Then click the links of the items you wish to suggest. The item IDs of the clicked items will automatically appear in the suggestion list text box. You have the option to select where the suggested items are seen: – Just the cart.php page or – Both the item details page and cart.php page |
| View Suggested Items Section Navigation: Inventory Control > Edit Item > View Suggested Items Selection |
| View Suggested Items Section Suggesting Items to your customes is a great way to let your customers know about other products that they may be interested in. An example would be if you had an item like a pair of shorts, you could recommend the matching t-shirt. Your sales for the matching t-shirt are likely to increase. To begin, click the ‘View Suggested Items Section’ to suggest items to your customers which will be seen on the /shop/cart.php and/or on the item page itself. You can suggest items manually by product ID, or you can add them by searching by category. The best way is usually to find the category containing the product you would like to select, and then click ‘Show Items In this Category.’ You would then click on the item desired. To suggest more than one item, repeat this process, and then when finished click ‘Update Item Data’. Options HTML to Display on Cart Page When This Item is Purchased This is the text or HTML that the customer will see on the cart page after adding this item to cart. Example: Thank you for purchasing this book. Item IDs The Item IDs field allows you to manually suggest items through the ‘View Suggested Item Ids’. * Suggested Ids shoud be comma seprated like 1,3,25,100 Typically this field is used for viewing purposes only, as it is usually easier to add items through the ‘Show Items In This Category’ button below. Item Names The ‘Item Names’ field is for viewing purposes only. You will see this updated automatically if you add the items via the ‘Show Items In This Category’. If you enter the items manually under the Item IDs field, this field will not be updated until you click ‘Update Item Data’ below. Item Suggestion Options: Items listed here will appear on the cart page after a shopper adds this item to their cart. To create a suggested items list, select a category from the dropdown, then click the “Show Items In This Category” button. Then click the links of the items you wish to suggest. The item IDs of the clicked items will automatically appear in the suggestion list text box. You have the option to select where the suggested items are seen: – Just the cart.php page or – Both the item details page and cart.php page |
| Shipping Options (Item) Navigation: Inventory Control > Edit Item > Shipping |
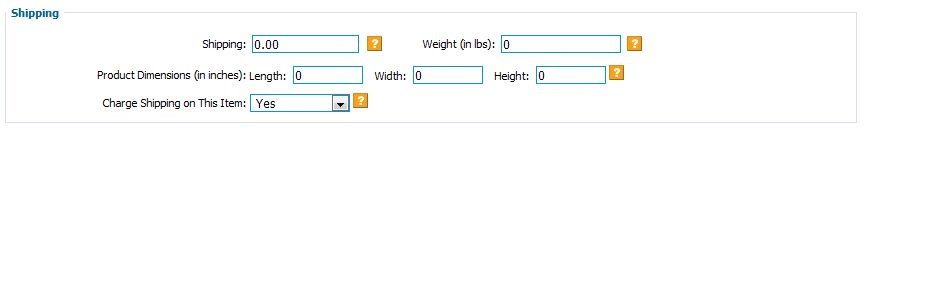 There are other shipping options for all of your items under Manage > Shipping. This section is separate but related to that section as it allows you to set different shipping options for individual items. . Examples If you want a standard way of shipping most of your items, but you have a few items which need to have different shipping dimensions, you are able to edit those individual item dimensions here. (Product dimension are used with the “Base + Calculate Rate” option found on the main shipping options page). If you would like to charge shipping for most of you items, but have a few items you would not like to charge shipping for, you are able to edit those individual items under these options. Options Shipping This shipping value is only used if you have specified the “Base + Rate Specified by Items” in the Manage shipping section. This allows you to charge different shipping prices for different items. Weight The weight needs to be specified in pounds. For example, 1 ounce = .0625 lbs. 2 ounces = .125 lbs. 1/2 pounds = .5 lbs. Product Dimensions Enter the product dimensions you would use for shipping the product. Typically you would use the box dimensions for shipping that particular product Charge Shipping Option If you would like to charge shipping for this item, click ‘Yes’. There are other shipping options for all of your items under Manage > Shipping. This section is separate but related to that section as it allows you to set different shipping options for individual items. . Examples If you want a standard way of shipping most of your items, but you have a few items which need to have different shipping dimensions, you are able to edit those individual item dimensions here. (Product dimension are used with the “Base + Calculate Rate” option found on the main shipping options page). If you would like to charge shipping for most of you items, but have a few items you would not like to charge shipping for, you are able to edit those individual items under these options. Options Shipping This shipping value is only used if you have specified the “Base + Rate Specified by Items” in the Manage shipping section. This allows you to charge different shipping prices for different items. Weight The weight needs to be specified in pounds. For example, 1 ounce = .0625 lbs. 2 ounces = .125 lbs. 1/2 pounds = .5 lbs. Product Dimensions Enter the product dimensions you would use for shipping the product. Typically you would use the box dimensions for shipping that particular product Charge Shipping Option If you would like to charge shipping for this item, click ‘Yes’. |
| Edit Item Page This page allows you to edit an individual item |
| Using this page you will be able to edit: – General Item Options – Shipping – Category Selection – Suggested Items – Create Custom Text – Item Images – Create Drop Down Lists |
| General Item Options Navigation: Inventory Control > Edit Item > General Item Options |
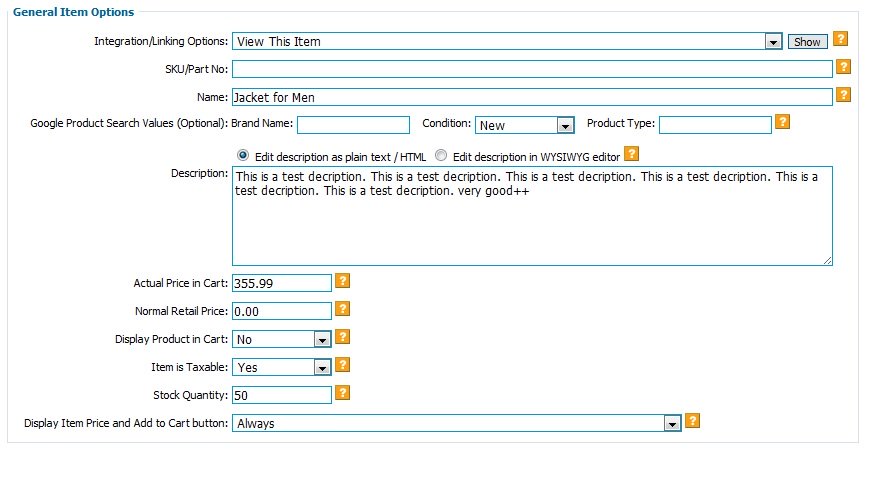 Integration/Linking Options This feature will help you integrate your site. If you are not using the shop to show you items, and you would like to use your web pages to show items, this information will be particularly helpful. With the shopping cart’s import template feature, typically shop owners use the shop to display their items, which is what we recommend . However, you may find additional customization in using the shopping cart information on your actual pages. Option Explanation: ‘Linking to this item’ will show the item URL You can use this link on your web page to point a customer to the shopping cart item page. You can also use this link to view your item page. ‘Linking to this category’ will show the category URL for this particular item You can use this link on your web page to point a customer to the shopping cart category page. ‘HTML to display this item’ will provide HTML code that you can insert into your web page HTML code to display this item ‘Item Include Code’ provides you with .shtml code for this item as a complete item listing. When integrated in your site, it automatically updates your web pages with the shopping cart. For more complete information on Category Include Code, visit the help information for Integration > Category Items listing HTML. ‘View This Item’ lets you preview your item how it appears currently in the shop part of your site. ‘Category Include Code’ provides you with .shtml code for the entire category with the complete item listing of each item . When integrated in your site, it automatically updates your web pages with the shopping cart. For more complete information on Category Include Code, visit the help information for Integration > Category Items listing HTML. ‘Category Thumbnail Display Include Code’ provides you with .shtml code for the entire category with the thumbnail option. When integrated in your site, it automatically updates your web pages with the shopping cart. For more complete information on Category Include Code, visit the help information for Integration > Category Thumbnail HTML. Integration/Linking Options This feature will help you integrate your site. If you are not using the shop to show you items, and you would like to use your web pages to show items, this information will be particularly helpful. With the shopping cart’s import template feature, typically shop owners use the shop to display their items, which is what we recommend . However, you may find additional customization in using the shopping cart information on your actual pages. Option Explanation: ‘Linking to this item’ will show the item URL You can use this link on your web page to point a customer to the shopping cart item page. You can also use this link to view your item page. ‘Linking to this category’ will show the category URL for this particular item You can use this link on your web page to point a customer to the shopping cart category page. ‘HTML to display this item’ will provide HTML code that you can insert into your web page HTML code to display this item ‘Item Include Code’ provides you with .shtml code for this item as a complete item listing. When integrated in your site, it automatically updates your web pages with the shopping cart. For more complete information on Category Include Code, visit the help information for Integration > Category Items listing HTML. ‘View This Item’ lets you preview your item how it appears currently in the shop part of your site. ‘Category Include Code’ provides you with .shtml code for the entire category with the complete item listing of each item . When integrated in your site, it automatically updates your web pages with the shopping cart. For more complete information on Category Include Code, visit the help information for Integration > Category Items listing HTML. ‘Category Thumbnail Display Include Code’ provides you with .shtml code for the entire category with the thumbnail option. When integrated in your site, it automatically updates your web pages with the shopping cart. For more complete information on Category Include Code, visit the help information for Integration > Category Thumbnail HTML. |
| SKU/Part No., Name You have the ability to change the Item’s SKU/Part Number and the Item’s Name. Google Product Search Values For help on Google product search: http://www.google.com/support/merchants/bin/answer.py?hl=en&answer=160081 Description Enter the description of your product this field. The plain text / HTML option will allow you to enter plain text or HTML code. The WYSIWYG editor give you the option to edit the text in HTML format. Actual Price in Cart This is the price the customer will see as the item price. Normal Retail Price This is the price the customer sees next to the actual price if the ‘Display Regular Pricing & Sale Price’ is set to ‘Both’ under General Settings > Misc. Options Display Product in Cart If set to ‘No’, this item is – Not searchable – Not in the item’s category – Available if people have the link – Available if the link shows up in search engine – Available if the item html shows up elsewhere on the site If option is set to ‘Yes, this item is available throughout the shopping cart software. Display Item Price and Add to Cart button Click ‘Always’ if you would like customers to be able to add items to cart without having to be logged in. Click ‘Only when shopper is logged in’ if you would like to hide the item price and add to cart button when customers are not logged in. |
| The Inventory Stock Control allows you to monitor inventory counts and notify customers: |
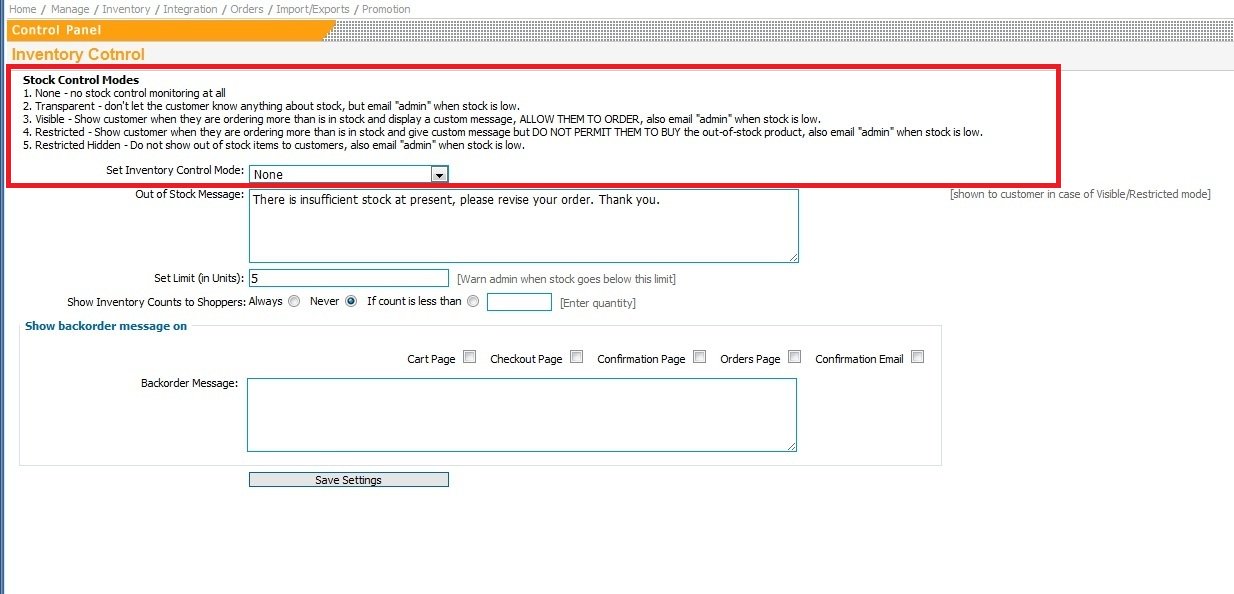 Stock Control Modes When you inventory stock gets low or runs out, the shopping cart has several different options to edit what the customer sees. None Has no stock control monitoring at all. The shopping cart will still keep track of the amount of stock for each item, but the customer will not see a difference regardless of the amount of inventory in stock. Transparent The customers won’t know anything about stock, but the administrator of the shop will still be emailed when stock is low. Visible This option shows customer when they are ordering more than is in stock and display a custom message, This option does ALLOW them to order, and the administrator also receives an email. Restricted This option shows customer when they are ordering more than is in stock , and then the shopping cart gives a custom message. It DOES NOT PERMIT THEM TO BUY the out-of-stock product. The administrator does receive an email. Restricted Hidden This option does not show out of stock items to customers, and the administrator does receive an email. Stock Control Modes When you inventory stock gets low or runs out, the shopping cart has several different options to edit what the customer sees. None Has no stock control monitoring at all. The shopping cart will still keep track of the amount of stock for each item, but the customer will not see a difference regardless of the amount of inventory in stock. Transparent The customers won’t know anything about stock, but the administrator of the shop will still be emailed when stock is low. Visible This option shows customer when they are ordering more than is in stock and display a custom message, This option does ALLOW them to order, and the administrator also receives an email. Restricted This option shows customer when they are ordering more than is in stock , and then the shopping cart gives a custom message. It DOES NOT PERMIT THEM TO BUY the out-of-stock product. The administrator does receive an email. Restricted Hidden This option does not show out of stock items to customers, and the administrator does receive an email. |
 Out of Stock Message This message is the custom message that customers will see depending on the inventory control option selected. Set Limit (in Units) This is the limit for the shopping administrator to receive an email. Show Inventory Counts to Shoppers This allows you to show customers the inventory count. One nice feature is to show the customer only when it is below a certain amount. Some shop administrators use this to create a sense of urgency on the part of the customer. Other shop administrators prefer to keep their inventory counts hidden. Out of Stock Message This message is the custom message that customers will see depending on the inventory control option selected. Set Limit (in Units) This is the limit for the shopping administrator to receive an email. Show Inventory Counts to Shoppers This allows you to show customers the inventory count. One nice feature is to show the customer only when it is below a certain amount. Some shop administrators use this to create a sense of urgency on the part of the customer. Other shop administrators prefer to keep their inventory counts hidden. |
| The main Inventory Control allows you to perform a number of functions relating to the items in your inventory: |
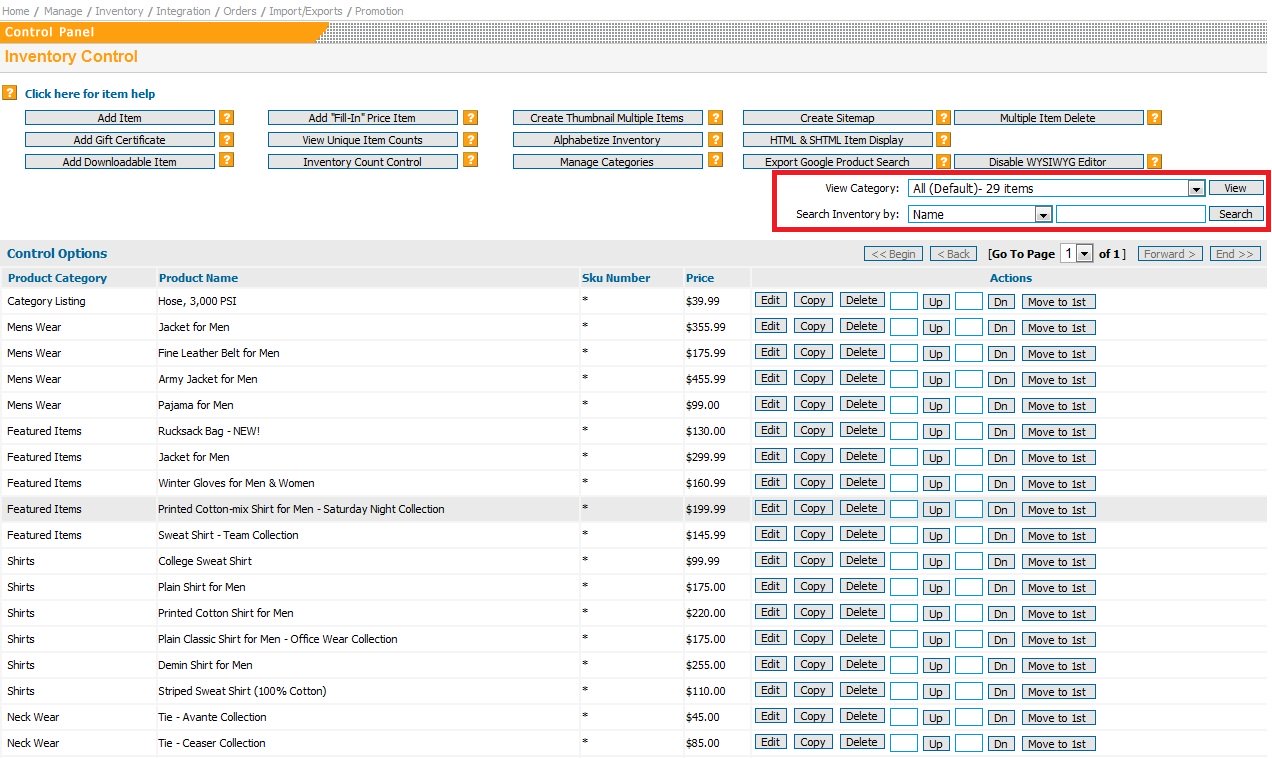 View your items by category To narrow you item choices by category, use this function to view the different items Search Inventory by: You are able to search the inventory by: – Name – Brand – SKU (part #) – Description – Display Product in Cart (search based on whether a product is displayed in the cart or not) – Out of Stock items View your items by category To narrow you item choices by category, use this function to view the different items Search Inventory by: You are able to search the inventory by: – Name – Brand – SKU (part #) – Description – Display Product in Cart (search based on whether a product is displayed in the cart or not) – Out of Stock items |
 Edit Item This is one of the more important links found in the shopping cart. You’ll be able to edit what your item’s name, description, image, etc.. Copy Item To copy an item, select ‘Copy’, and the item will be immediately copied. The screen that you are brought to is the copied item, which you can edit and alter from the original item. Delete Item Deleting an Item will ask for confirmation, and then you will be able to select and delete the item. Up/Down Options These options allow you to change the order that the items appear to customers in the shop. You also have the ability to move the item to the top through the “Move to 1st” option. Edit Item This is one of the more important links found in the shopping cart. You’ll be able to edit what your item’s name, description, image, etc.. Copy Item To copy an item, select ‘Copy’, and the item will be immediately copied. The screen that you are brought to is the copied item, which you can edit and alter from the original item. Delete Item Deleting an Item will ask for confirmation, and then you will be able to select and delete the item. Up/Down Options These options allow you to change the order that the items appear to customers in the shop. You also have the ability to move the item to the top through the “Move to 1st” option. |
| ‘Category Items Listing Integration’ allows you to put items from your shopping cart into your actual website pages. As opposed to the ‘Category Thumbnail HTML’ page which generates code for the thumbnails, this page allows you to integrate the complete item information by category. Navigation: Integration > Category Items Listing Integration |
 Using the following steps, you will be able to generate the code which can be used in your website programming code. 1. Select the category you would like to include. 2. Select the options you would like to display. The options selected will change what the code displays. Using the following steps, you will be able to generate the code which can be used in your website programming code. 1. Select the category you would like to include. 2. Select the options you would like to display. The options selected will change what the code displays. |
 3. Generate the code by selecting “Show Category Listing Code”. Selecting “HTML Code for .html pages” generates standard HTML code which would need to be updated if your items change. It does allow for additional customization of the look of the items. Selecting “Include Code of .shtml pages” generates SHTML code which is generated dynamically by taking the current information from the shopping cart items. The advantage to using SHTML code is that it automatically updates your items and categories on your webpage as you update those items/categories in your shopping cart. This saves you time in having to update information in 2 different places. 4. The code is now ready to be integrated into your site (copy & paste). In the provided image the SHTML code is listed first , and the HTML code is listed second. 3. Generate the code by selecting “Show Category Listing Code”. Selecting “HTML Code for .html pages” generates standard HTML code which would need to be updated if your items change. It does allow for additional customization of the look of the items. Selecting “Include Code of .shtml pages” generates SHTML code which is generated dynamically by taking the current information from the shopping cart items. The advantage to using SHTML code is that it automatically updates your items and categories on your webpage as you update those items/categories in your shopping cart. This saves you time in having to update information in 2 different places. 4. The code is now ready to be integrated into your site (copy & paste). In the provided image the SHTML code is listed first , and the HTML code is listed second. |
| Category HTML allows you to pull items from your shopping cart into your actual website pages by category. You can manage your Categories under Inventory>Manage Categories. If you currently do not have any categories, you can create categories and subcategories under Inventory>Manage Categories>Add Category. Using this page, you will be able to create HTML or SHTML code which can be used in your website programming code. This code will display items by category, and the options you select will change what the code displays. Navigation: Integration > Category Thumbnail HTML |
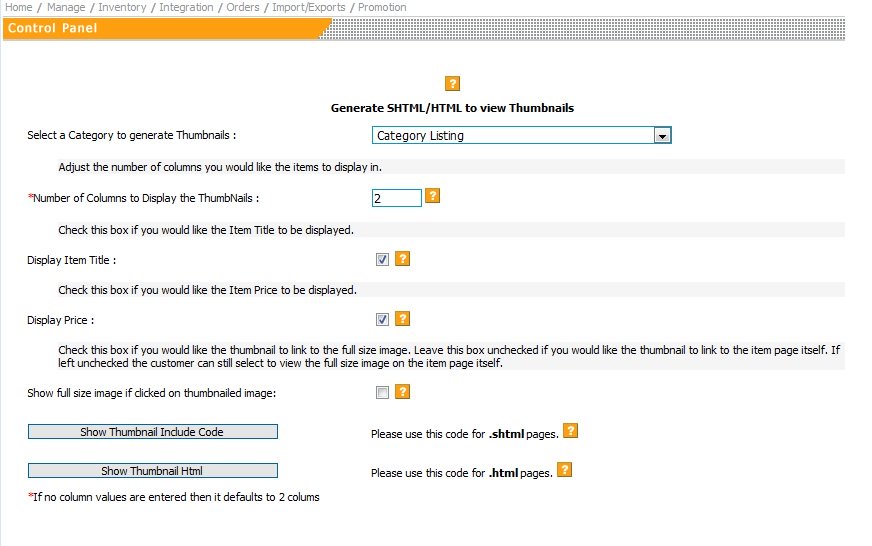 Using the following steps, you will be able to generate code which can be used in your website programming code. 1. Select the Category you would like to pull the code for. 2. Choose the options you would like for columns, title, price display. 3. Choose whether you would like the thumbnail to link to the item page itself. Check the box if you would like the thumbnail to link to the full size image. Leave this box unchecked if you would like the thumbnail to link to the item page itself. If left unchecked the customer can still select to view the full size image on the item page itself. Using the following steps, you will be able to generate code which can be used in your website programming code. 1. Select the Category you would like to pull the code for. 2. Choose the options you would like for columns, title, price display. 3. Choose whether you would like the thumbnail to link to the item page itself. Check the box if you would like the thumbnail to link to the full size image. Leave this box unchecked if you would like the thumbnail to link to the item page itself. If left unchecked the customer can still select to view the full size image on the item page itself. |
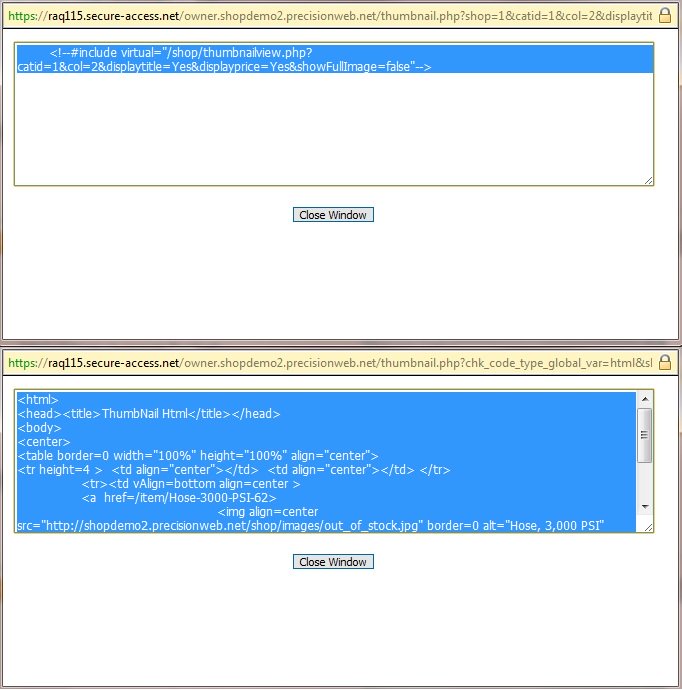 4. Generate the code: “Show Thumbnail Include Code” generates SHTML code which is generated dynamically by taking the current information from the shopping cart items. The advantage to using SHTML code is that it automatically updates your items and categories on your webpage as you update those items/categories in your shopping cart. This saves you time in having to update information in 2 different places. “Show Thumbnail Html” generates standard HTML code which would need to be updated if your items change. The advantage to using standard HTML is that it does allow for additional customization of the look of the items. Typically this option is used by web designers who have had experience with manipulating HTML. 4. Generate the code: “Show Thumbnail Include Code” generates SHTML code which is generated dynamically by taking the current information from the shopping cart items. The advantage to using SHTML code is that it automatically updates your items and categories on your webpage as you update those items/categories in your shopping cart. This saves you time in having to update information in 2 different places. “Show Thumbnail Html” generates standard HTML code which would need to be updated if your items change. The advantage to using standard HTML is that it does allow for additional customization of the look of the items. Typically this option is used by web designers who have had experience with manipulating HTML. |
| Multiple Product Integration allows you to put items from your shopping cart into your actual website pages. Navigation: Integration > Multiple Product HTML |
 Using the following steps, you will be able to generate code which can be used in your website programming code. 1. Expand the category tree from the panel on the left hand side. Using the following steps, you will be able to generate code which can be used in your website programming code. 1. Expand the category tree from the panel on the left hand side. |
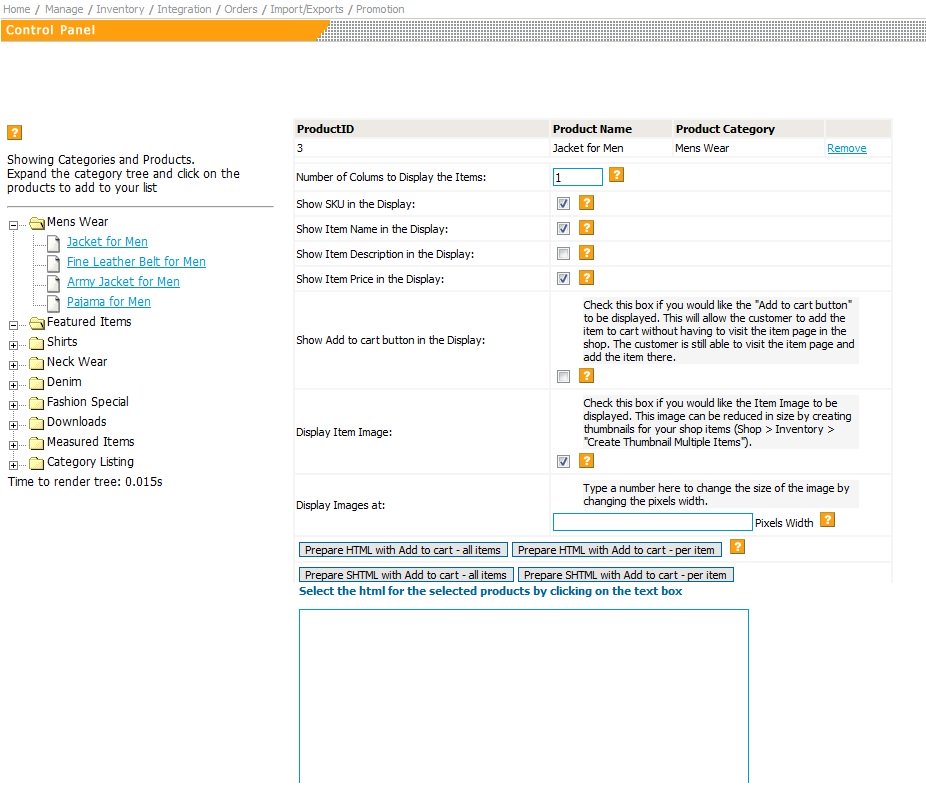 2. Select the items you would like to include. To the right, you can see the items that have been selected. 3. Select the options you would like to display. The options selected will change what the code displays. 4. Generate the code by choosing either the HTML or SHTML options. 2. Select the items you would like to include. To the right, you can see the items that have been selected. 3. Select the options you would like to display. The options selected will change what the code displays. 4. Generate the code by choosing either the HTML or SHTML options. |
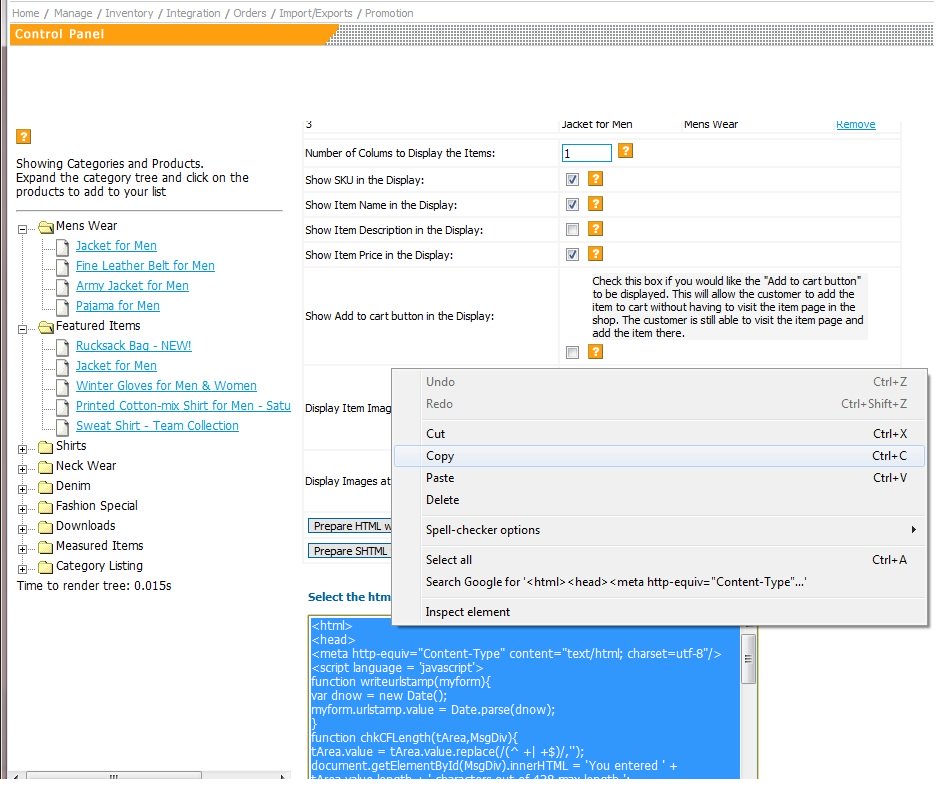 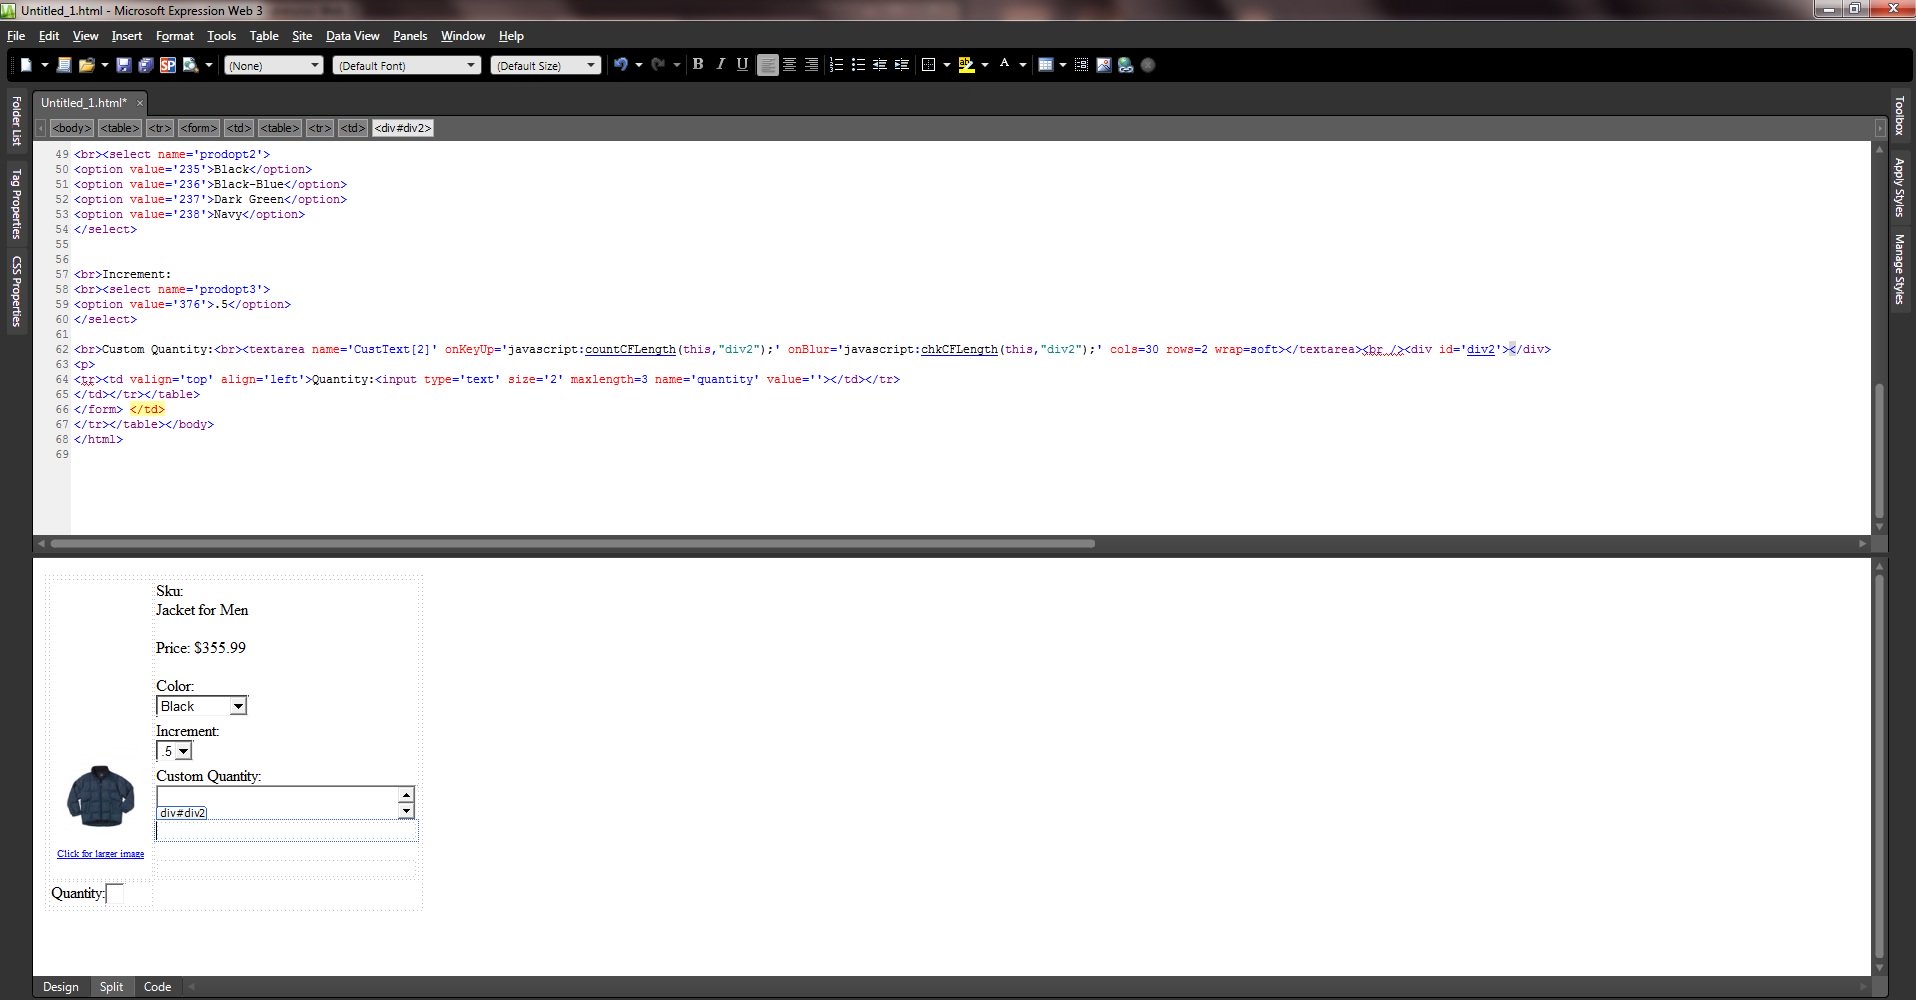 5. The code is now ready to be integrated into your site (copy & paste). 5. The code is now ready to be integrated into your site (copy & paste). |
| Navigation: Manage > Categories > Category Links or Inventory > Manage Categories > Arrange Categories |
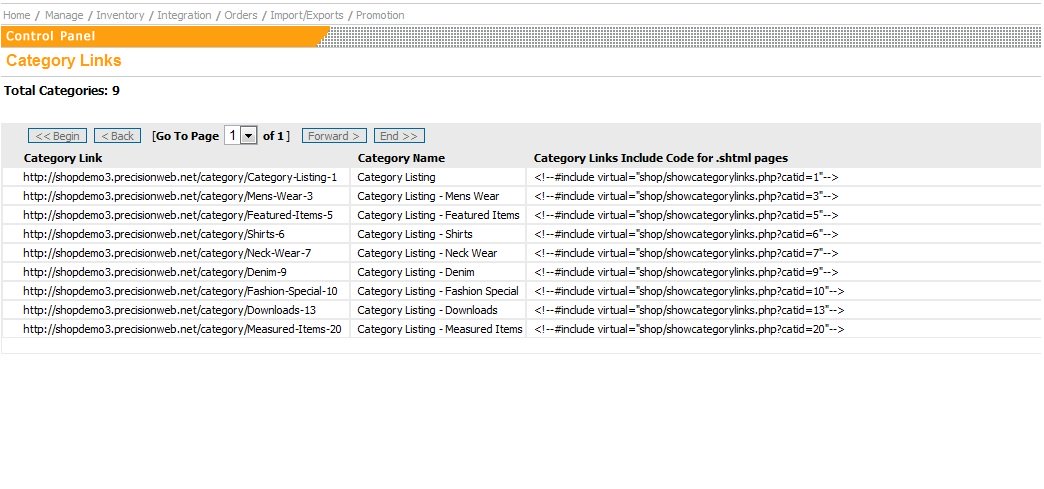 Catagory Links This page serves as a handy place to reference linking information for your categories. Category Link These are the links associated with a particular category. You can use these links to reference from pages outside the site to the actual shopping cart. Category Links Include Code for .shtml pages This is the SHTML code that is associated with items in a particular category. If you were displaying your items on pages outside the cart and you coudl use this code. The advantage to using SHTML code is that it automatically updates your items and categories on your webpage as you update those items/categories in your shopping cart. This saves you time in having to update information in 2 different places. Catagory Links This page serves as a handy place to reference linking information for your categories. Category Link These are the links associated with a particular category. You can use these links to reference from pages outside the site to the actual shopping cart. Category Links Include Code for .shtml pages This is the SHTML code that is associated with items in a particular category. If you were displaying your items on pages outside the cart and you coudl use this code. The advantage to using SHTML code is that it automatically updates your items and categories on your webpage as you update those items/categories in your shopping cart. This saves you time in having to update information in 2 different places. |
| This section allows you to arrange categories. Navigation: Manage > Categories > Arrange Categories or Inventory > Manage Categories > Arrange Categories |
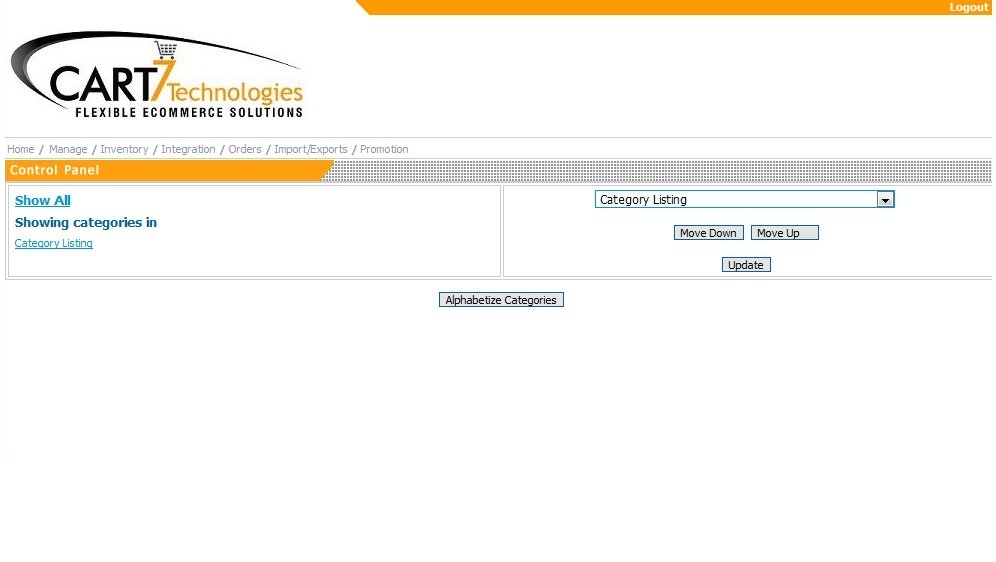 Arrange Categories The ‘Show All’ button is not a button to show all categories, but rather, once you have found a category, to return to the main category. The first step is to click on the main category (‘Category Listing’ in the demo shop). You will then see an expanded list of categories. From this list, you will be able to arrange them to the right or click to the left on the categories to arrange subcategories of those categories. ‘Alphabetize Categories’ allows you to arrange the categories listed alphabetically. Arrange Categories The ‘Show All’ button is not a button to show all categories, but rather, once you have found a category, to return to the main category. The first step is to click on the main category (‘Category Listing’ in the demo shop). You will then see an expanded list of categories. From this list, you will be able to arrange them to the right or click to the left on the categories to arrange subcategories of those categories. ‘Alphabetize Categories’ allows you to arrange the categories listed alphabetically.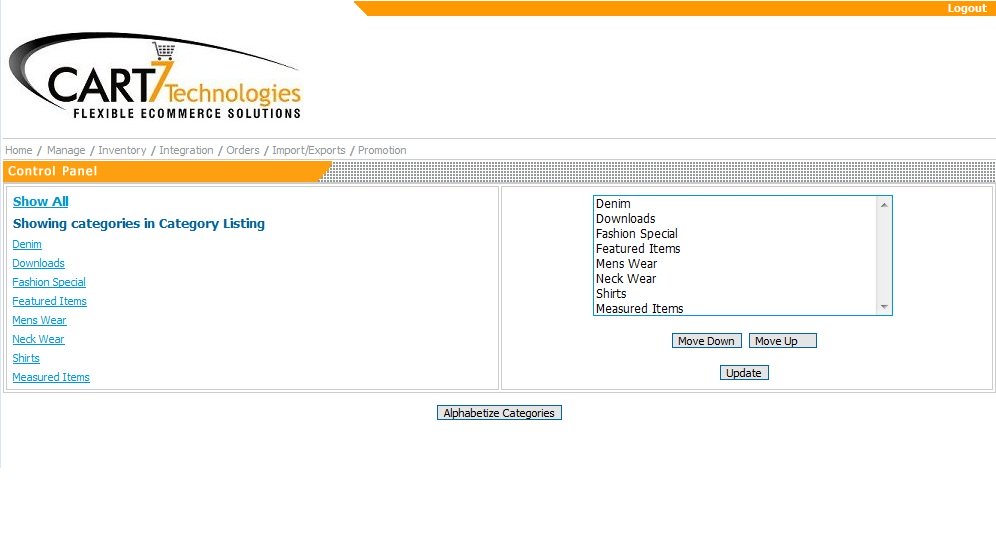 |
| This section allows you to edit the HTML for categories. This gives you the ability to give a custom look to each category page in the shopping cart. This is a good way to go if you are using the /shop pages and categories as a way for your customers to browse (instead of using your own web pages as browsing pages.) You can add HTML from web design software, or you can use the editor provided. Navigation: Manage > Categories > Edit Category HTML/TITLE > Proceed to Edit Category for Selected Category or Inventory > Manage Categories >Edit Category HTML/TITLE > Proceed to Edit Category for Selected Category |
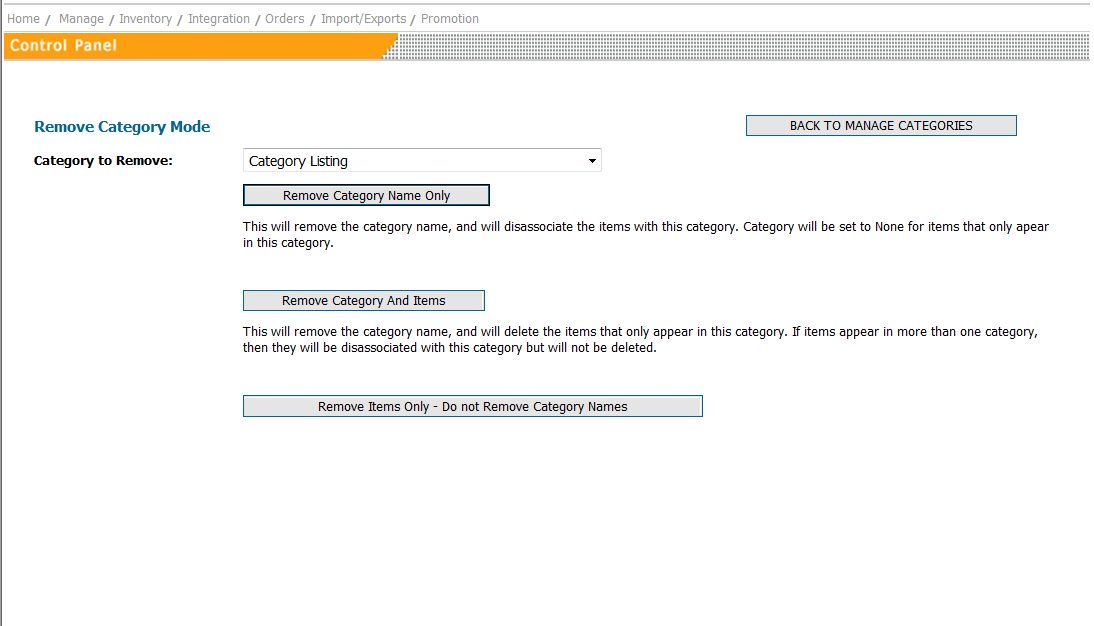 Edit Category HTML / Title Remove Category Name Only This will remove the category name, and will disassociate the items with this category. Category will be set to None for items that only apear in this category. Remove Category Name and Items This will remove the category name, and will delete the items that only appear in this category. If items appear in more than one category, then they will be disassociated with this category but will not be deleted. Remove Items Only – Do not Remove Category Names This option allows you to delete all the items in a particular category without deleting the category itself. Edit Category HTML / Title Remove Category Name Only This will remove the category name, and will disassociate the items with this category. Category will be set to None for items that only apear in this category. Remove Category Name and Items This will remove the category name, and will delete the items that only appear in this category. If items appear in more than one category, then they will be disassociated with this category but will not be deleted. Remove Items Only – Do not Remove Category Names This option allows you to delete all the items in a particular category without deleting the category itself. |
|
| This section allows you to remove categories. Navigation: Manage > Categories > Remove Category or Inventory > Manage Categories > Remove Category |
| Remove Category Remove Category Name Only This will remove the category name, and will disassociate the items with this category. Category will be set to None for items that only apear in this category. Remove Category Name and Items This will remove the category name, and will delete the items that only appear in this category. If items appear in more than one category, then they will be disassociated with this category but will not be deleted. Remove Items Only – Do not Remove Category Names This option allows you to delete all the items in a particular category without deleting the category itself. |
| This section allows you to rename categories.br> Navigation: Manage > Categories > Rename Category or Inventory > Manage Categories > Rename Category |
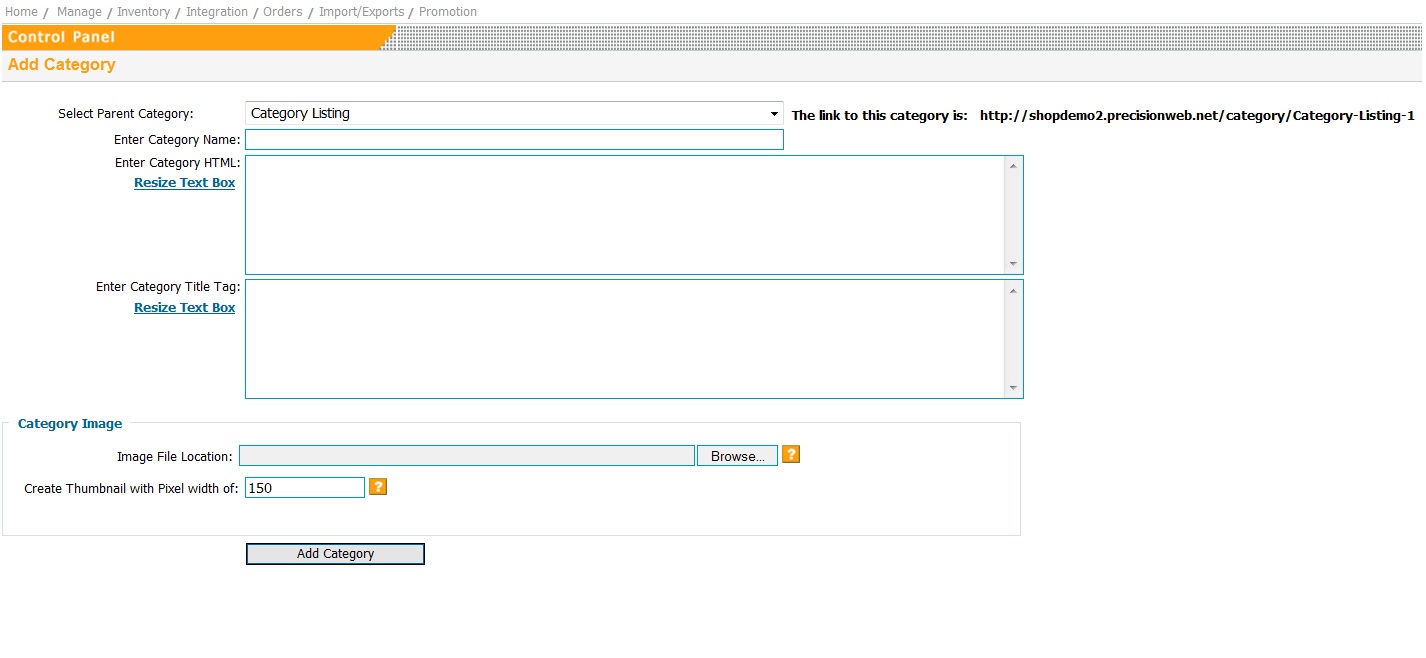 Rename Category Renaming category page allows you to modify the titles of your current categories. Select the category name that you would like to modify, and then enter the new category name in ‘New Name for this Category’ field. Do not include the parent category name (ex. don’t type Main Shop – Shirts, type Shirts) Rename Category Renaming category page allows you to modify the titles of your current categories. Select the category name that you would like to modify, and then enter the new category name in ‘New Name for this Category’ field. Do not include the parent category name (ex. don’t type Main Shop – Shirts, type Shirts) |
|
| This section allows you to view / edit users for the Adminstration page. Navigation: Manage > Categories > Add Category or Inventory > Manage Categories > Add Category |
| Add Category Categories are a good way to organize your items to make it easier for you customers to find. This page allows you to add categories. You are also able to create categories through the Import function found at Import > Import Item Data. To get started, select the main shop as a parent category, and then create a category under ‘Enter Category Name’. This will allow you to create a subcategory of the Main Shop parent category. You will then be able to create further subcategories of each category that you create. For example: You create a Shirts category. After creating that category, you will then be able to create subcategories t-shirts and dress shirts, etc. Enter Category Name Subcategory of the parent category list above. Enter Category HTML Allows you to input custom HTML that appears before the items in a particular category. Enter Category Title Tag Normally is automatically generated to match the name of the category. If you input anything in this field, it will overwrite that automatically generated title tag. Category Image This field only applies if you have ‘Display subcategory links as thumbnails’ set to yes. This option is found in the Category Display Options under Manage > General Settings Image File Location: To load an image that is on your hard drive, click ‘Browse’, find the file, and click open. When you click ‘Add Image’ below, you will upload the image. Create Thumbnail with Pixel width You are able to create a thumbnail of the image which is typically a smaller version of the image. |
d
| This section allows you to view / edit users for the Adminstration page. Navigation: Manage > Admin Users |
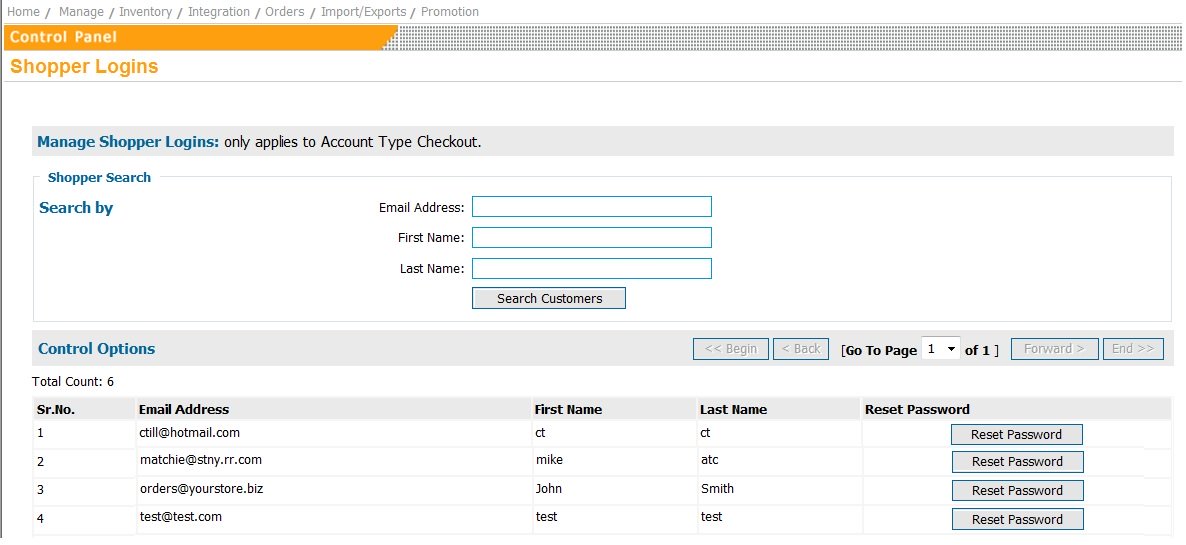 The Shopper Logins page allows you to view the customers that have gone through the Checkout process past the billing page. Your shopping cart must be using the ‘Account Type Checkout’ or this page will not apply. You are able to search for customers, reset passwords, and view their email address. The Shopper Logins page allows you to view the customers that have gone through the Checkout process past the billing page. Your shopping cart must be using the ‘Account Type Checkout’ or this page will not apply. You are able to search for customers, reset passwords, and view their email address. |
d
| This section allows you to view / edit Downloadable Items. Navigation: Manage > Downloadable Options / Items |
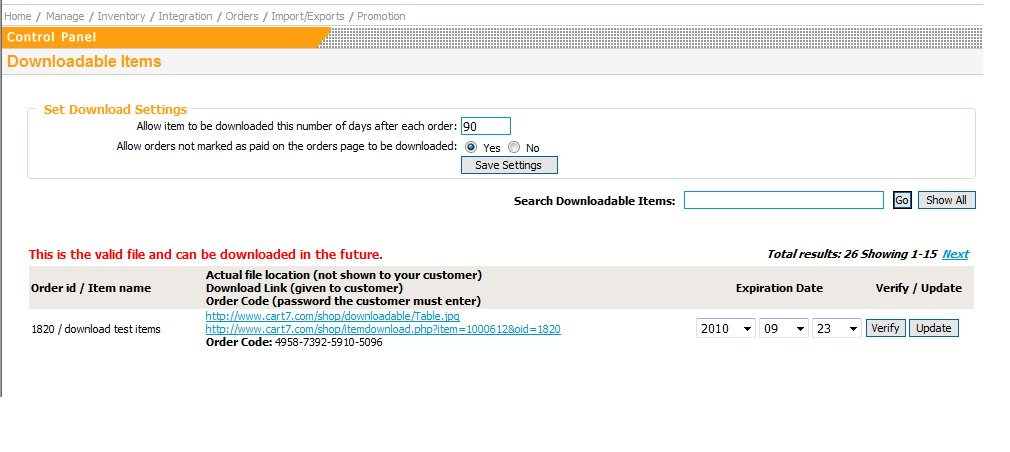 Downloadable Items The first step in using the dowloadable item page is to add a downloadable item. Navigate to Inventory > Inventory Main > ‘Add Downloadable Item’ On the Add Downloadable Item page you can create downloadable items for sale. Some example file types are: MP3 files, e-books, PDF files, images, zip files, and more. When a customer buys the downloadable item file, they are given a link to the php download script along with a password. From there they can download the file for a limited time. The customer will not know the file’s actual location on your site. Once a customer has purchased a downloadable item, you will be able to view/edit the downloadable item on this page. Set Download Settings Allow item to be downloaded this number of days after each order: Set the amount of days a customer has to view the downloadable item after purchase. Allow orders not marked as paid on the orders page to be downloaded: This option is for shop owners who do not have real time credit card processing. This allows customer who have purchased to access their downloadable file (since they are waiting for the shop owner to process their credit card). Existing Items Order id The Order used to purchase the download Expiration Date Allows you to reset the expiration date on the item. Verify / Update Verify allows you to check on the downloadable item’s locations. Update allows you to make changes Downloadable Items The first step in using the dowloadable item page is to add a downloadable item. Navigate to Inventory > Inventory Main > ‘Add Downloadable Item’ On the Add Downloadable Item page you can create downloadable items for sale. Some example file types are: MP3 files, e-books, PDF files, images, zip files, and more. When a customer buys the downloadable item file, they are given a link to the php download script along with a password. From there they can download the file for a limited time. The customer will not know the file’s actual location on your site. Once a customer has purchased a downloadable item, you will be able to view/edit the downloadable item on this page. Set Download Settings Allow item to be downloaded this number of days after each order: Set the amount of days a customer has to view the downloadable item after purchase. Allow orders not marked as paid on the orders page to be downloaded: This option is for shop owners who do not have real time credit card processing. This allows customer who have purchased to access their downloadable file (since they are waiting for the shop owner to process their credit card). Existing Items Order id The Order used to purchase the download Expiration Date Allows you to reset the expiration date on the item. Verify / Update Verify allows you to check on the downloadable item’s locations. Update allows you to make changes |
d
| This section allows you to customize coupon codes and promotions for your shop. This is seperate from Discount Options page. Navigation: Manage > Promotional / Coupon Codes |
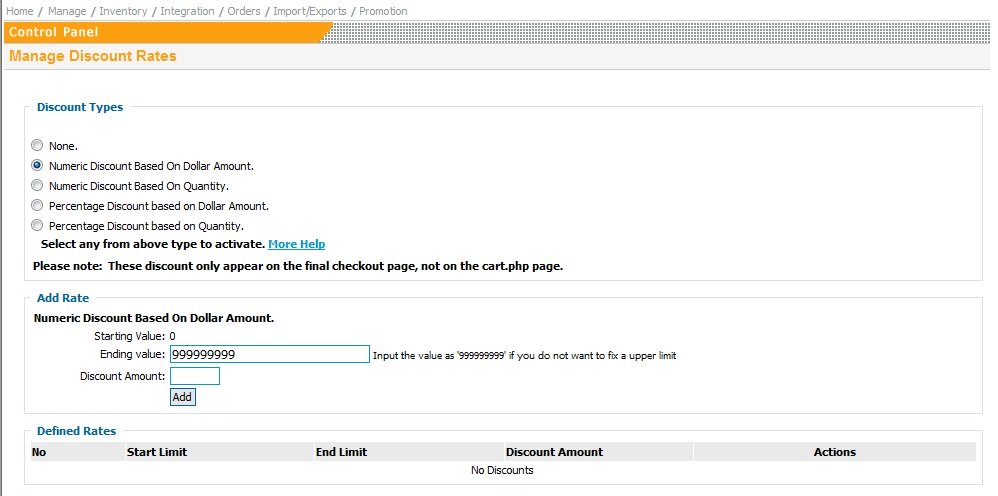 Get Started First, edit your ‘Checkout Page Text’, which will appear at checkout page as the title for the box where customers will input their code. Next, select ‘Click Here to Create New Promo Code’. If you already have a coupon created, look under ‘Existing Promotional Codes’ and select ‘Edit’ or ‘Delete’. Edit Promotional Code Promotional Code Name Option: The text you type in the “Promo Code Name” field is what your customers will need to type in on the final checkout page in order to see their discount. The “Promo Code Name” is case sensitive so “Promo1” is different than “promo1”. Code Type Option: The Code Type field selection allows you to choose from 5 different discount types which are listed below. 1. % Discount: The shopping cart will take that ercentage off the total order. For example, if you select “% Discount” and then enter 10 in the Amount field, then the shopping cart will give a 10% discount when the customer types in the promo code on the checkout page. 2. Flat Rate Discount: The shopping cart will deduct a fixed amount from the order total. For example, if you select “Flat Rate Discount” and then enter 10 in the Amount field, then the shopping cart will give a $10 discount when the customer types in the promo code on the checkout page. It would reduce an $11 order to $1 or a $100 order to $90 3. Free Shipping: The shopping cart will change the shipping cost to $0. For example, if you select “Free Shipping” (don’t worry about the amount field as it does not apply n this case) then the shopping cart will give free shipping when the customer types in the promo code on the checkout page. If you are using the Base + Calculate Rate shipping, then the free shipping will only apply to your basic ground shipping, not your Next Day etc. options. 4. Dollar Amount Discount Per Item: The shopping cart will deduct the specified amount multiplied by the number of items purchased. For example, if you select “Dollar Amount Discount Per Item” and enter 10 in the Amount field, then the shopping cart will give a $10 per item discount when the customer types in the promo code on the checkout page. If a customer ordered 5 items, then it would deduct $50 from the order. If a customer ordered 5 items, then it would deduct $50 from the order. If a customer ordered 10 items, then it would deduct $100 from the order. 5. Flat Rate Shipping: The shopping cart will change the shipping cost to the amount you specified in the Amount field. For example, if you select “Flat Rate Shipping” and specify the amount as 2, then the shopping cart will change the shipping cost from your normal shipping amount to this flate rate of $2.00. If you are using the Base + Calculate Rate shipping, then the Flat Rate Shipping will only apply to your basic ground shipping, not your Next Day etc. options. Start Date Option: The date with effect from the promotional code will start to work. [ Leave blank for immediate start ] One use by one customer only: If you would like to give out a promotional code to one customer and only have that one customer use it once, then you would select this to Yes. If you select this option to “Yes” and two different customers put this code in, then it will not work for the second customer. This code is meant to act as a gift certificate would. Specify Product Option: Promotional code will be applied on given product(s). You can specify multiple product ids separated by commas. Products can also be viewed and specified as follow: Click [Show Categories] button. Check any one category at a time from Available Categories. Click [Show Products To Specify] button. Click on shown products to specify. Amount Option: The Amount field is where you would specify the the percantage, dollar amount, or fixed shipping price for each of the separate discount types. It does nto apply to the Free Shipping Option. For a $10 discount you’d type in just the number 10 with no $ sign. For a 10% discount you’d type in just the number 10 with no % sign. Minimum Order Amount to Apply Promocode Option: You can create a Promo Code that rewards your customers if they spend over a certain amount. For example, you might create a code named “FreeShip” with a minimum order of $100. So, if your customers order over $100 and enter in the code, then they will get the free shipping. Another reason to use it would be if you are offering a Flate Rate Discount but you do not want an order so small that it is essentially free to the buyer; for example, a $15 off promo code on a $20 order. End Date Option: The date after which the promotional code will stop working. [ Leave blank for no expiration ] Get Started First, edit your ‘Checkout Page Text’, which will appear at checkout page as the title for the box where customers will input their code. Next, select ‘Click Here to Create New Promo Code’. If you already have a coupon created, look under ‘Existing Promotional Codes’ and select ‘Edit’ or ‘Delete’. Edit Promotional Code Promotional Code Name Option: The text you type in the “Promo Code Name” field is what your customers will need to type in on the final checkout page in order to see their discount. The “Promo Code Name” is case sensitive so “Promo1” is different than “promo1”. Code Type Option: The Code Type field selection allows you to choose from 5 different discount types which are listed below. 1. % Discount: The shopping cart will take that ercentage off the total order. For example, if you select “% Discount” and then enter 10 in the Amount field, then the shopping cart will give a 10% discount when the customer types in the promo code on the checkout page. 2. Flat Rate Discount: The shopping cart will deduct a fixed amount from the order total. For example, if you select “Flat Rate Discount” and then enter 10 in the Amount field, then the shopping cart will give a $10 discount when the customer types in the promo code on the checkout page. It would reduce an $11 order to $1 or a $100 order to $90 3. Free Shipping: The shopping cart will change the shipping cost to $0. For example, if you select “Free Shipping” (don’t worry about the amount field as it does not apply n this case) then the shopping cart will give free shipping when the customer types in the promo code on the checkout page. If you are using the Base + Calculate Rate shipping, then the free shipping will only apply to your basic ground shipping, not your Next Day etc. options. 4. Dollar Amount Discount Per Item: The shopping cart will deduct the specified amount multiplied by the number of items purchased. For example, if you select “Dollar Amount Discount Per Item” and enter 10 in the Amount field, then the shopping cart will give a $10 per item discount when the customer types in the promo code on the checkout page. If a customer ordered 5 items, then it would deduct $50 from the order. If a customer ordered 5 items, then it would deduct $50 from the order. If a customer ordered 10 items, then it would deduct $100 from the order. 5. Flat Rate Shipping: The shopping cart will change the shipping cost to the amount you specified in the Amount field. For example, if you select “Flat Rate Shipping” and specify the amount as 2, then the shopping cart will change the shipping cost from your normal shipping amount to this flate rate of $2.00. If you are using the Base + Calculate Rate shipping, then the Flat Rate Shipping will only apply to your basic ground shipping, not your Next Day etc. options. Start Date Option: The date with effect from the promotional code will start to work. [ Leave blank for immediate start ] One use by one customer only: If you would like to give out a promotional code to one customer and only have that one customer use it once, then you would select this to Yes. If you select this option to “Yes” and two different customers put this code in, then it will not work for the second customer. This code is meant to act as a gift certificate would. Specify Product Option: Promotional code will be applied on given product(s). You can specify multiple product ids separated by commas. Products can also be viewed and specified as follow: Click [Show Categories] button. Check any one category at a time from Available Categories. Click [Show Products To Specify] button. Click on shown products to specify. Amount Option: The Amount field is where you would specify the the percantage, dollar amount, or fixed shipping price for each of the separate discount types. It does nto apply to the Free Shipping Option. For a $10 discount you’d type in just the number 10 with no $ sign. For a 10% discount you’d type in just the number 10 with no % sign. Minimum Order Amount to Apply Promocode Option: You can create a Promo Code that rewards your customers if they spend over a certain amount. For example, you might create a code named “FreeShip” with a minimum order of $100. So, if your customers order over $100 and enter in the code, then they will get the free shipping. Another reason to use it would be if you are offering a Flate Rate Discount but you do not want an order so small that it is essentially free to the buyer; for example, a $15 off promo code on a $20 order. End Date Option: The date after which the promotional code will stop working. [ Leave blank for no expiration ] |
d
| This section allows you to customize coupon codes and promotions for your shop. This is seperate from Discount Options page. Navigation: Manage > Gift Certificates |
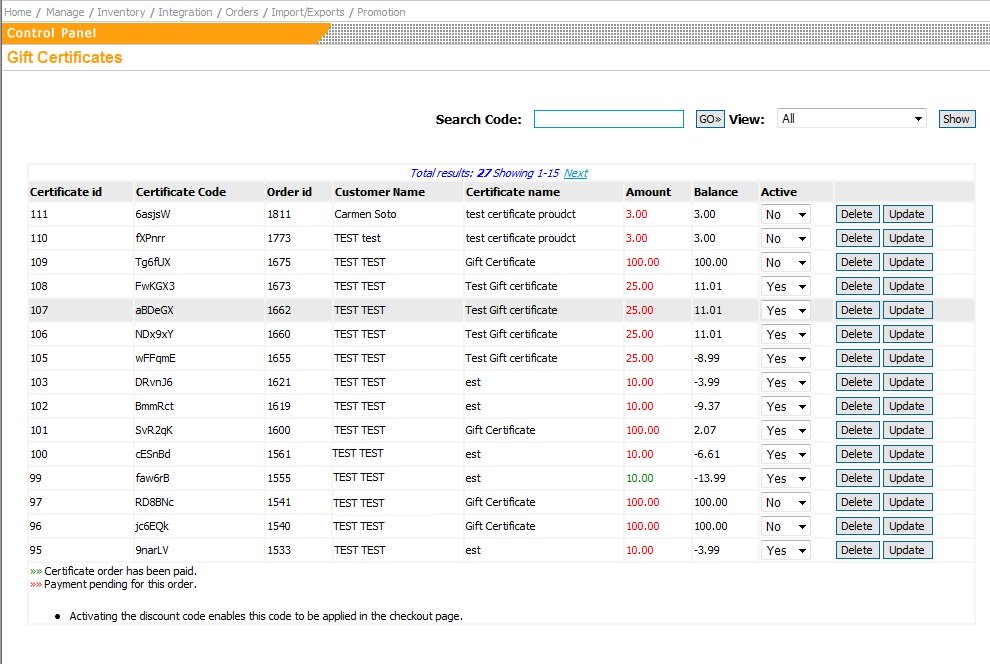 Gift Certificates The first step to using the gift certificate function is to add a gift certificate in the Inventory Control Panel (Inventory > Inventory Main > Add Gift Certificate). Next a customer would need to purchase this item gift certificate. After this has occured, you will be able to see gift certficates listed on this screen. Order ID The Order # that was used to purchase the certificate. Amount This is the original dollar amount of the gift certificate. Balance The amount a customer has left with the gift certificate. Active Activating the discount code enables this code to be used on the checkout page by a customer, while setting it to no disables the code from being used. Green Certificate order has been paid. Red Payment pending for this order. Gift Certificates The first step to using the gift certificate function is to add a gift certificate in the Inventory Control Panel (Inventory > Inventory Main > Add Gift Certificate). Next a customer would need to purchase this item gift certificate. After this has occured, you will be able to see gift certficates listed on this screen. Order ID The Order # that was used to purchase the certificate. Amount This is the original dollar amount of the gift certificate. Balance The amount a customer has left with the gift certificate. Active Activating the discount code enables this code to be used on the checkout page by a customer, while setting it to no disables the code from being used. Green Certificate order has been paid. Red Payment pending for this order. |
| This section allows you to customize discounts for your shop. This is seperate from Coupon & Promo Codes. Navigation: Manage > Discount Options |
| The discounts are a tier system. Starting with 0, you can apply discounts between certain amounts or quantities. The last discount will have an upper limit value of “999999999”. For example, if you wanted customes to save $1 for purchases between $10 and $50, you first need to specify the discount between $0 and $10. The ending value would be 10, and the discount amount would be 0. Then you could input the ending value of 50, and the discount of 1 (for $1). You could then enter other discounts for orders more than $50 if you wished. |
| (a) |
None |
– |
Do not provide discounts. |
| (b) |
Numeric Discount Based On Dollar Amount |
– |
Provide dollar amount discounts on the total value of purchases. |
| (c) |
Numeric Discount Based On Quantity |
– |
Provide dollar amount discounts based on total items ordered. |
| (d) |
Percentage Discount based on Dollar Amount |
– |
Provide discounts based on a percentage of the total value of purchase. |
| (e) |
Percentage Discount based on Quantity |
– |
Provide discounts based on a percentage of the items ordered. |
|
 Set Default Settings ‘Alternative Shipping Default Text’ If you create an Alternative Shipping option, that will create a dropdown list on the checkout page. The default text is what shows up on the dropdown when no option has been selected. For example, you might want to create an “Alternative Shipping Option” like “Gift Wrapping” and set it to add $7 to the order. Then you could set the default text to something like “Click dropdown menu to select your gift wrapping options”. Another example would be an “Alternative Shipping Option” to select to add insurance to the shipping. For that you might create a few different selections that your customer would select based on the amount of their order; then you could set the default text to “Please click here for shipping insurance options”. ‘Require Selection of an alternative shipping option’ This option would be used to force a shopper to explicitly accept or reject an option. For example, you may want to them to select “I want shipping insurance, please add $15 to my order” or “I do not want shipping insurance, I accept …..” Another example would be additional charges for International shipments. You might want to add an extra charge for export documentation or to cover additional shipping costs. In this case you could select to “Require selection — Yes only for international buyers”.
  Create Alternative Shipping Options ‘Option Name’
 ‘Fixed Charge Per Order’ The shipping cost will be equal to the base charge only per order. ‘Base charge’ is found at the top of the Manage Shipping screen (under Basic Settings).
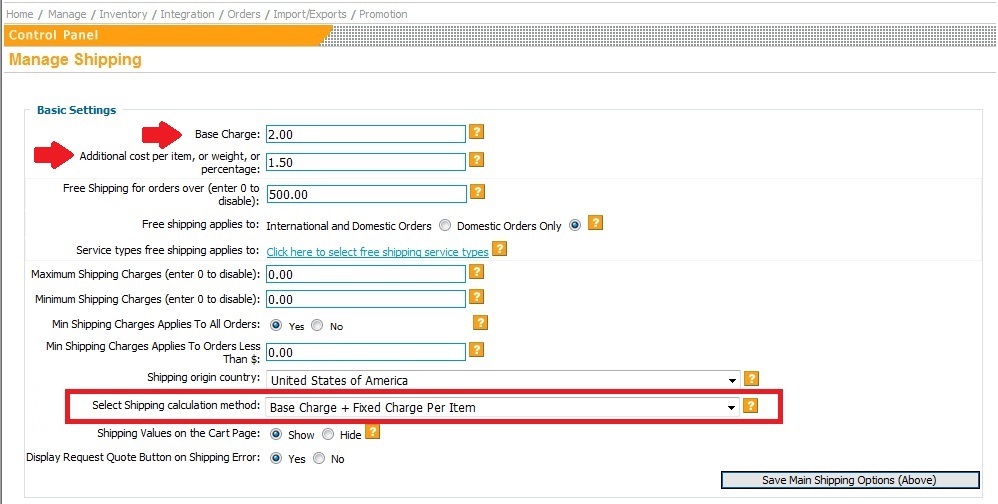 ‘Base Charge + Fixed Charge Per Item’ The shipping cost will be equal to the base charge plus (addtional cost per field * number of items).
 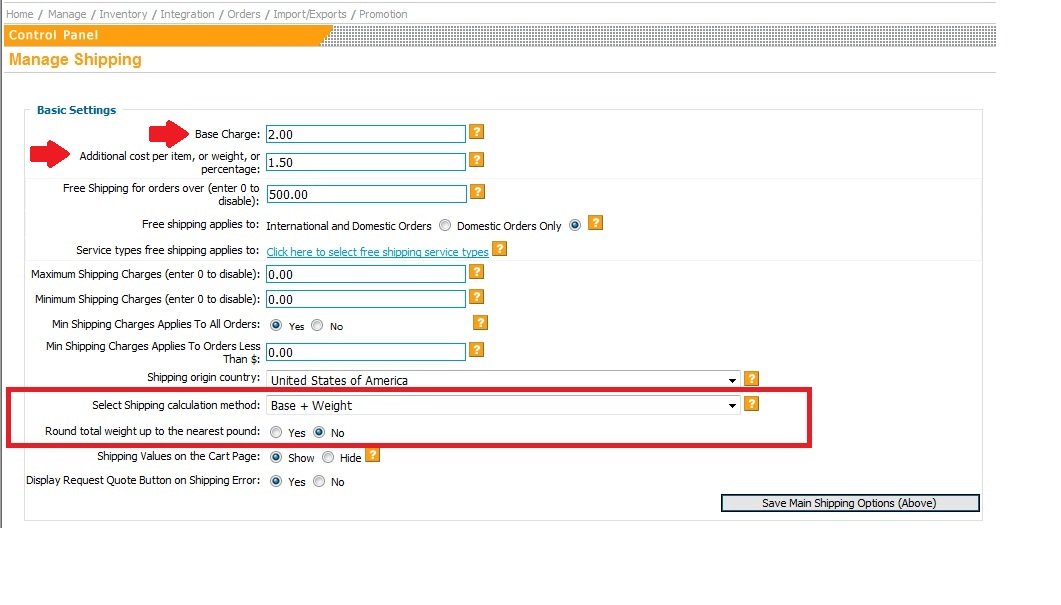 ‘Base Charge + Weight’ The shipping cost will be equal to the base charge plus (addtional cost per field * total weight).
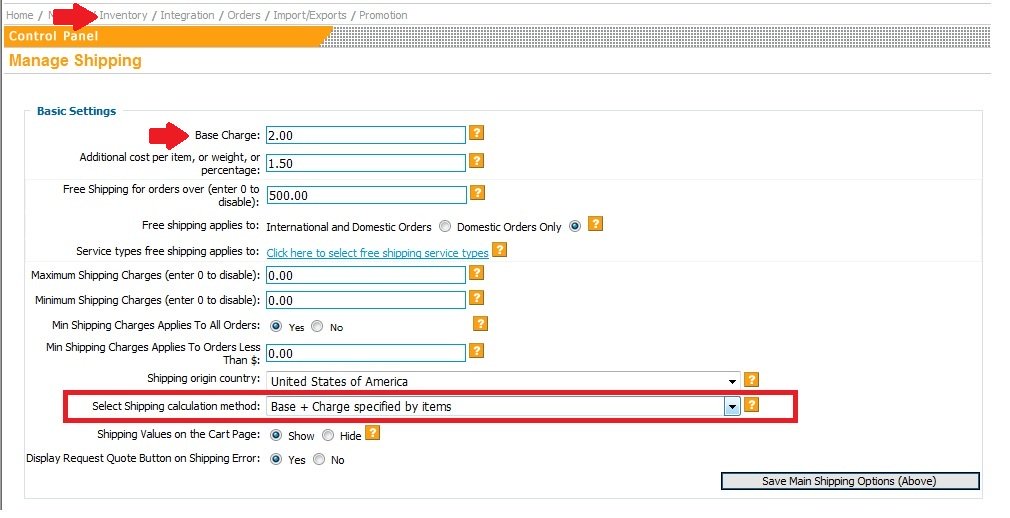 ‘Base + Charge specified by items’ The shipping cost will be equal to the base charge plus individual item shipping costs.
 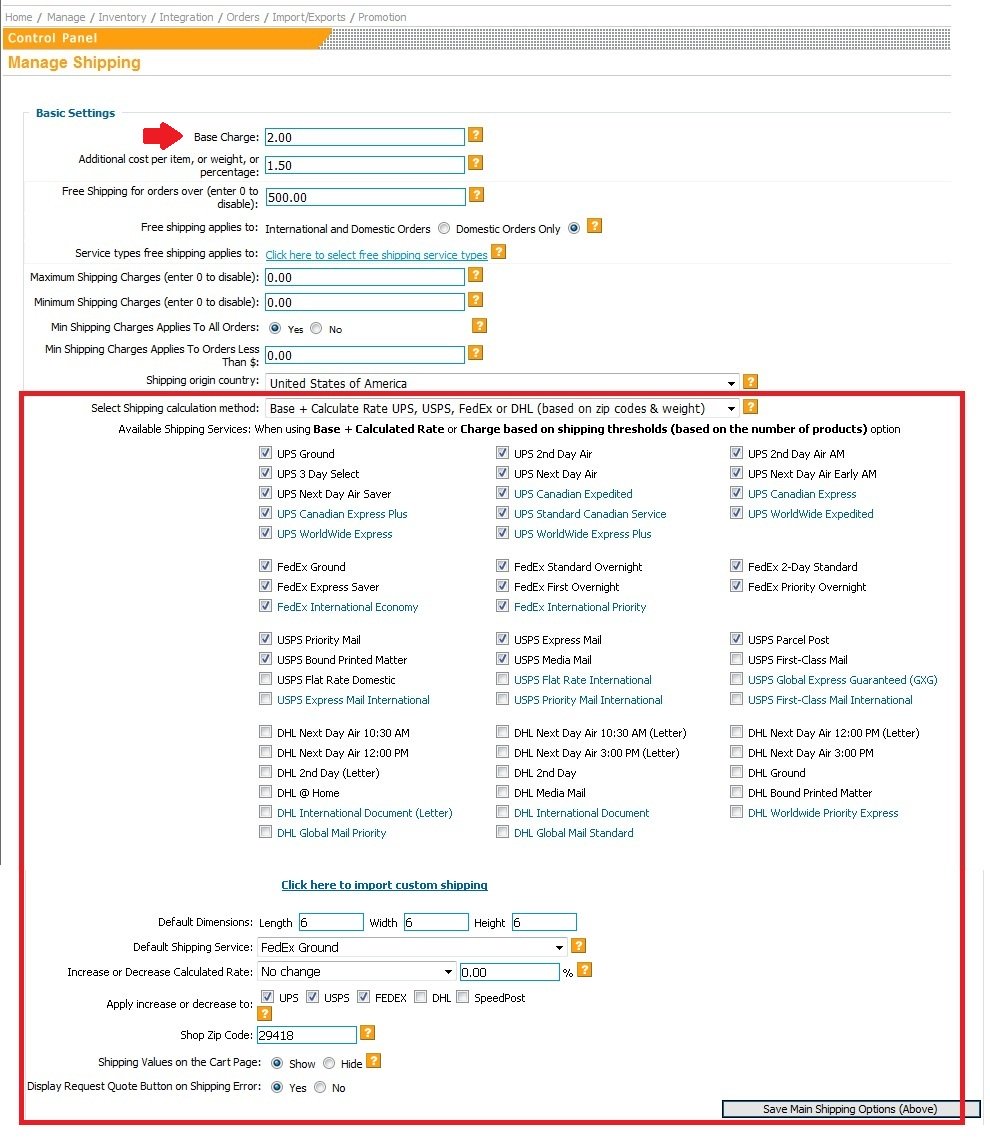 ‘Base + Calculate Rate’ The shipping cost will be the base charge plus the actual shipping cost as calculated by UPS/FedEx/USPS/DHL. The calculated cost returned by UPS/FedEx/USPS/DHL is based on the item weight, the item dimensions, the zip code the package is being sent from, and the destination zip code. For UPS API: max weight = 150 lbs, packaging = CP and drop-off/pickup method = RDP “Default Shipping Service” This options selects the shipping service that will be preselected and be the first shipping option on the checkout page. This selection only applies when the “Base + Calculate Rate” shipping method is selected above. Generally you will want to select a ground option as the default selection: e.g. UPS ground, FedEx ground, Priority Mail.
 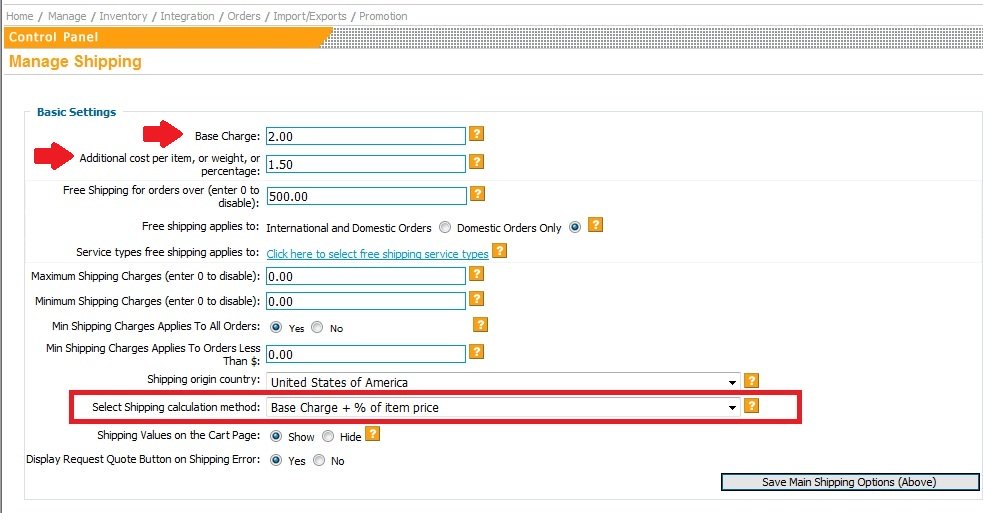 ‘Base Charge + % of Item price’ The shipping cost will be equal to the base charge plus a percentage of the item price. Eg: On a $10 item if the rate were 19% the shipping cost would be $1.90
 Shipping threshold based on total cost: You may wish to charge a flat rate for orders between certain purchase amounts, like $5 shipping for orders between $0 and $50 dollars and $7.50 shipping for orders between $50.01 and $100. You can accomplish this using the ‘Shipping Thresholds’ shipping method. Simply click on the ‘Edit Thresholds’ button and a new window will pop-up. You would enter the Starting and Ending Purchase amounts and the Shipping Charge, then click Update.
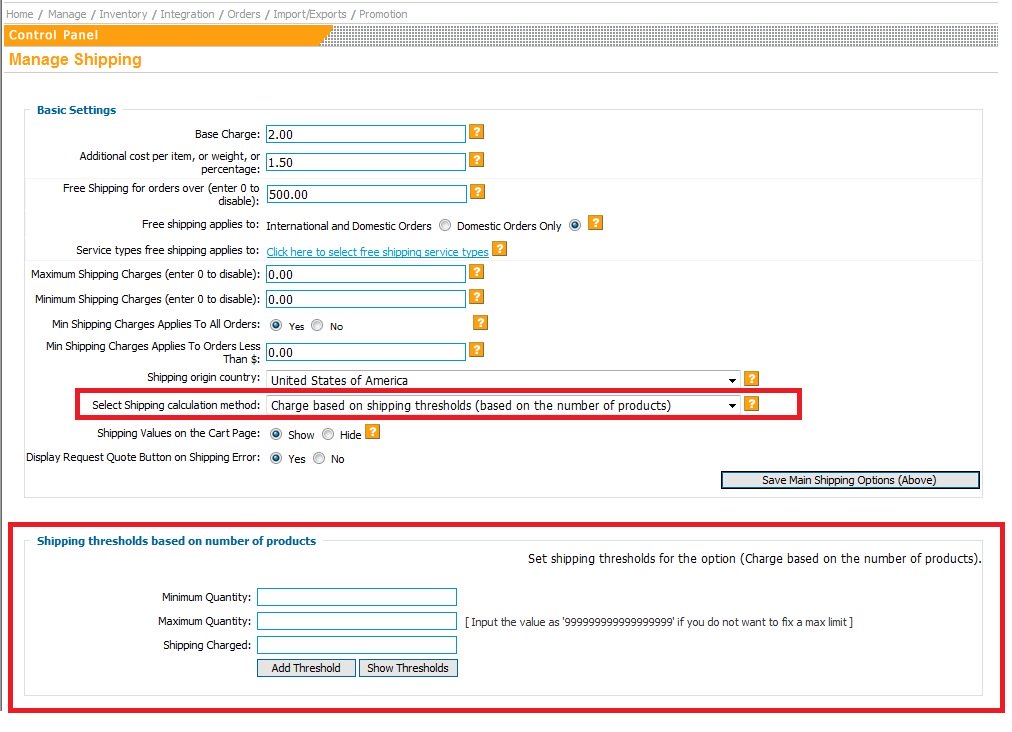 Shipping threshold based on number of products: You may wish to charge a flat rate for orders between certain quantities of products, like $5 shipping for orders with quantities between 1 and 10 and $7.50 shipping for orders with quantities between 10 and 20. To use this setting, look for ‘Shipping threshold based on number of products in blue. You would enter the Starting and Ending quantity amounts and the Shipping Charge, then click Update.
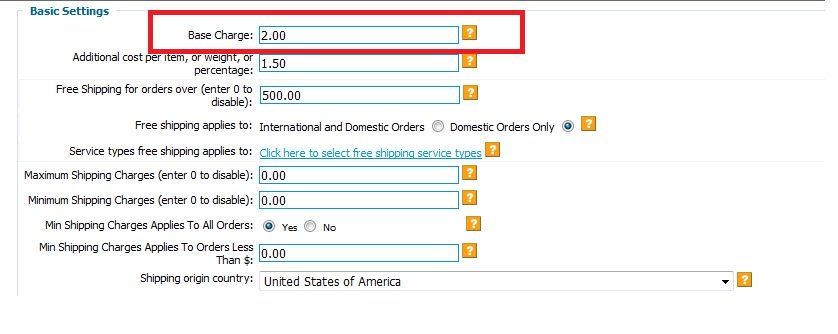 “Base Charge” The base charge is the amount that is added to each shipping calculation. Normally this is the handling or packaging charge. For example if you select the “Base + Calculate Rate” option below, then the shopping cart will start with the Base Charge and then add the actual calculated rate to that base charge. The base charge applies to all the “Base +” shipping method selections.
 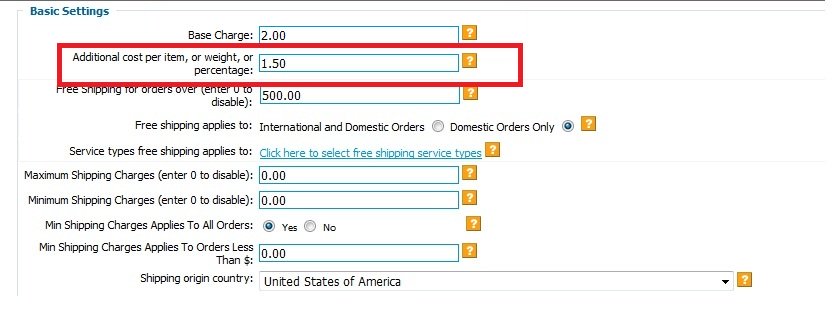 “Additional cost per item weight or percentage” The “Additional Cost” field only applies if you are using the “Per item”, “Base + %”, or “Base + Weight” options as your shipping calculation type. If you select “Per item” then the “Additional cost” value will add the amount specified times the number of items. For example, if you have a Base charge of 5 and an “Additional cost” of 1, and a customer orders 10 items, then their total shipping cost will be $15 If you select “Base + %” then the “Additional cost” value will add the percentage specified times the total dollar amount. For example, if you have a Base charge of 5 and an “Additional cost” of 10, and a customer orders $200 worh of items, then their total shipping cost would be $25 If you select “Base + Weight” then the “Additional cost” value will add the amount specified times the total weight of all items. For example, if you have a Base charge of 5 and an “Additional cost” of 1, and a customer orders items that weight a total of 50 pounds, then their total shipping cost would be $55 ($5 for the base and $50 for the 50 pounds of weight times the $1).
 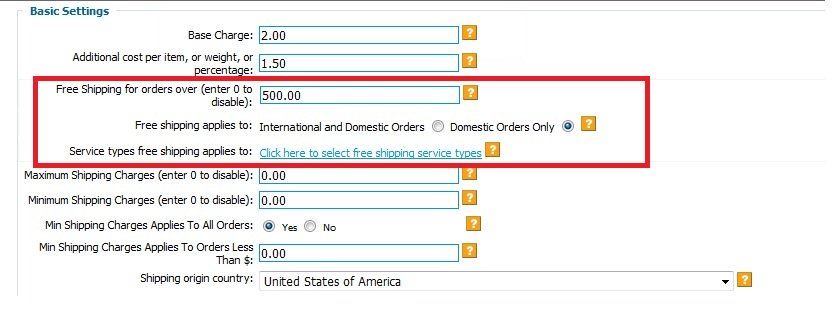 “Free shipping value” One way to encourage your buyers to buy more is to offer them free shipping if they order over xx amount of product. For example, if you set the free shipping value to $100 and a shopper orders $50 then they will still need to pay for shipping. But, if they order $100 worth or product then they would not have to pay for shipping. They would get free shipping if they choose one of the approved shipping methods; normally you will not want to enable options like Next Day Air as free options. YOu can read more about this by clicking the following 2 help icons. “Free shipping applies to” Generally you will not want to enable free shipping for international orders as the cost for shipping tends to be much higher. The normal option would be to select “Domestic Orders Only”. So if the free shipping amount is met then the customer will have to meet this criteria also in order to get free shipping. “Select free shipping service types” Generally you will only want to enable the ground options for free shipping. For example you might enable UPS ground, FedEx ground, and Priority mail, but you would probably not want to enable and Next Day Air type options since the cost to ship it might remove the profit from the order.
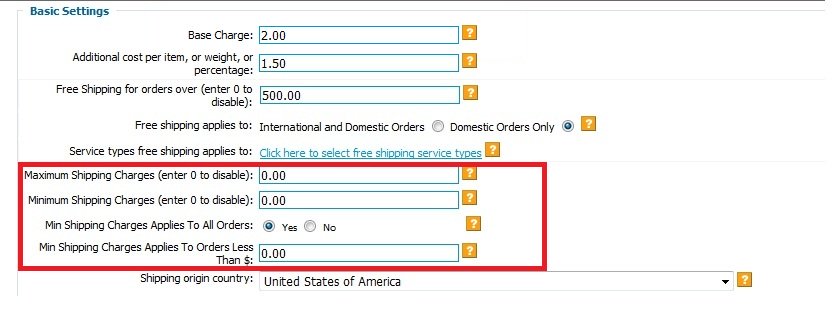 “Maximum shipping charges” The Maximum shipping charges field is another way that you can reward customers for placing high dollar amount orders. For example, a shopper might pay $50 dollars in shipping on a $500 order. If you had the maximum set at $50 and they ordered $1000 worth of product, then they would still only pay the $50 for shipping, where the shipping amount would normally be more. If you enter 0 in this field, then there is no maximum. “Minimum shipping charges” You would use the minimum shipping charges option to make sure that no order is changed less than a certian amount in shipping. For example, if you never wanted to charge less than $5 for shipping you could set the minimum shipping charge to $5. Then if the total shipping on an order came to $3.99 the shop would automatically increase it to $5. “Min Shipping Applies to all orders” This option is used to modify the free shipping option above. You would use this option if you wanted to have a minimum shipping charge applied unless they ordered more than xx of your product. If you select “Min Shipping Applies to all orders” to No, then you would want to fill in the “Applies to orders less than” amount below. “Min shipping charges applies to orders less than” Use this value in conjunction with the 2 options above to only apply the minimum shipping to orders that are less than your specified amount.
  “Shipping origin country” The value for this field is only used to determine what an “international” order is. For example, for a store in New Zealand that is shipping an order to New Zealand the shipping is not considered international. This is used for Base + API calculations shipping type displays, and the “Alternative Shipping Options” “selection required” option.
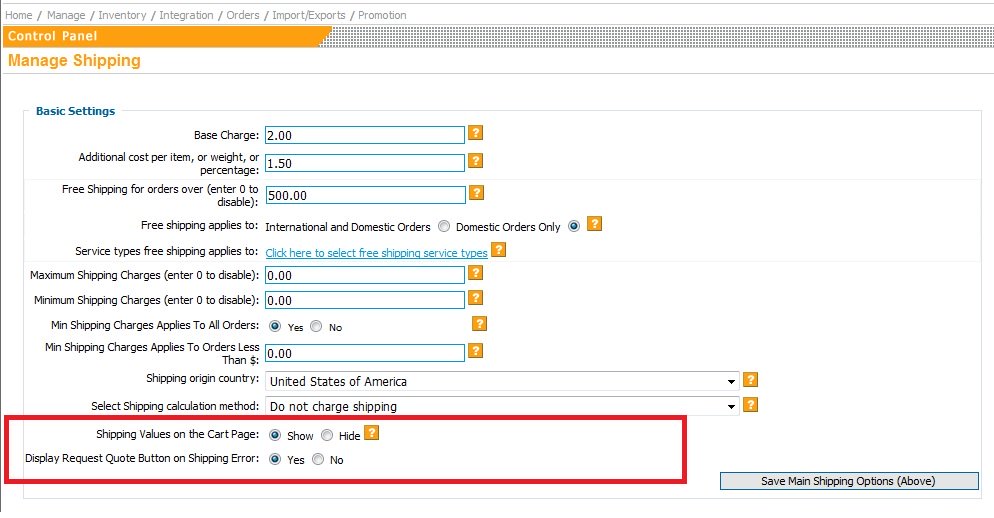 “Shipping Values On The Cart Page” With this option you can control whether the shipping values are displayed on the cart.php page. The cart.php page is the page that shows up after the “Add To Cart” button is clicked to buy one of your items. If you have this set to “Hide” then the shipping values will not show up on the cart.php page, but they will of course still show up on the final checkout page. This option applies to all shipping calculation methods except, the “Base + Calculate Rate”. When you are using the “Base + Calculate Rate” shipping method then the shipping rates will not show up on the cart.php page in any case; the reason for this is that when using that method the shopping cart needs the customers zip code in order to calculate the rate, and it does not have that until the shopper gives their address information on the next page. “Display Request Quote on Shipping Error” This option allows you the customer to request a shipping quote if there is an error for the customer in selecting a shipment option. Let’s say the customer is from outside the USA and the shopis set to allow USA orders only, the customer would be able to request a shipment quote if this option is set to ‘Yes.’
 (click here for larger image) Login Page When you go to the shop control panel, you will come to a Login Page that looks like the image to the right. You will need to enter the password in the box marked ‘Password’. Your password will be listed in your ‘Web Site Settings Email’ sent to you when you created your account. You will also see the ‘User Login’ button to the upper right. If you have multiple users set up in the shop, you can use this function. If not, you will not have to worry about it.
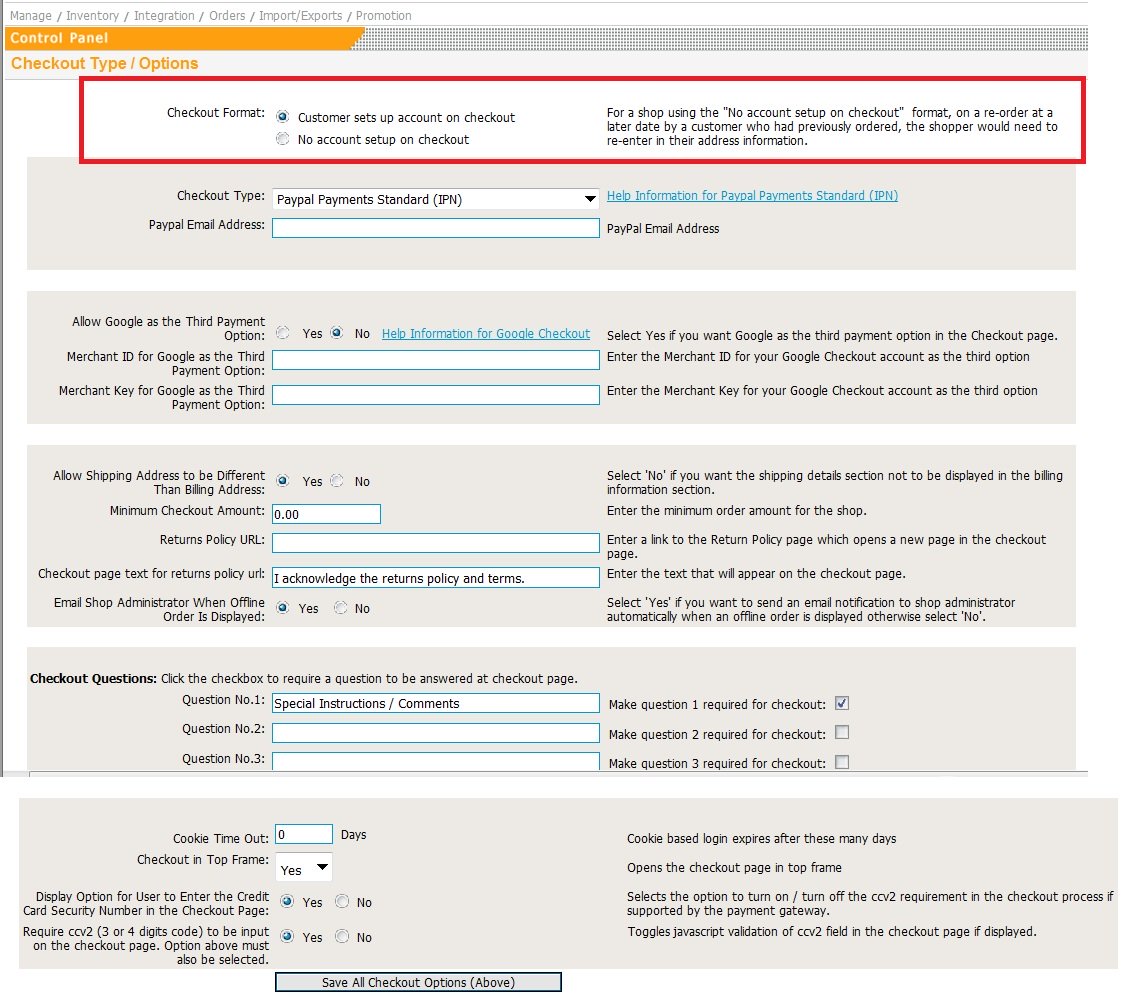 For a shop using the “No account setup on checkout” format, on a re-order at a later date by a customer who had previously ordered, the shopper would need to re-enter in their address information.
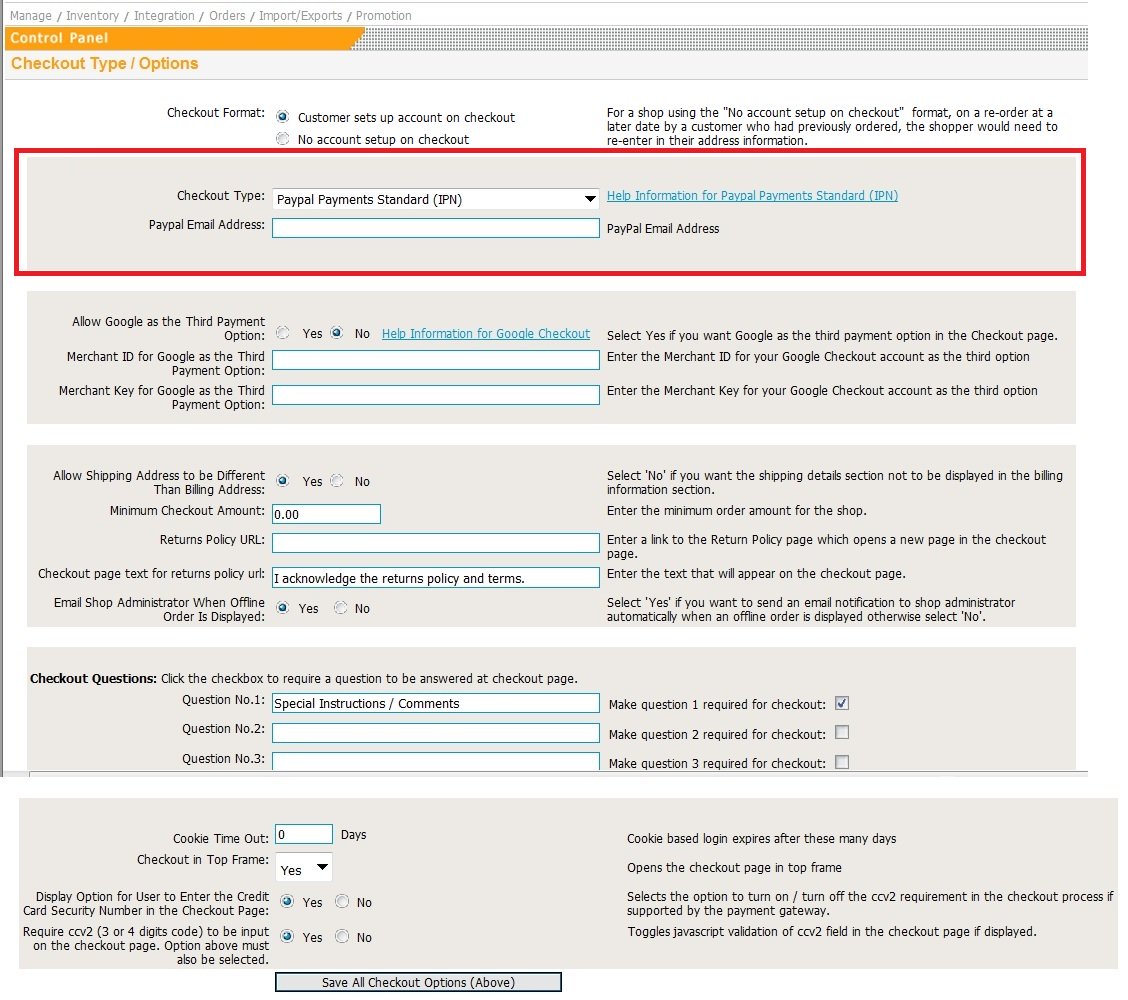 Checkout Type The Checkout Type field is very important as it determines the credit card merchant that you will be using. Once you have a credit card merchant that you have signed up with, select your merchant from the drop down menu, and then fill out the required fields. Which gateways will work with the Precision Web Shopping Cart System?
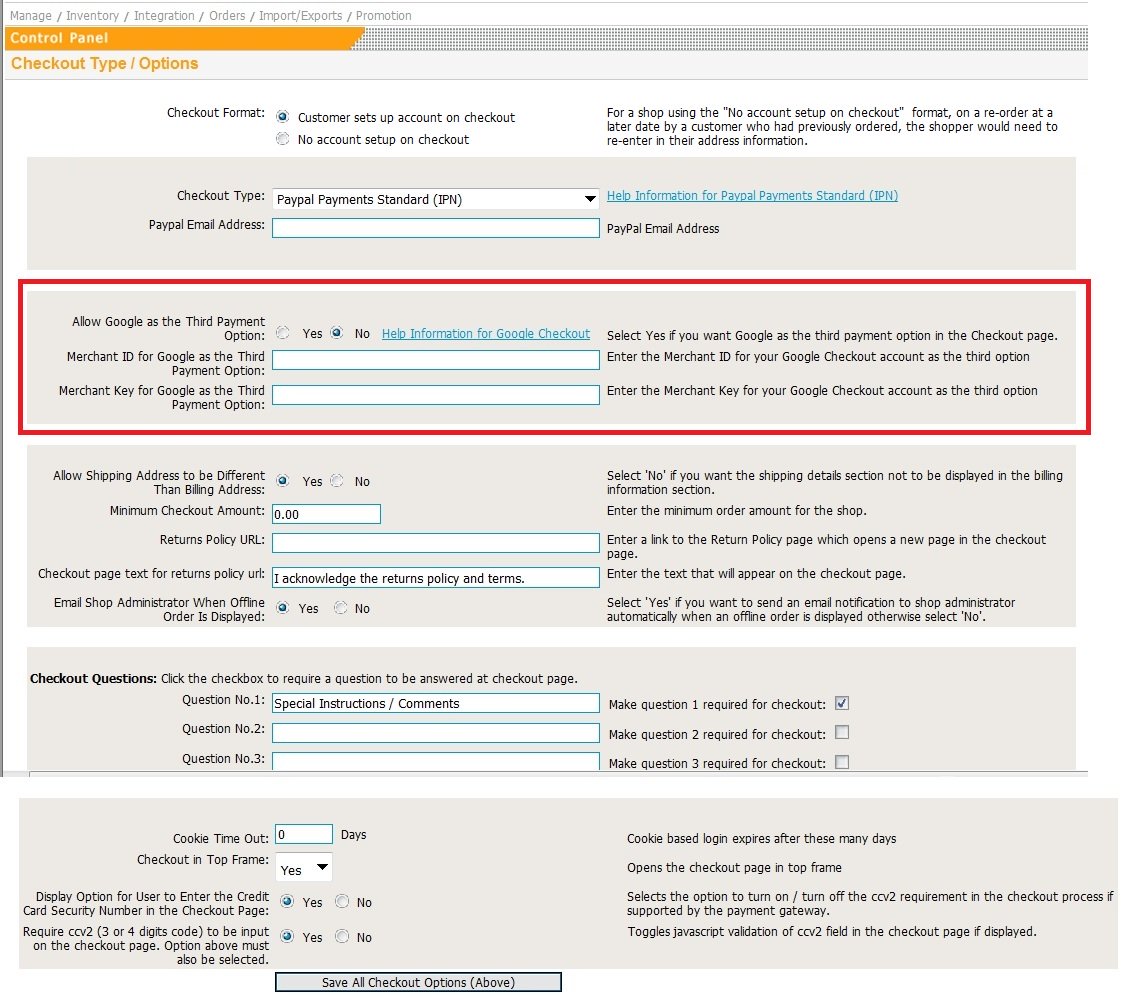 If Paypal is not your main gateway, you can use PayPal as a “Third Payment Option” If Google is not your main gateway, you can use Google Checkout as a “Third Payment Option” If you select ‘Yes’ for either of these options, you will need your Merchant ID and Merchant Key
 Miscellaneous Options: – allow the shipping address to be different then the billing addres – the minimum checkout amount (default is $1) – the web page for the Returns policy page – the text for acknowledging the Returns policy – whether to email the shop adminstrator or not when an offline order is displayed
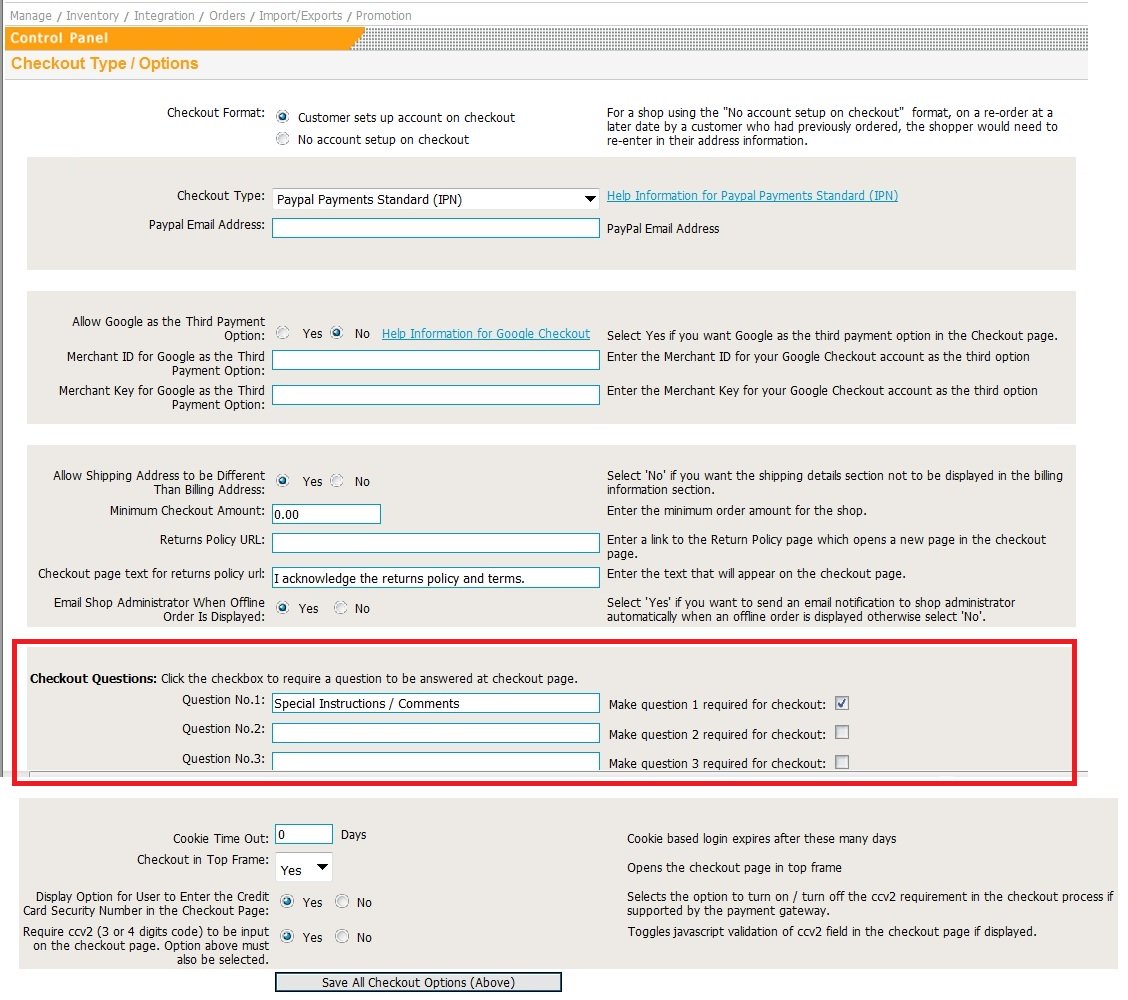 Checkout Questions: This is a good way to gain customer feedback. Click the checkbox to require a question to be answered at checkout page.
 Cookie Time Out Cookie based login expires after these many days. Checkout in Top Frame Opens the checkout page in top frame
 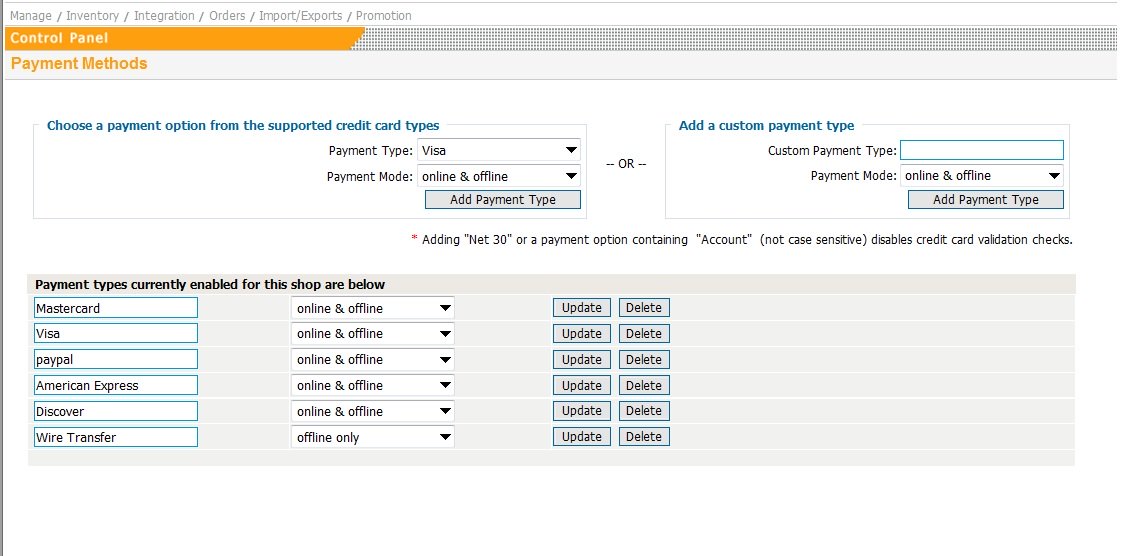 (click here for larger image) Choose a payment option from the suppoted credit card types Payment Type: You may wish to add common payment types. Choose any from the list and click on the ‘Add Payment Type’ Payment Mode:
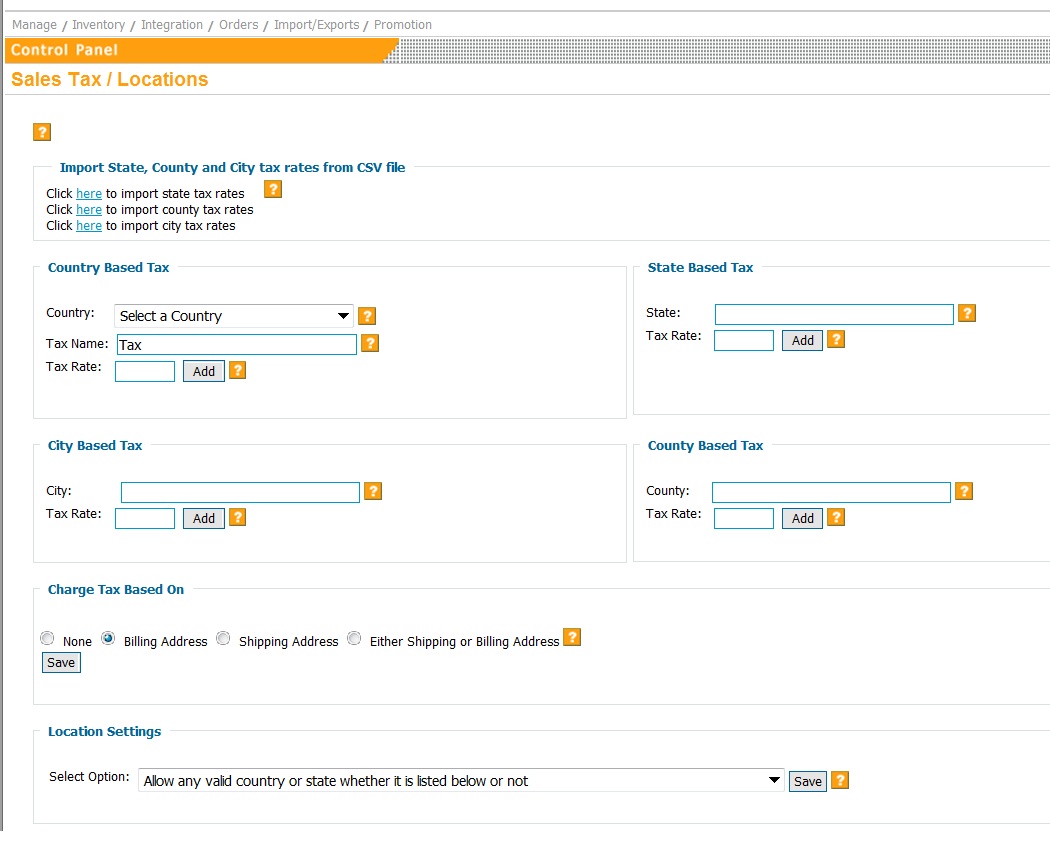 (click here for larger image) The sales tax rate used will be based on the information you input into the shopping cart system on this page. The shopping cart will then check the customer’s information for their City, County, State, and Country. The shopping cart will use the “lowest common denominator” for the sales tax rate meaning if the customer’s city matches a city put in below, it will use that tax rate for the customer’s order. If the customer’s city doesn’t not match a city put it below, then the shopping cart will use the county tax rate. If the customer’s county does not match put in below, then the shopping cart will use the state tax rate. If the customer’s state does not match a state below, then it will use the country tax rate. If you do not enter a sales tax rate for a City or County, the system will use the state tax rate. Example: Let’s say, United States has a 0% sales tax. California has a 8% sales tax. Californians in San Diego pay 9% (1% for the county) Californians in Vista pay 9.75% (.75% for the city) You would enter: Country Based Tax (USA) Leave blank State Based Tax State: California Tax Rate: 8% County Based Tax County: San Diego Tax Rate: 9% (note — this will add an option for a customer to choose their county on the billing page) City Based Tax City: Vista Tax Rate: 9.75% Based on this information input into the system: If a customer from Vista, CA orders they would pay 9.75% for sales tax. If a customer from San Diego, CA orders they would pay 9% for sales tax. If a customer from Sacramento, CA orders they would pay 8% sales tax. If a customer from AZ orders they would pay 0% sales tax.
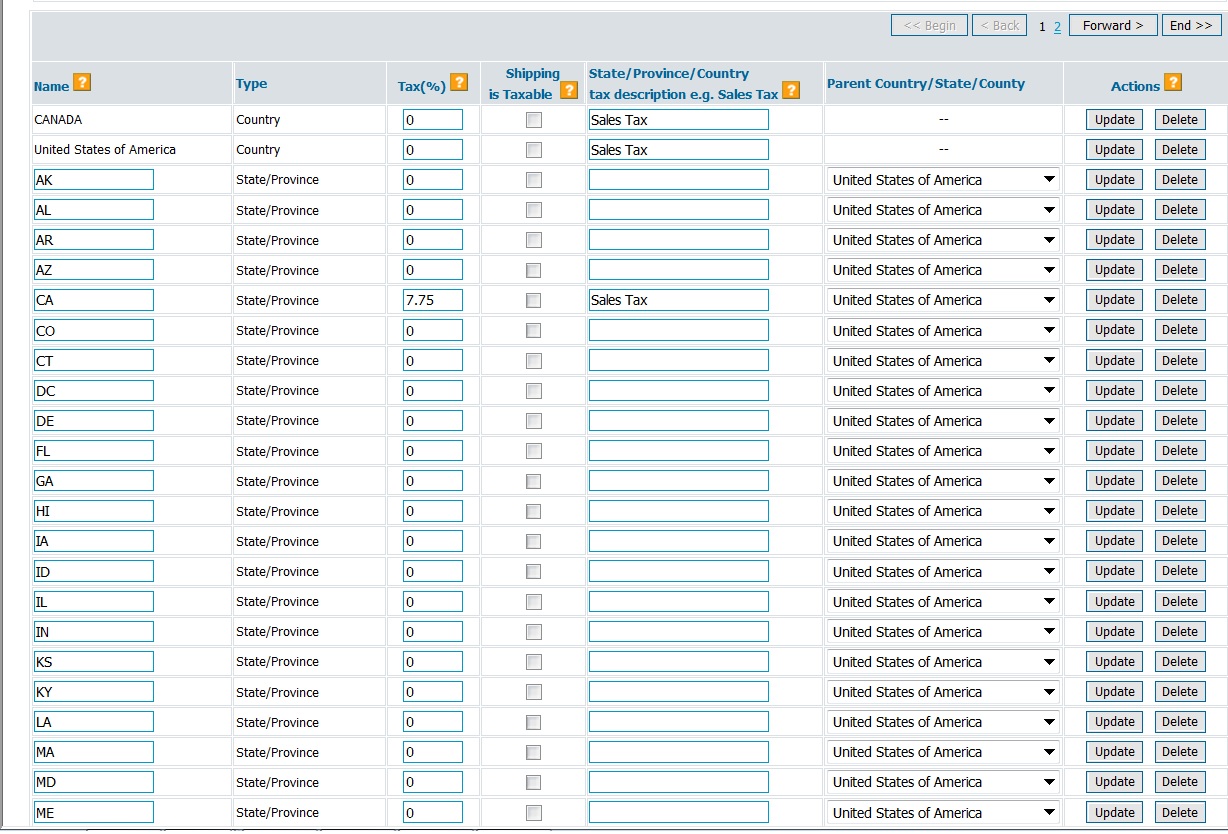


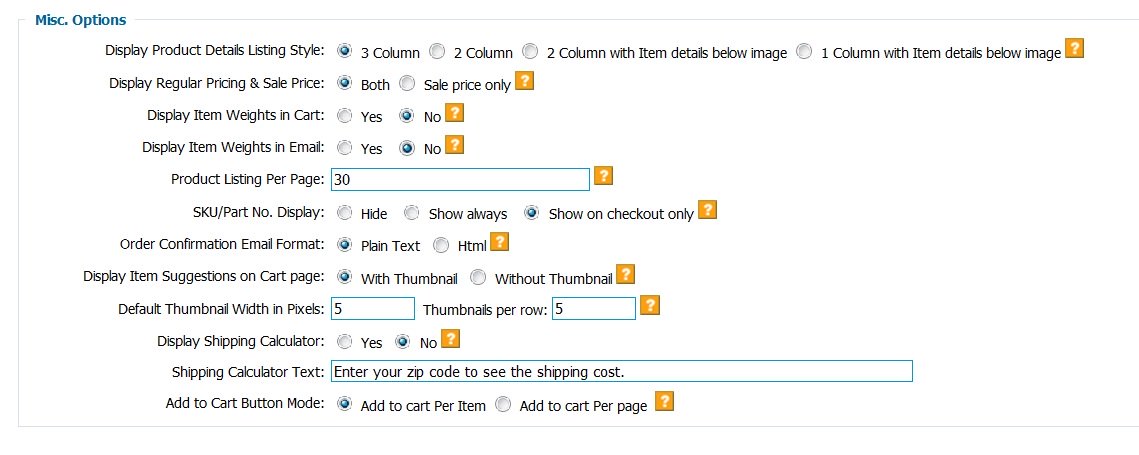
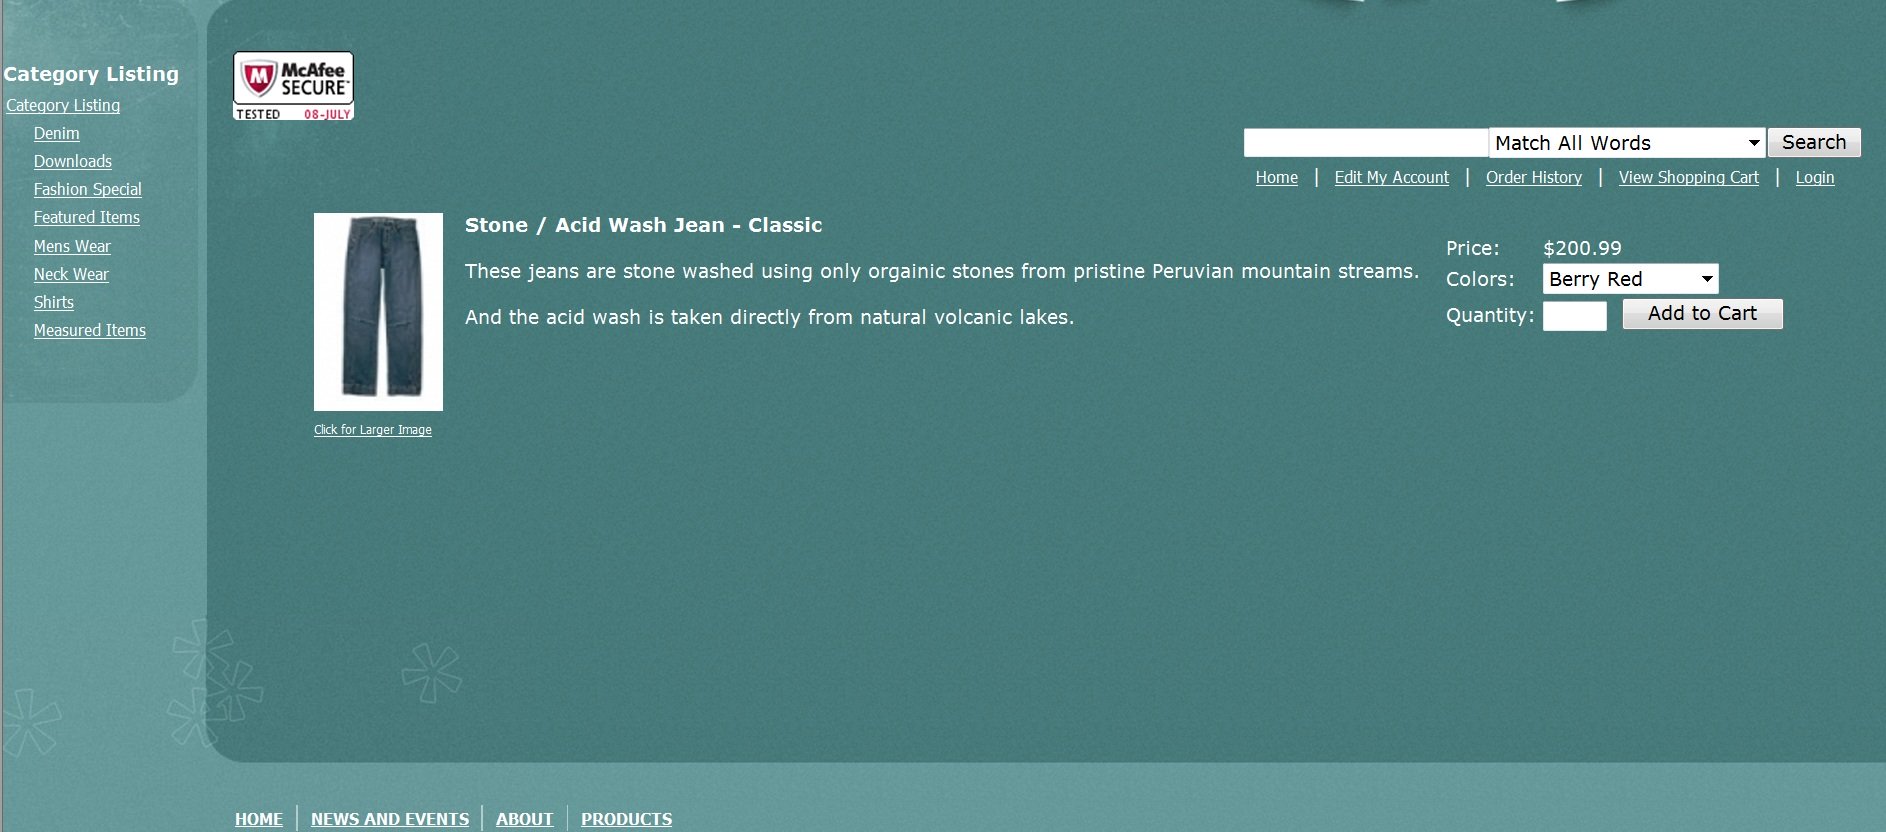
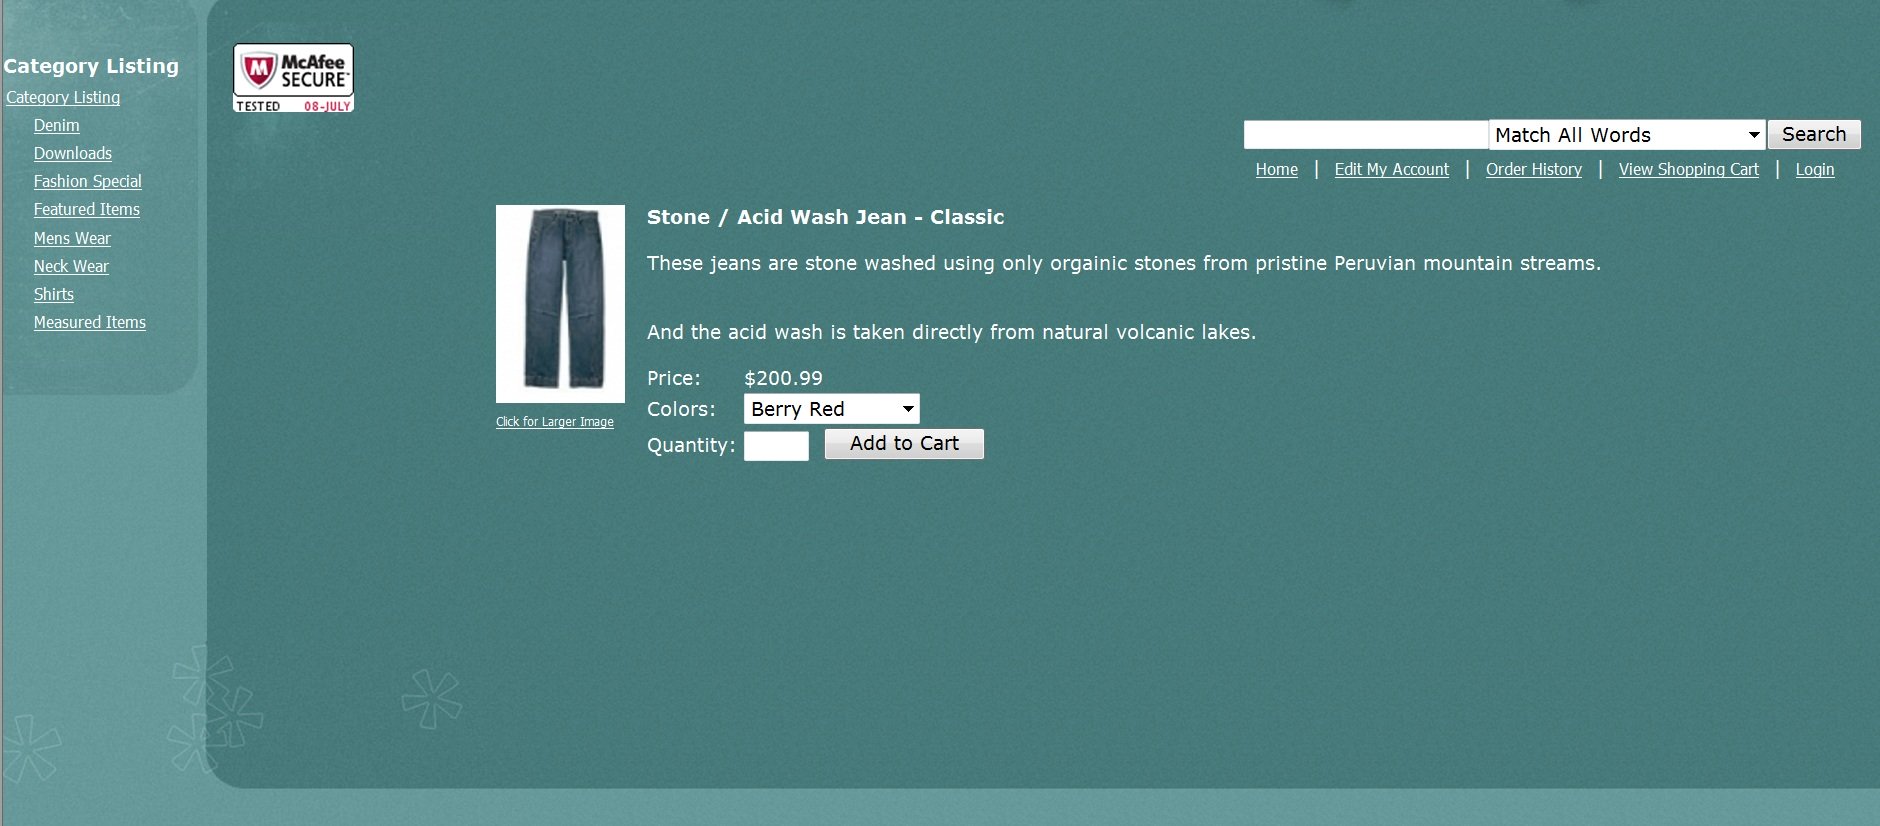

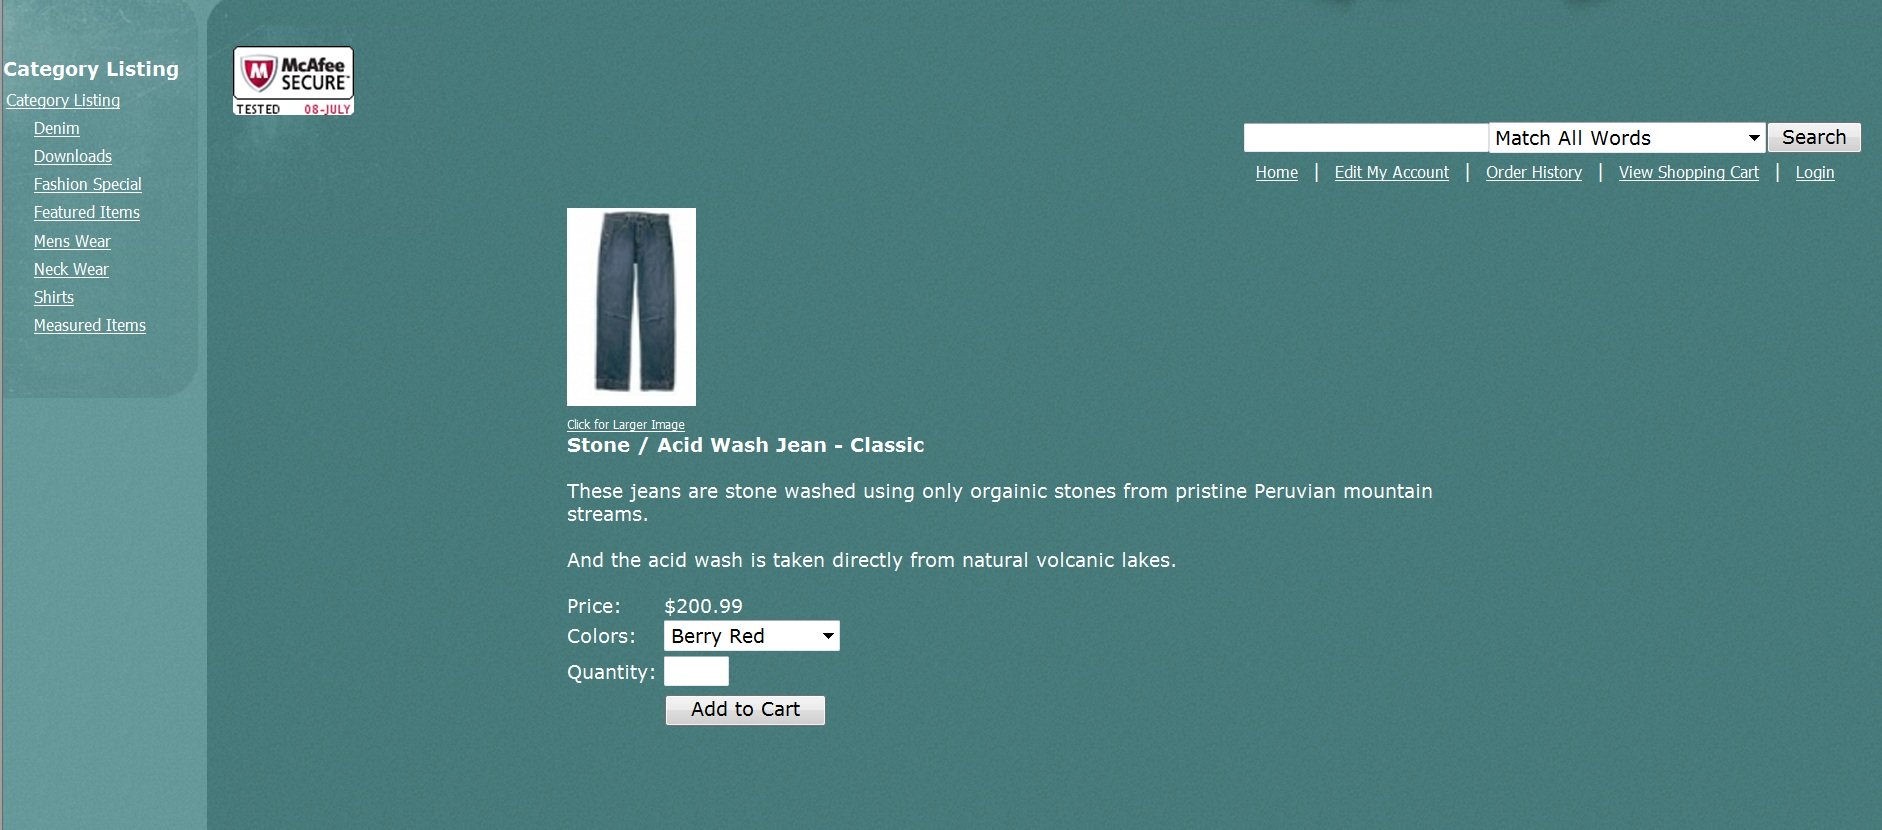
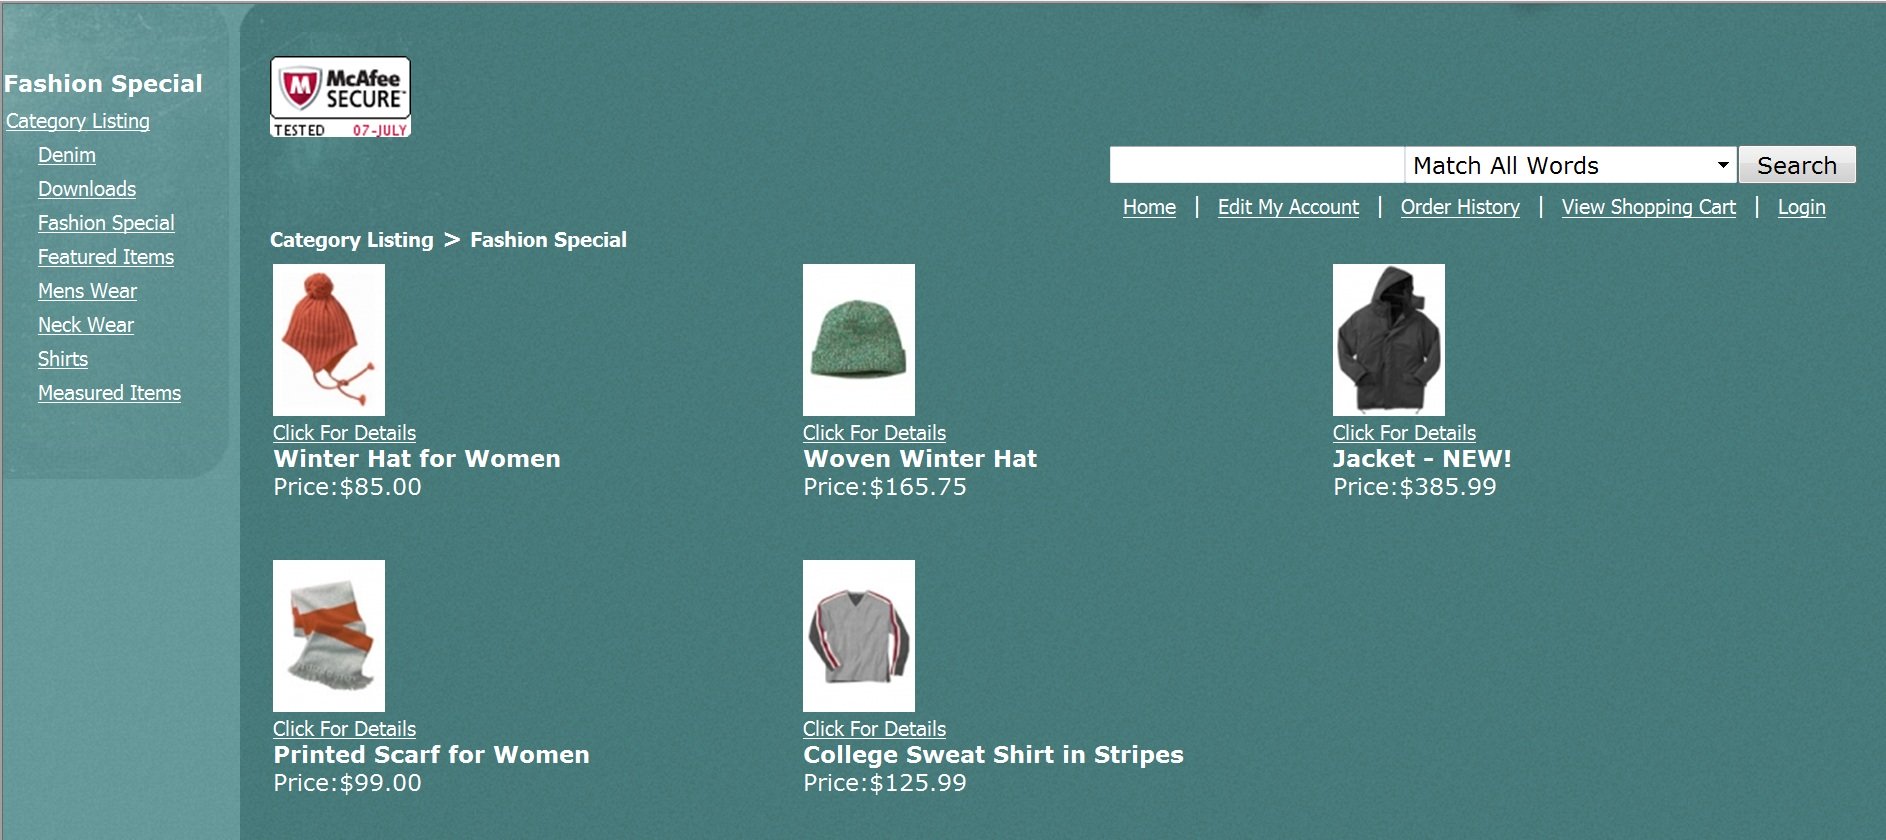
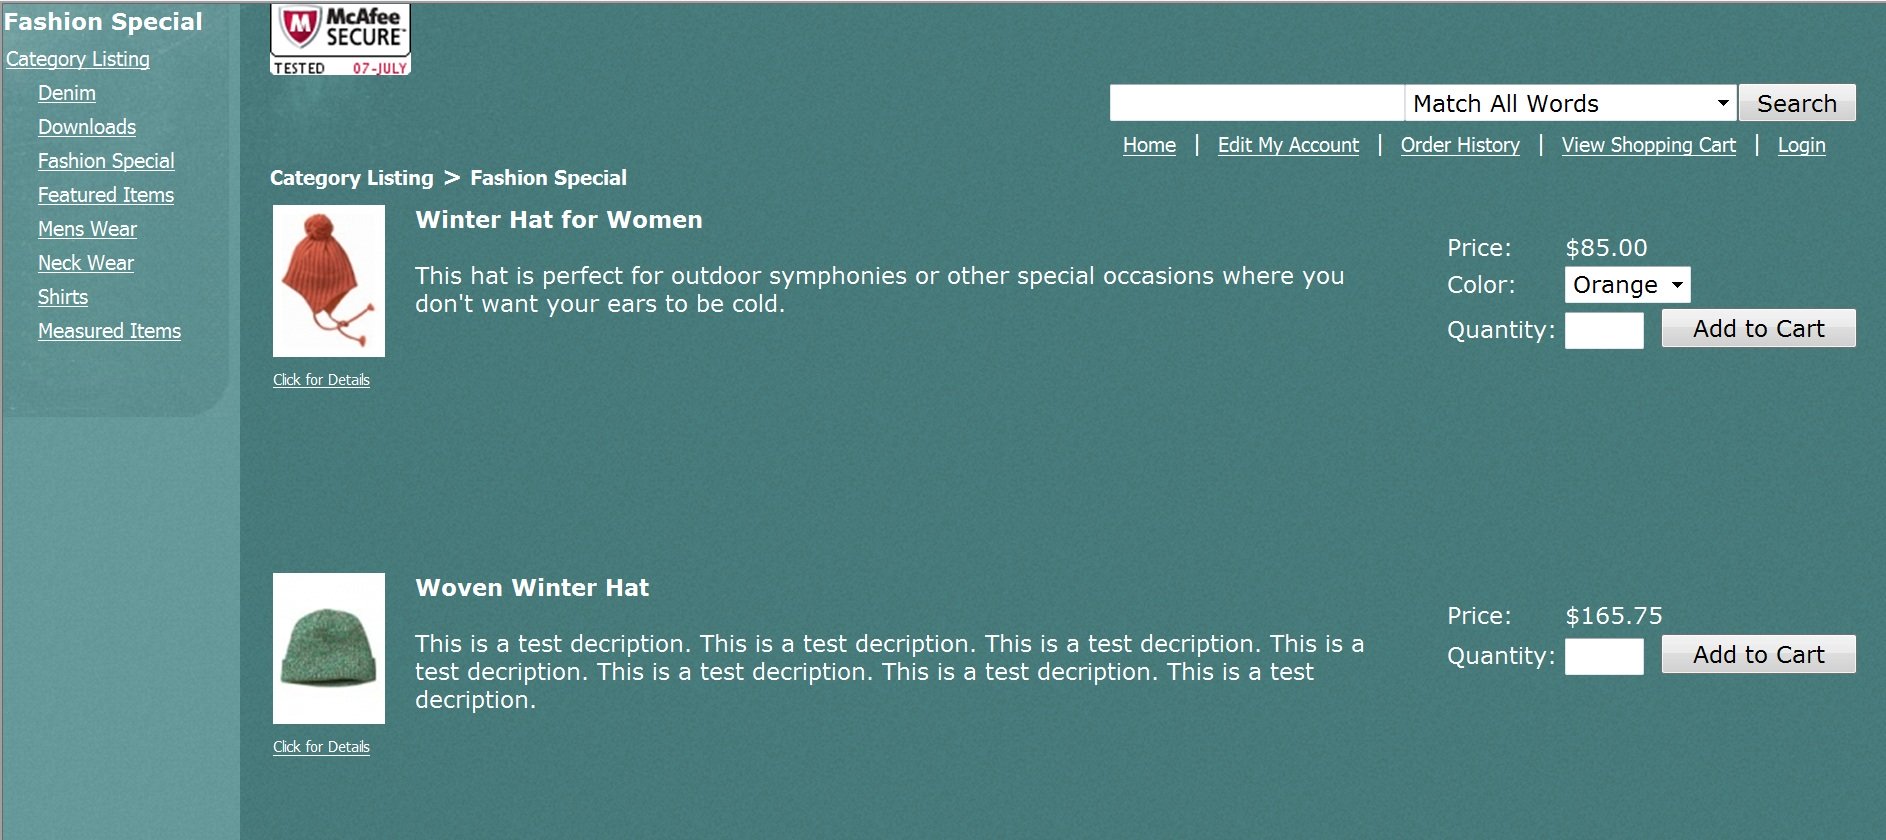
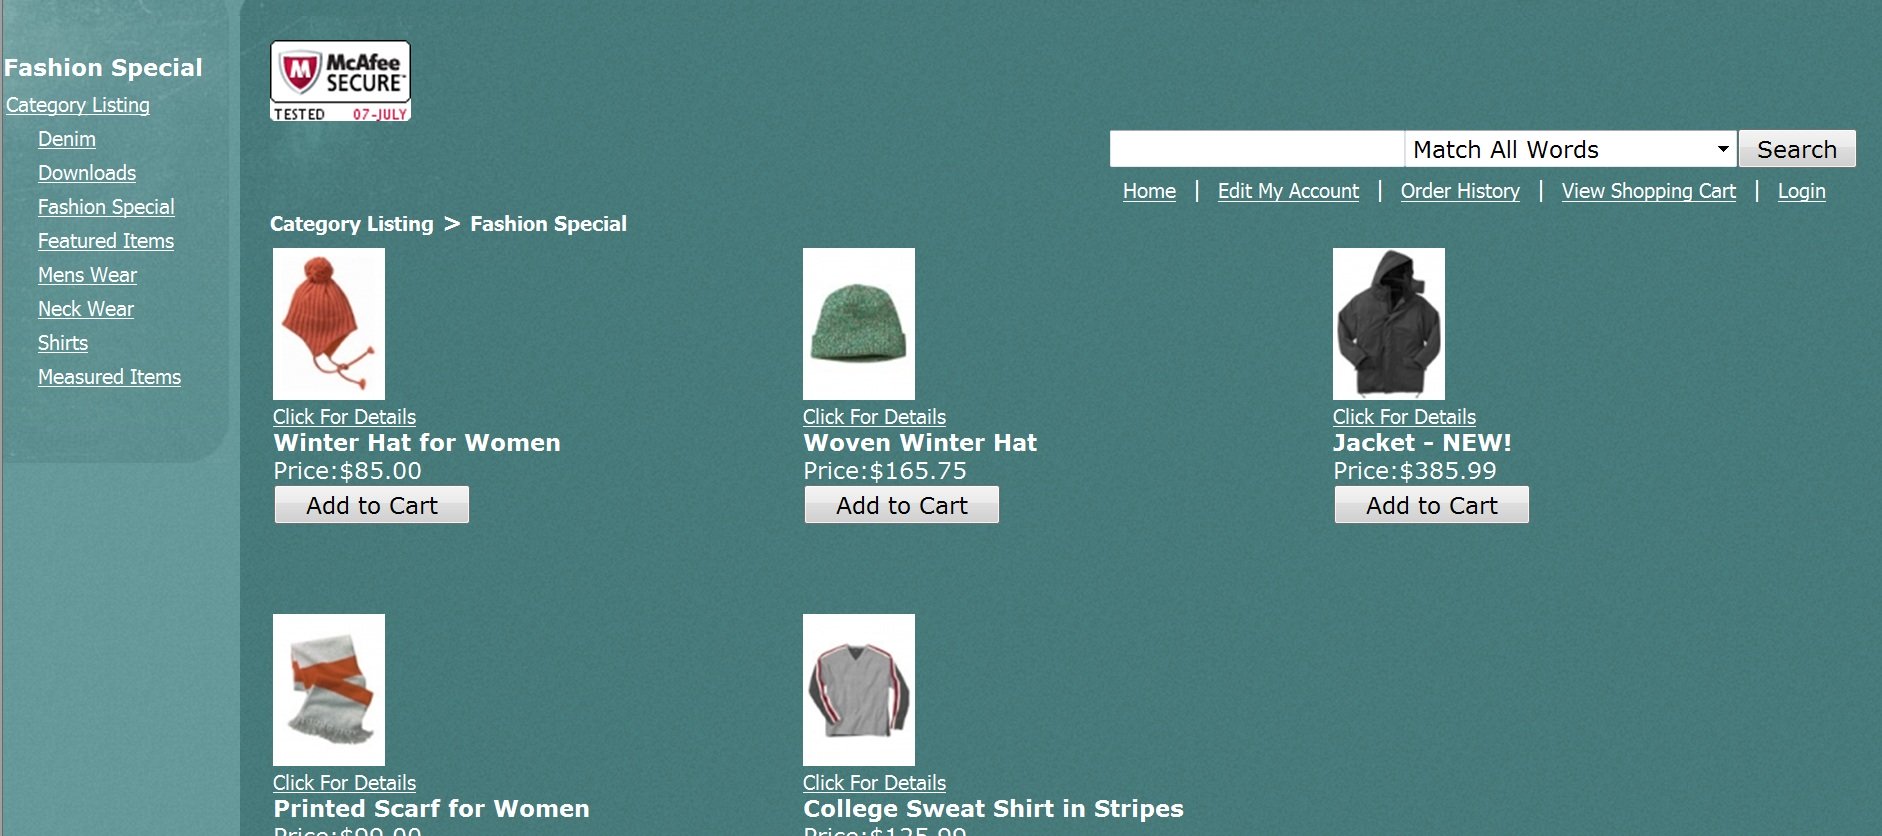
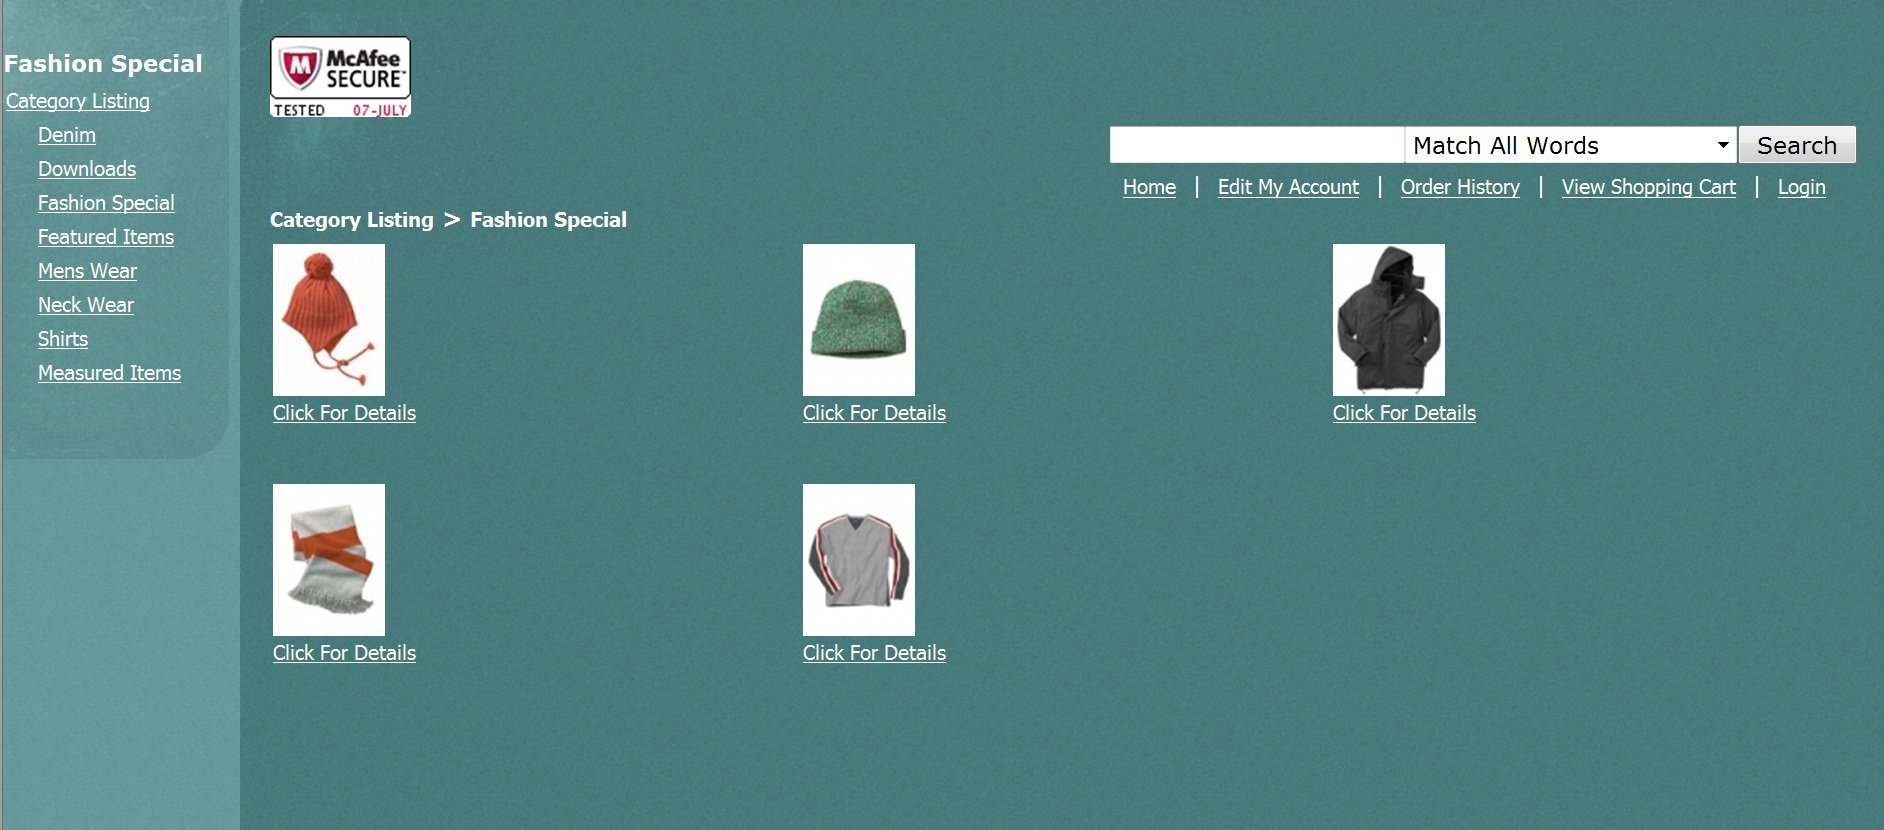
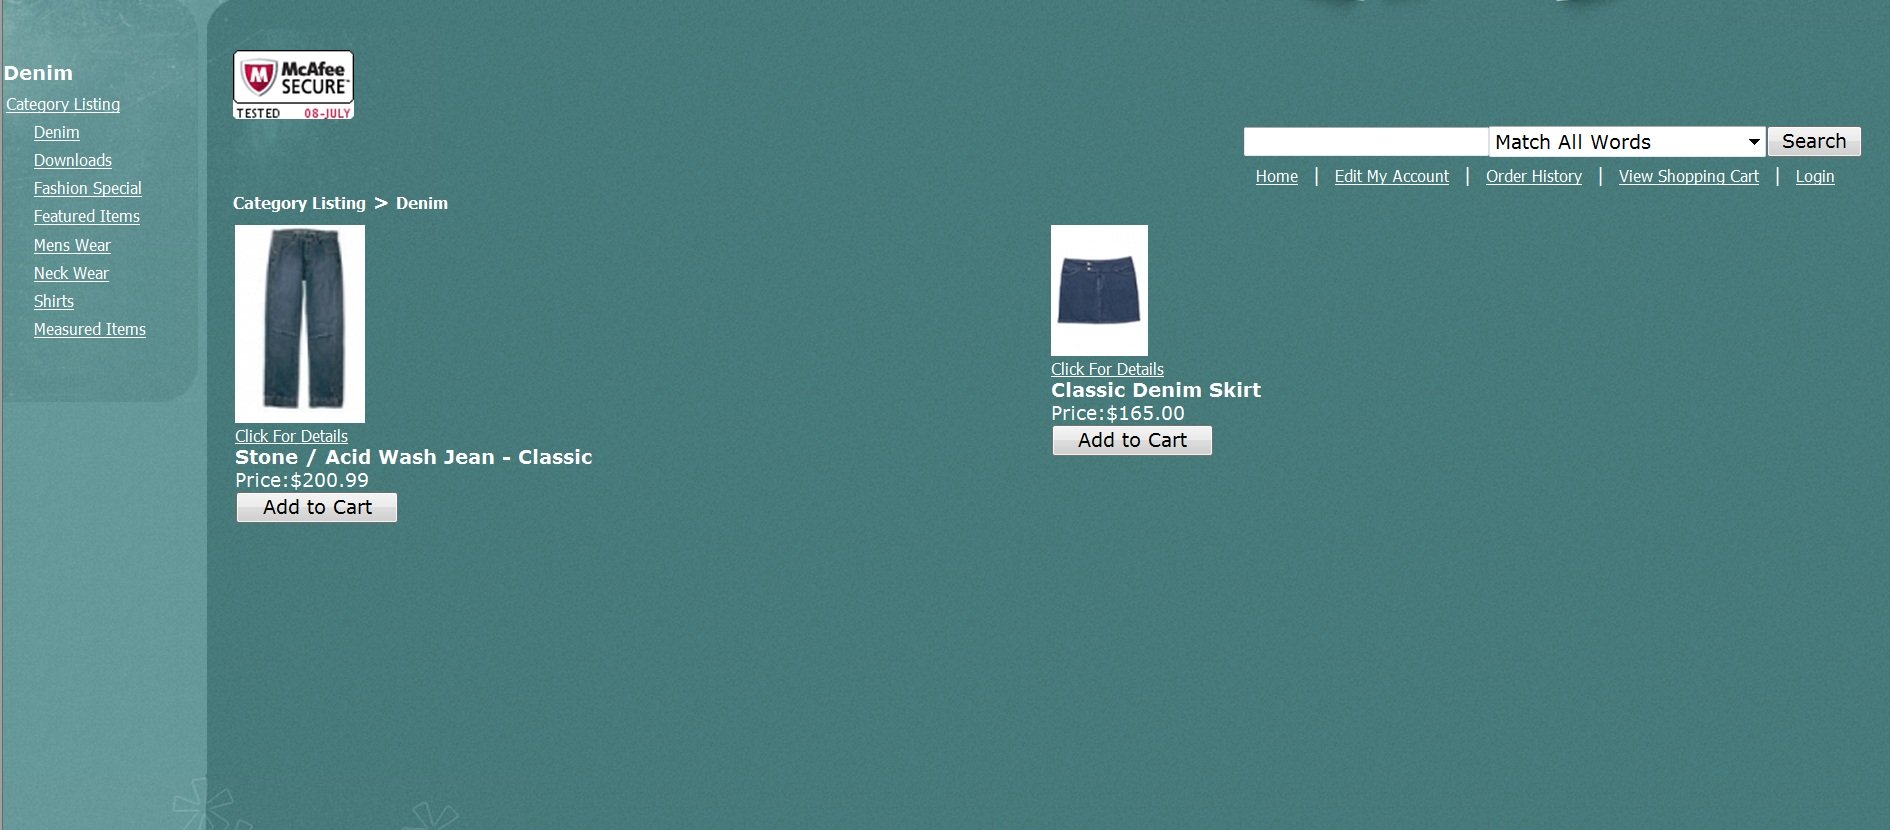

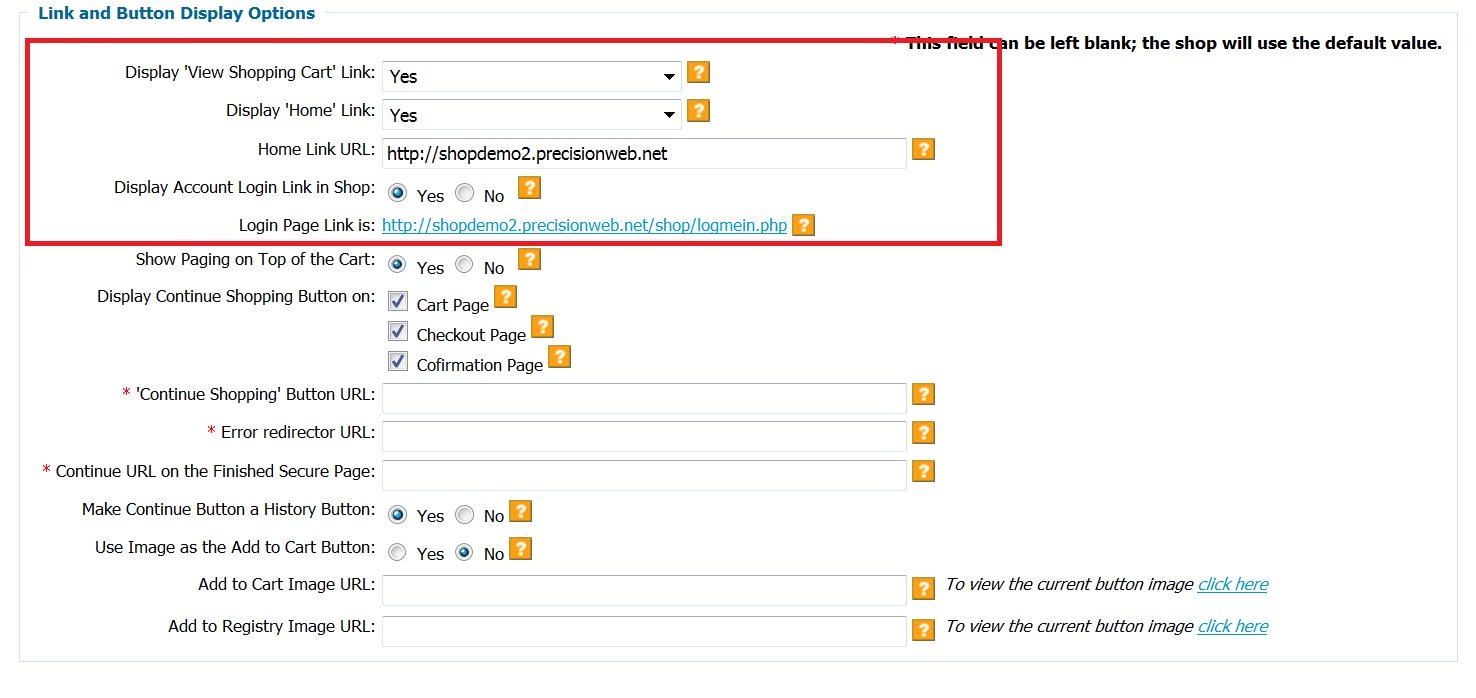


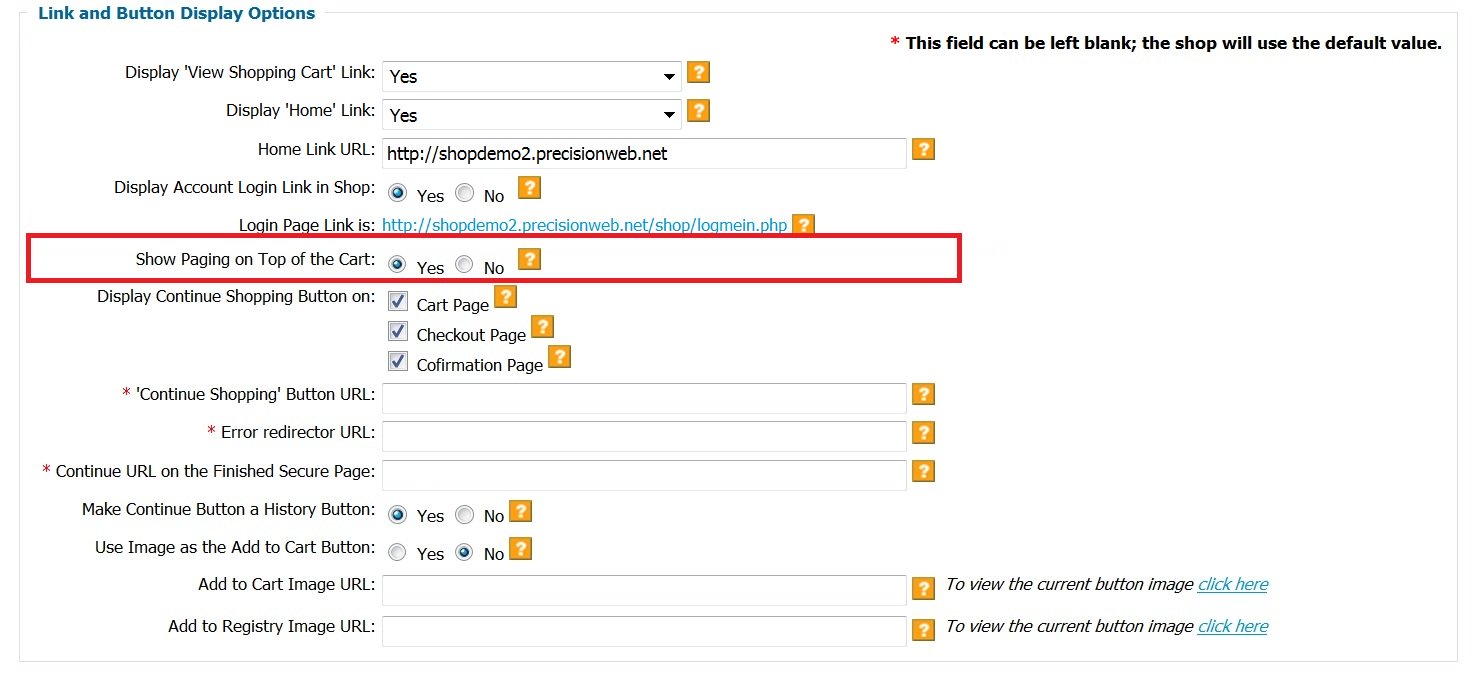
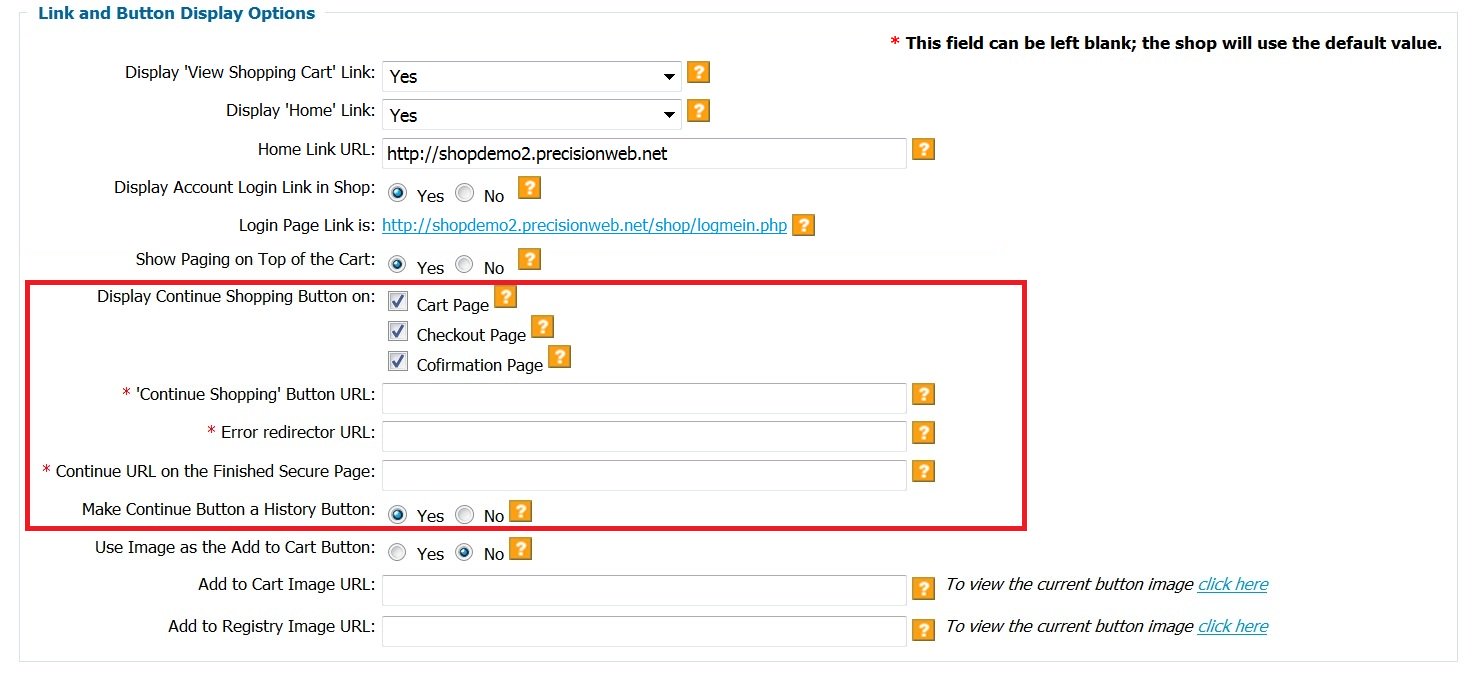


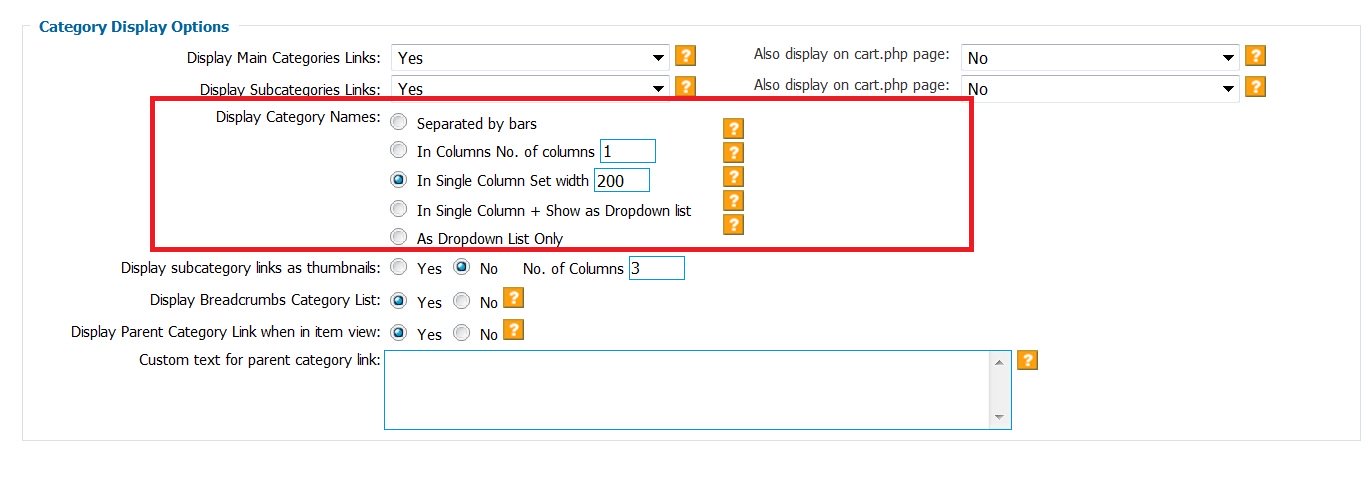


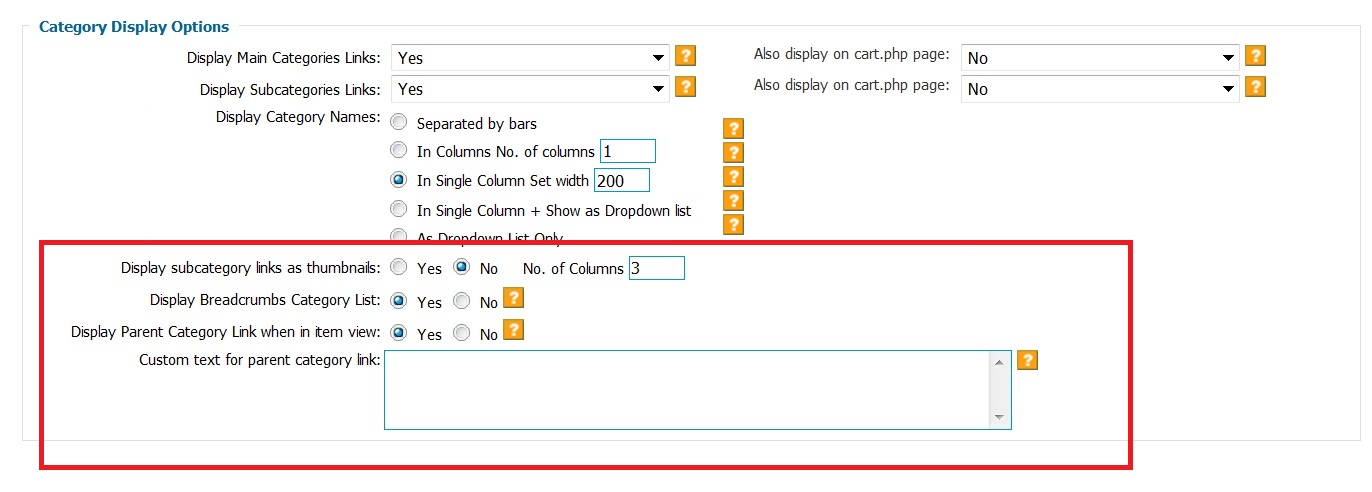
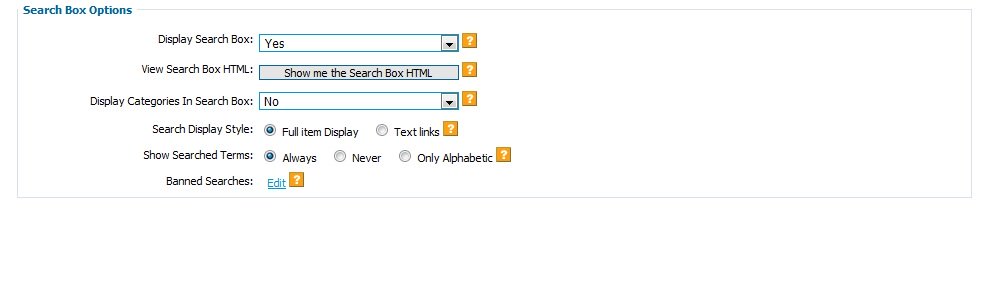
 If you choose to enter a customer HTML footer, the page may look something like this:
  The information in the ‘Custom HTML Footer’ will appear on your shop pages and the Contact information above it will not.