Blog

Archive for shopmanual

Edit Category HTML


Navigation:
Manage > Categories > Edit Category HTML/TITLE > Proceed to Edit Category for
Selected Category
or
Inventory > Manage Categories >Edit Category
HTML/TITLE > Proceed to Edit Category for Selected Category


Edit
Category HTML / Title

This section allows you to edit
the HTML for categories.  This gives you the ability to give a custom look to
each category page in the shopping cart.  This is a good way to go if you are
using the /shop pages and categories as a way for your customers to browse
(instead of using your own web pages as browsing pages.)  You can add HTML from
web design software, or you can use the editor provided.


Edit
Category html

Category HTML is the HTML that is shown above the items in a particular
category.


You can enter the HTML in the

WYSIWYG editor, or you can enter your own custom HTML. 

For example, if I entered in "Our shirts our made of the highest quality
cotton…. etc.", it would like something like the second picture in the shop.


Category
Image
The category image is the image that is used for category
thumbnails.  What are category thumbnails?  These are images that are used by
shoppers to click on to get to the category.  You can see an example of this in
the
Shop Demo

To enable Category Thumbnails navigate to Manange > General Settings >
Category Display options >
Display subcategory links as thumbnails

This should be set to "Yes".


Search
Engine Optimization
As you can see from this video, the title,
description, and keyword tags are automaticallly generated to help with search
engines. 

http://www.precisionwebhosting.com/seo-video.htm

If you would like to edit
these automatically generated titles for the category pages, you can do so here.

Enter Category title:
Modifies the auto generated title tag.

Enter Category description:
Modifies the auto generated description tag.

Enter Category Keywords:

Modifies the auto generated keywords tag.

Posted in: category

Leave a Comment (0) →

Completed Orders Options


Completed Orders Options

Navigation:
Orders > Completed Orders Options


Truncate
Paid Credit Cards

This option allows you to truncate the credit card #
for your paid orders. This is a good option for people’s security.

The
first "Mark as completed" option allows you to enter
the total number of oldest orders you would like to be marked as completed.
Enter
a numeric value for the amount of OLDEST orders your would like the
cart to mark as completed. Oldest orders are orders placed on a date
furtherest away from current date.

A separte "Mark
as completed
" option is to enter a number of days or months that you
would not like to mark as complete. This allows you
to mark orders older
than a certain time period as complete.

Posted in: shopmanual

Leave a Comment (0) →

Create Thumbnails for Item Images

Create Thumbnail For All Items


Thumbnails are are reduced-size versions of your item
pictures.
This link allows you to create thumbnails for multiple items that
already have a main image or have been imported. 

The reason you would
use this is to have smaller images for customers to see when they are browsing
through products, and a larger image which they could view on the item page.


Create
Thumbnail Options

Choose the categories of products by checking the
box next to the category you would like to create thumbnails for.  Next,
click the  ‘Create Thumbnails’  button.

Posted in: setupinv

Leave a Comment (0) →

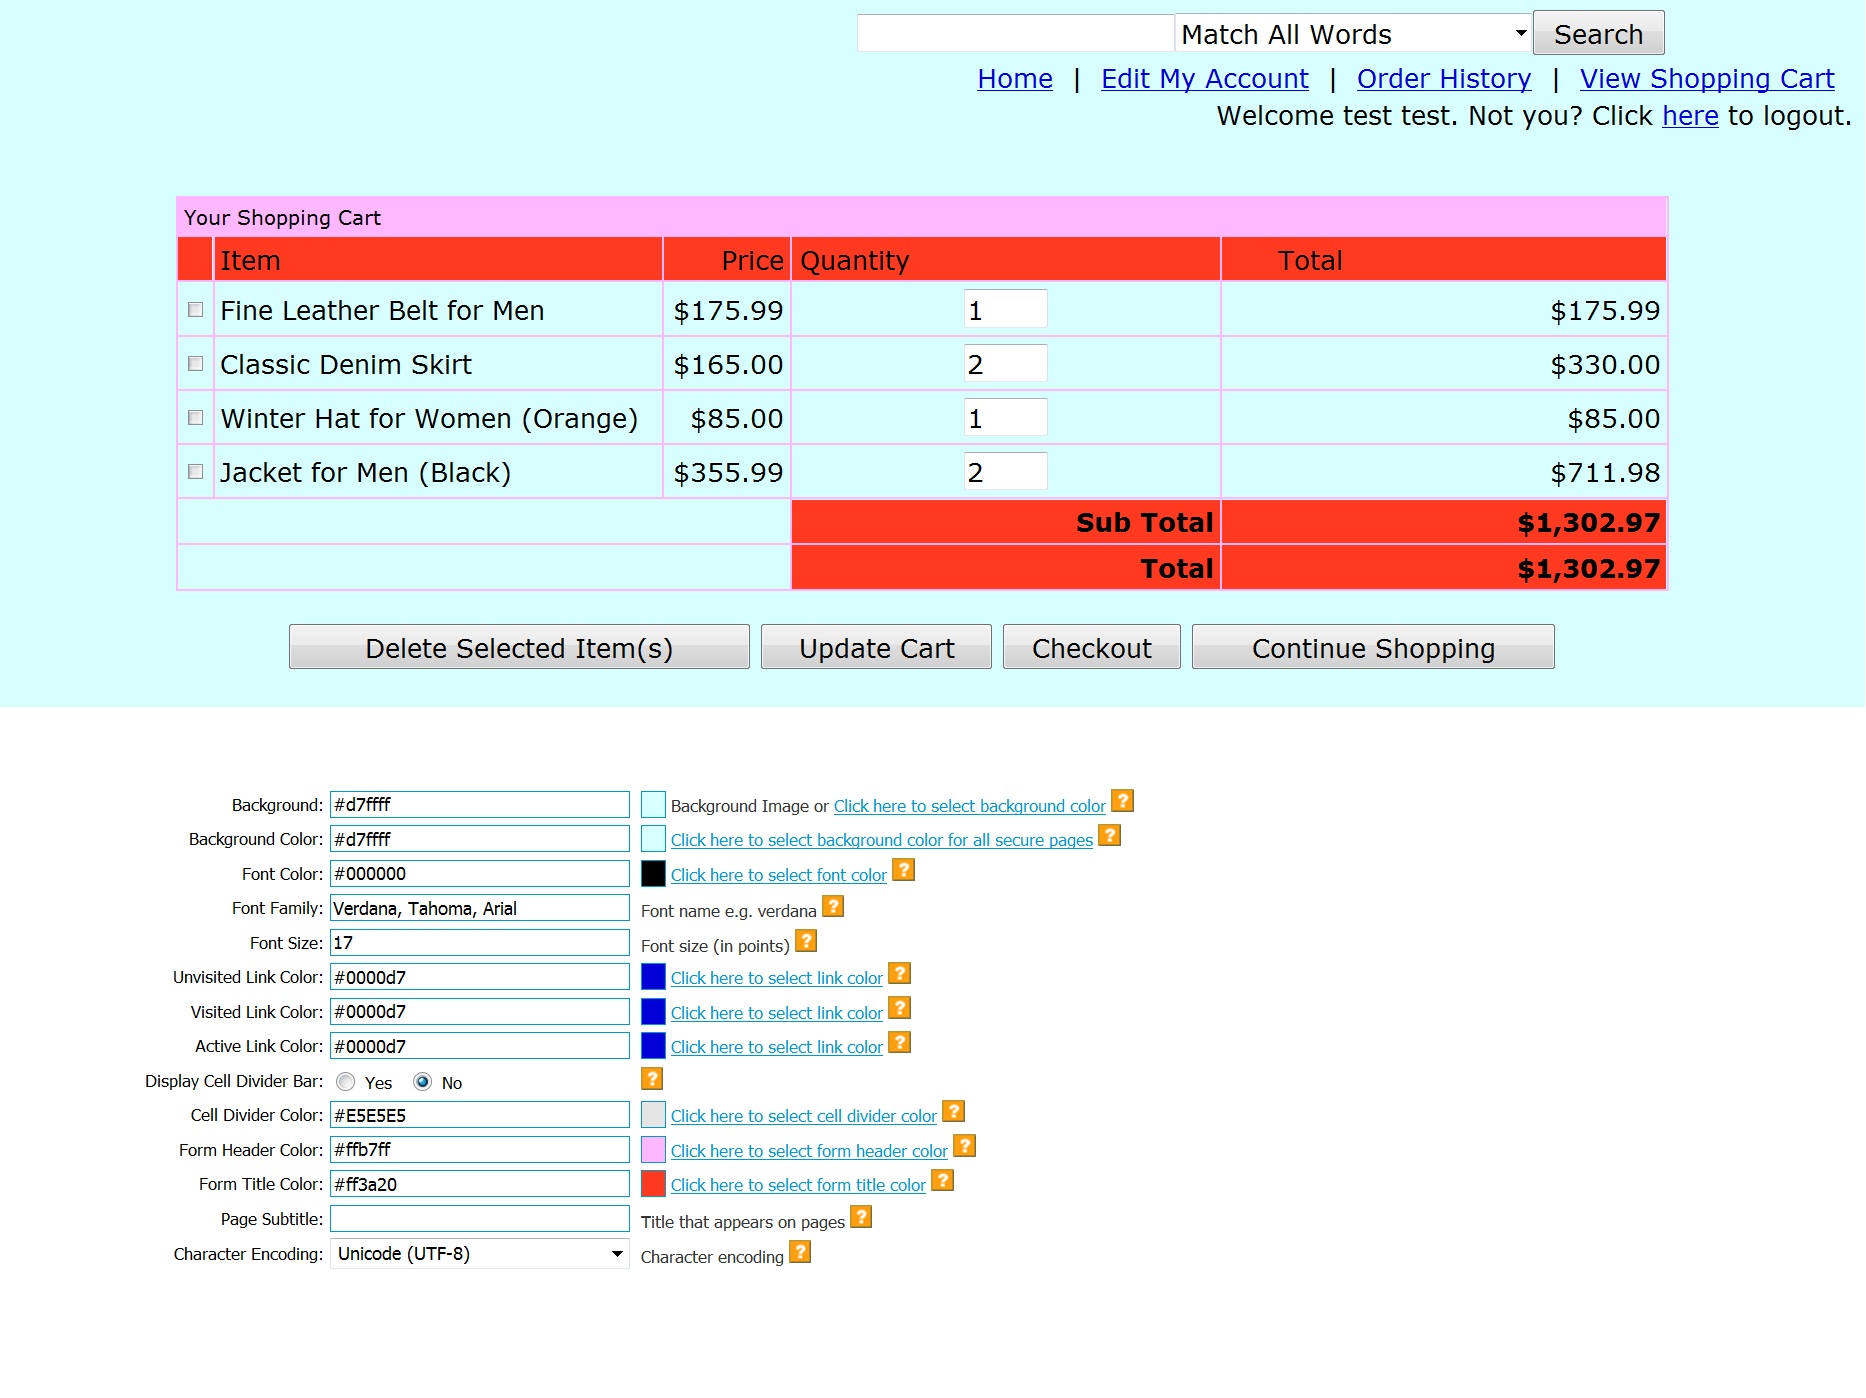
Color Choices

The page to the left is how your shop would appear to your customers if you
chose the color scheme depicted below. The image below shows how one would need
to enter the color codes for the different sections in order to alter your shop
apperance. The font and font colors would be over-written. The last 3 fields
will not be over-written though.

Posted in: general_settings

Leave a Comment (0) →

Shop Aesthetics

Shop Aesthetics
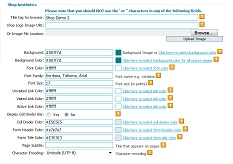
Under the Shop Aesthetics, there are many
fields which help you customize your shop look. The shopping cart
is customizable so your shop has a unique look and feel.  There are many
different sections here that you can use, or if you choose, you can leave blank.

Manage > General Settings


(Click here for larger image)


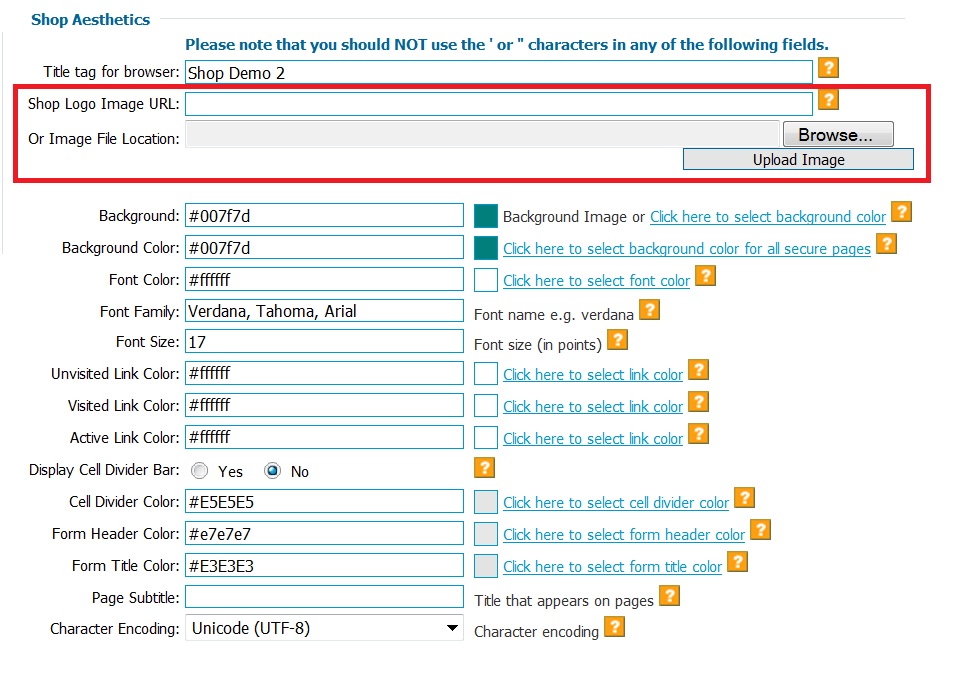
Title Tag Field

The shopping cart uses the "Title tag for browser" when displaying the shop
categories and items. It will display this text between the tags on the shop
page that is being displayed. Since the title tag is a critical factor used by
search engines in determining the relevance of a page to a specific search, then
you should make sure to use a relevant title tag.

When displaying a category of items, the shopping cart will automatically
propagate the category name to the title tag in order to increase the relevance
of the title tag. Similarly, when the shopping cart displays one specific item
it will automatically


propagate


the item name to the title tag in order to make the title tag as relevant as
possible to the information being displayed.

The title tag field value is not used if you are using the "Custom HTML Header".
If you are using the "Custom HTML Header", then within that area you would want
to include the HTML for a title tag. The shopping cart will automatically


propagate


the category or item name there also.


(Click here for larger image)


Shop Logo

If you are using the URL field,
then the steps to update your logo image are:

  1. Browse to a page on your site that contains the image you would like to use
    as your logo.
  2. Right click on the image.
  3. Select "Properties", that will popup a window showing the image properties
    including the image url.
  4. Click your left mouse button and hold it down while you drag it across the
    image url text.
  5. Once you have selected all the text of the url, then hold down the Control
    button on your keyboard and hit "C" key. That will copy what you have
    highlighted to your clipboard.
  6. Go to your shop/owner General Settings page and paste that image url into
    the field for your logo.
  7. Scroll down to the bottom of the General Settings page and click the Save
    button.

If you are using the "File Image
Location", then the steps to update your logo image are:

  1. Click the Browse button and browse to the image on your computer’s hard
    drive.
  2. Select the image and then click the Upload Image button.


Sample Background Image


(Click
here for larger image)


(Click
here for larger image)


(Click
here for larger image)

Background

You can use the "Background" field in order to specify the background color or
image to use when displaying your items within the shop. The "Background" value
is used in the shop pages when there is nothing in the "Custom HTML Header"
field, and it is used on the secure pages which do not use the "Custom HTML
Header".


Using a Background Image

To use a background image you would insert the
complete url ( beginning with http:// ) of the image that you’d like to use as a
background.

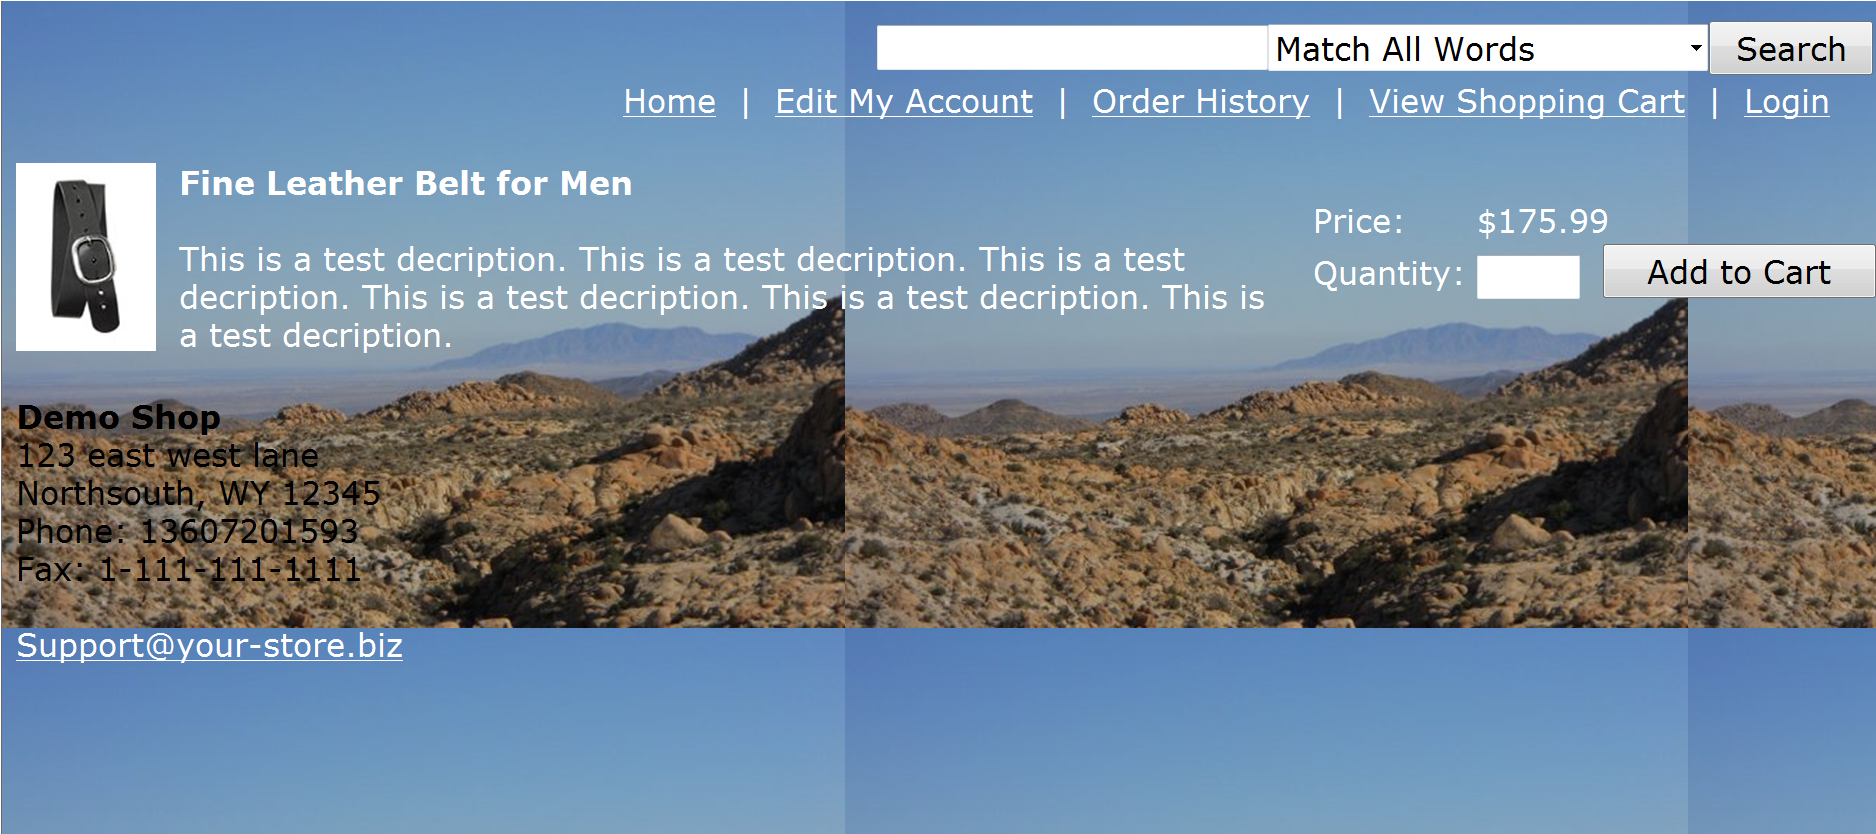
The image to the left is called background.jpg. If I set it as my background
image it would create the page that looks like what is displayed to the right.


Using a Background Color

To set a background color you would click the "Click
here to select background color" link and then select your desired background
color from the color map. Alternately, if you know the color code for the color
you would like to use, you simply type it in.


Using a Background Color for Secure Pages

The next field is ‘Background Color’ for the secure pages where your customers
will enter their credit card information. Since this is a secure page, your
background image cannot be displayed there because it is not secure (http:
address vs. https: address). In this example, I set the background color to
#666666 (grey) (see picture to the right) and the result is the checkout screen
displayed at the right.


(Click here for larger image)

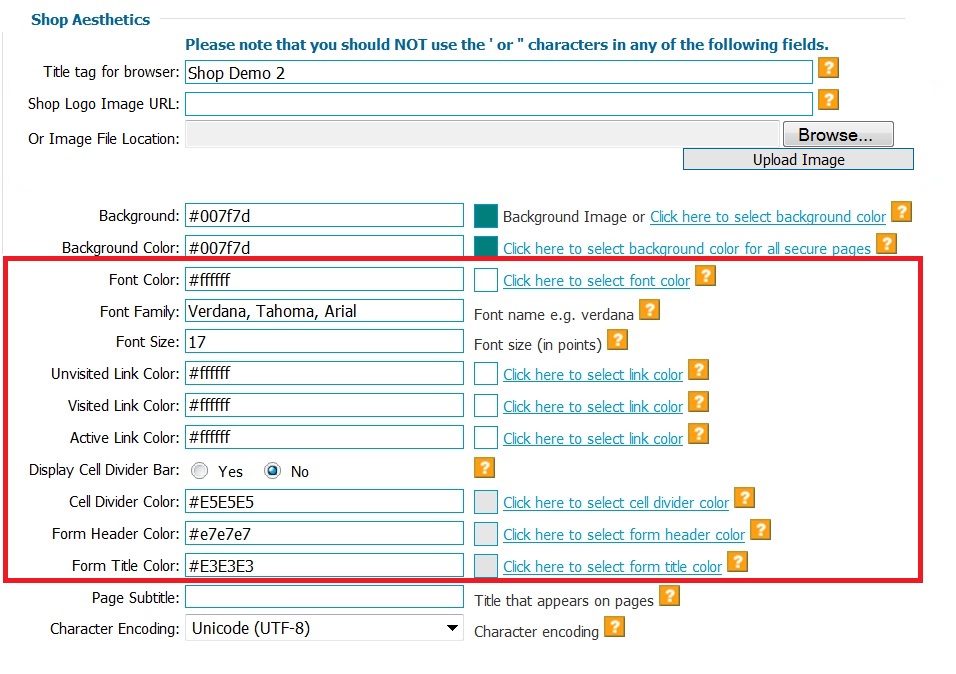
Font, Link, Cell, & Form Options

 It is IMPORTANT TO NOTE that most of this information is overwritten by
entering custom header information. SO, if you plan on using the custom header
and footer information, the information entered in these fields will not matter.

To the right of the color fields are links that state ‘Click here to select link
color’. When you Click on them, a color pallet will ‘pop-up’ as shown to the
right. Simply Click on the color you wish to use and it will enter that info the
appropriate field for you. Or, if you know the color code you wish to use,
simply type that into the field directly.


(Click here for larger image)

Color Guide

To the left is a visual of how the colors correspond to an
actual shop.

A few tips:
The Form Header Color does not appear on the item pages, but
rather on the checkout and following pages. It is important to note if you
choose a color for the Form Header Color similar to the Font Color that the type
in the Form Header Field will not show up and your customers may be confused.
Finally, the Form Title Color is the secondary row on the forms. Again, it is
important that this color is not closely matched to your font color.


Page Subtitle
The "Page Subtitle" field appears on your shop page. It is on the same line as
the "Home" and "View Shopping Cart" links. The "Page Subtitle" appears on the
Billing Information and Checkout pages, and, if you are not using the "Custom
HTML Header" field, then it also appears on the item display pages, and the Cart
page (the page that shows up after you click the "Add To Cart" button for an
item). You could use the subtitle line for text like "The best selection of
…", etc. Or, this field can be left blank.

Character Encoding 
The "Character Encoding" field is used
to specify the character encoding for the shop display. A good selection for the
Character Encoding is "UTF-8" as this will work with almost all languages and
special characters: e.g. the copyright character.

Posted in: general_settings

Leave a Comment (0) →

Gift Certificate

Add Gift Certificate 
The Gift Certificate page allows you
to create gift certificates for sale in your shopping cart. When a customer buys
a gift certificate, the shopping cart will give them the gift certificate code
on a certificate (for printing out) both on the confirmation page and in the
email they receive. When the customer who purchased the gift certificate gives
this gift certificate code to the final recipient, then that recipient is able
to use that code on your checkout page to receive a credit for the gift
certificate amount.

Inventory > Inventory Main > Add Gift Certificate


Add
Gift Certificate Options


C
ertificate
Title

Create the Gift Certificate title.


Description
Enter the description of your product
this field. The plain text / HTML option will allow you to enter plain text or
HTML code. The WYSIWYG editor give you the option to edit the text in HTML
format.

Amount
The price for
your downloadable item.


Display Product in Cart

If set to ‘No’, this item is 
– Not
searchable
– Not in the item’s category
– Available if people have the
link
– Available if the link shows up in search engine
– Available if the
item html shows up elsewhere on the site

If option is set to ‘Yes, this
item is available throughout the shopping cart software.


Category Selection
 
Select the category(ies) you would like to associate with your item.  Categories
are helpful for the customer to locate your items. 


Google Product Search Values

For help on Google product search:

http://www.google.com/support/merchants/bin/answer.py?hl=en&answer=160081

Posted in: setupinv

Leave a Comment (0) →

Set up Item, Linking to this Item

General Item Options

Navigation:
Inventory Control > Edit
Item > General Item Options


Integration/Linking
Options
This feature will help you integrate your site. If you are
not using the shop to show you items, and you would like to use your web pages
to show items, this information will be particularly helpful. With the shopping
cart’s import template feature, typically shop owners use the shop to display
their items, which is what we recommend . However, you may find additional
customization in using the shopping cart information on your actual pages. 


Option Explanation:

‘Linking to this item’ will show the item URL
You
can use this link on your web page to point a customer to the shopping cart item
page. You can also use this link to view your item page.


‘Linking to this category’
will show the category URL for this particular
item
You can use this link on your web page to point a customer to the
shopping cart category page.

‘HTML to display this
item’
will provide HTML code that you can insert into your web page HTML code
to display this item

‘Item Include Code’
provides you with .shtml code for this item as a complete item listing. When
integrated in your site, it automatically updates your web pages with the
shopping cart. For more complete information on Category Include Code, visit the
help information for Integration > Category Items listing HTML.

‘View This Item’ lets you preview your item how it
appears currently in the shop part of your site.


‘Category Include Code’
provides you with .shtml code for the entire category with the complete
item listing of each item . When integrated in your site, it automatically
updates your web pages with the shopping cart. For more complete information on
Category Include Code, visit the help information for Integration > Category
Items listing HTML.

‘Category Thumbnail Display
Include Code’
provides you with .shtml code for the entire category with
the thumbnail option. When integrated in your site, it automatically updates
your web pages with the shopping cart. For more complete information on Category
Include Code, visit the help information for Integration > Category Thumbnail
HTML.


SKU/Part
No., Name

You have the ability to change the Item’s SKU/Part Number
and the Item’s Name.


Description

Enter the description of your product this field. The
plain text / HTML option will allow you to enter plain text or HTML code. The
WYSIWYG editor give you the option to edit the text in HTML format.


Actual Price in Cart

This is the price the customer will see as the
item price.

Normal Retail Price
This is the price the customer sees next to the actual price if the ‘Display
Regular Pricing & Sale Price’ is set to ‘Both’ under General Settings > Misc.
Options

Display Product in Cart
If set to ‘No’, this
item is 
– Not searchable
– Not in the item’s category
– Available if people have
the link
– Available if the link shows up in search engine
– Available if
the item html shows up elsewhere on the site

If option is set to ‘Yes,
this item is available throughout the shopping cart software.


Display Item Price and Add to Cart button

Click ‘Always’ if you
would like customers to be able to add items to cart without having to be logged
in.
Click ‘Only when shopper is logged in’ if you would like to hide the item
price and add to cart button when customers are not logged in.

Google Product Search Values
For help on Google product
search:

http://www.google.com/support/merchants/bin/answer.py?hl=en&answer=160081

Posted in: setupinv

Leave a Comment (0) →

Shopping Cart Newsletter Sign-up Options

Customer Newsletter 
Signup Options


Navigation:
Promotion > Customer Newsletter > Signup
Options


The
Signup Options tab allows you to change signup options on the account page,
whether you would like to be notified of newsletter sign up, and what the
customer sees when they subscribe to the newsletter.


Show Newsletter Signup: 


Displays or hides the newsletter option from
appearing on the account page.


Notify Shop Admin:


Notify shop admin when a subscription is submitted.


Edit Confirmation Notice:


Edit the confirmation notice people receive when
they subscribe to the newsletter.

Posted in: newsletter

Leave a Comment (0) →

Rename Category

This section allows you to rename categories.

Navigation:
Manage > Categories > Rename Category
or
Inventory > Manage Categories > Rename Category


Rename
Category
Renaming category page allows you to modify the titles of
your current categories. 

Select the category name that you would like to
modify, and then enter the new category name in ‘New Name for this Category’
field.  Do not include the parent category name (ex. don’t type Main Shop –
Shirts, type Shirts.)

Posted in: category

Leave a Comment (0) →
Page 3 of 9 12345...»