Link & Button Display Options This section of the general settings allows you to modify how
your links & buttons display.
Manage > General
Settings
Shop Control Panel
Link Options
The shopping cart has a number of links that are
customizable. These links appear toward the upper
right part of the screen and are separated by bars.
Display ‘View Shopping Cart’ Link
View the ‘Shopping Cart link’
that appears on pages.
‘Home’ Link
Choose whether to display the
‘Home’ link that and also choose the URL for the Home link.
The default for the home link iswww.yoursite.com/shop.
Display Account
Login Link in Shop To
display the ‘Login’ link in shop, select ‘Yes’ under
this option. For this option to work, you must be
using Account Type Checkout. To change your checkout type
navigate to: Manage > Checkout type / Payment Options Then
change the Checkout format to ‘Customer sets up account on
checkout’
Show Paging on Top of the Cart If you have a
category with multiple items, the this options allows you to
show or hide the page numbers for being displayed on top of
the cart pages.
Continue Shopping Button
Display Continue Shopping Button
The ‘Continue Shopping’ Button
is a button that is designed to help customers navigate your
shopping cart.
You are able to select whether it appears on the Cart,
Checkout, and Confirmation pages.
‘Continue Shopping’ Button URL
If this is not filled in, it
will default to shop main entrance.
Error redirector URL
This is the absolute url (eg
http://sitename/a.html) used to redirect in case of any
errors.
Continue URL on the Finished Secure
Page
The absolute url (eg http://www.sitename.com/a.html) where
the user will be directed by clicking continue shopping in
the finished secure page
Make Continue Button a History Button
This option affects the cart
page and is a helpful feature to have enabled. After a
customer places an item in their cart, they will be taken to
the cart page. If the ‘Continue button’ is a history
button, it will take them back to the page where they added
an item to cart (item or category pages).
If the ‘Continue button’ is not a history button, the button
will default to shop main entrance.
Add to Cart Button
Use Image as the
Add to Cart Button: You can customize your
‘Add to Cart’ button by using an image.
Add to Cart Image URL:
Enter the image url (Use
http://….) or alternatively specify an image name that
will be searched from the images dir
To find the
image url follow these steps:
In your browser, browse to a page on your website
that shows the image you want.
Right click on the Image and select "Properties".
Select the image url text from the popup by
selecting it with your mouse. Then copy that selected
url with <Control> C.
On the newsletter page click the image insert icon.
Click in the image url field, then paste the copied
URL using <Control> V.
To create a template for your shopping cart to use you can either:
1. Create the page directly in the WSWYG editor.
2. Switch to HTML View by selecting “Edit template in plain text / HTML” and
then type or paste in the HTML
3. Or, the easiest way would be to use the import feature to import a page to
use as a template.
– To use the import feature, you would type or paste a url into the “Import web
page to use as template” field. The web address/url would be the location of the
page that you’d like to use as a template in the shopping cart.
– Once you have the url in that field, click the “Import Page / Template”
button. That will import the page and will attempt to change all the relative
image urls, css urls, etc. to fully specified urls.
– After the page is imported select and delete any unwanted items
– Copy and then remove the [displayshopitemshere] placeholder from the top of
your template field, and then type or paste it into the location on your page
where you’d like the shop information to appear (generally in the center portion
of your page).
Shortcuts Some of the shortcuts that you may want to place
within your shop template are:
[displayshopitemshere] – Display Shop items
##view cart##– Displays the
View Cart link. ##search form##–
Displays the Search Form. ##current total##–
Displays the current order total. ##category links##–
Displays the category links. ##include external file
##complete
url##– Include data from
external file. ##some text##affiliateid##–
Displays the shoppers affiliate ID (if any).
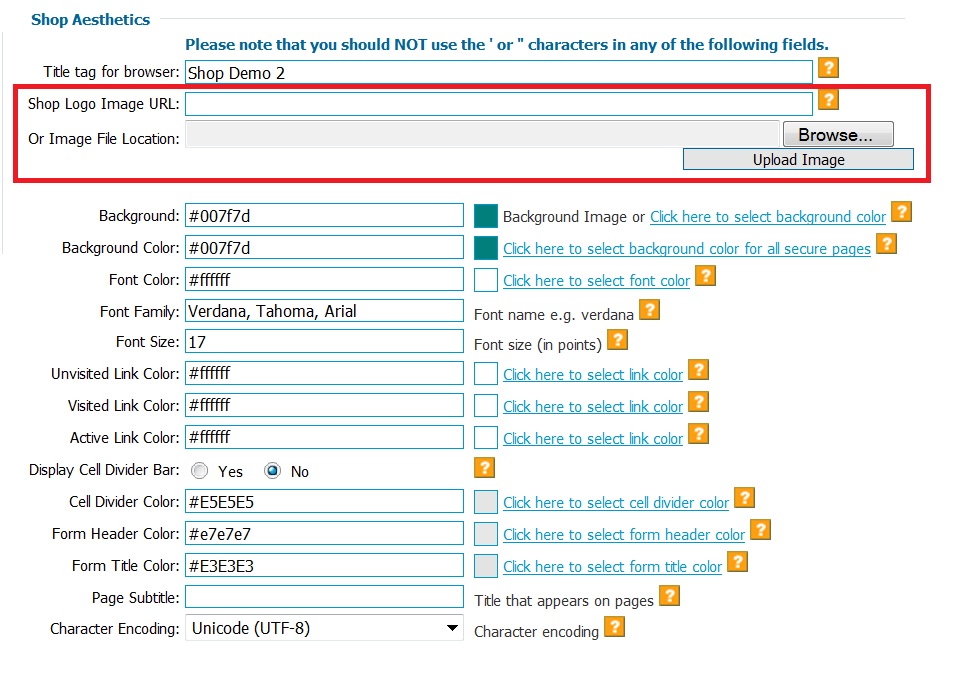
If you already have a logo within your shop template then you will not want to
upload a logo image from the General Settings page.
The HTML header is the HTML above the shopping cart html.
The HTML footer is the HTML below the shopping cart html.
The best way to edit the look of the shopping cart is to use
theShop
Template. The other links allow you
to further customize the HTML of Headers & Footers for the
following pages:
Login
Billing Information / Address Page
Checkout Page
Offline Page
Gift Certificate HTML Emails
Confirmation Page HTML Fields
Request Shipping Quote HTML Fields
To edit HTML on category pages navigate to: Manage
Categories > Edit Category HTML / Title
Text
You also have the ability to edit the text of different
fields throughout the shopping cart. To edit the text,
find the appropriate page level of the text, find the field,
and then edit the text.
There are eight different unique settings you can use, the key is choosing the one that works best for you. Please read all the descriptions to discern which will be best for you.
Thresholds:
You may wish to charge a flat rate for orders between certain amounts, like $5 shipping for orders between $0 and $50 dollars and $7.50 shipping for orders between $50.01 and $100. You can accomplish this using the 'Shipping Thresholds' shipping method. Simply click on the 'Edit Thresholds' button and a new window will pop-up. You would enter the Starting and Ending Purchase amounts and the Shipping Charge, then click Update. Click here to see a screen capture with the example amounts above.
Base + Charge specified by items
This shipping option will calculate, using the carriers program, the shipping cost of your customers' orders based on your zip code, the customers' zip codes and the orders' weights.
If you choose this shipping method, you can select UPS shipping options, FedEx shipping options or USPS shipping options.
After choosing this option, simply check the boxes to the left of the options you wish to give to your customers.
You will need to fill in the first field 'Base Charge' and the last field 'Shop Zip Code'.
Fixed Charge per order: Simply enter the charge in the 'Base Charge' field. In this example (to the left) the total shipping charge regardless of the order size would be $2.00.
Base Charge + Fixed Charge Per Item: Simply enter the Base in the 'Base Charge' field and the per item cost in the next field. In this example, the base would be $2.00 plus $1.50 per item. So if your customer ordered 3 items, the shipping would be $2.00 plus $4.50 for a total of $6.50.
Base + Weight: Enter the base in the 'Base Charge' field and the shipping cost per pound in the next field. You must enter the weights for each product in the Inventory Setup. In this example, if a customer ordered 2 items with weights of 3 pounds and 1.5 pounds respectively the charge would be $2.00 base plus $1.50 times 4.5 pounds for a total of $8.75.
Base + Charge Specified by items: As with the Base + Weight, part of this charge will be entered in the Set Up Inventory section. The 'Charge Specified by items' will be entered in the 'Edit Item' page, so this will charge a base price of $2.00 plus whatever you have specified for the items selected. This is a good option for someone selling products that have odd shapes or weigh a great deal or have special shipping requirements.
Base Charge + % of item price: again, the Base Charge would be entered in the first field and the percentage would go in the second field. In this example the base is $2.00 and the percentage is 1.50% of item price. So if the customer were to order 3 items with a combined price of $10.00 the shipping charge would be $2.00 plus $0.15 for a total of $2.15.
The final option is 'Do not charge shipping'. This means no shipping is calculated using these functions. People sometimes use this option is the shipping price is combined into the price of the product or if they use the 'Alternate Shipping Options' only.
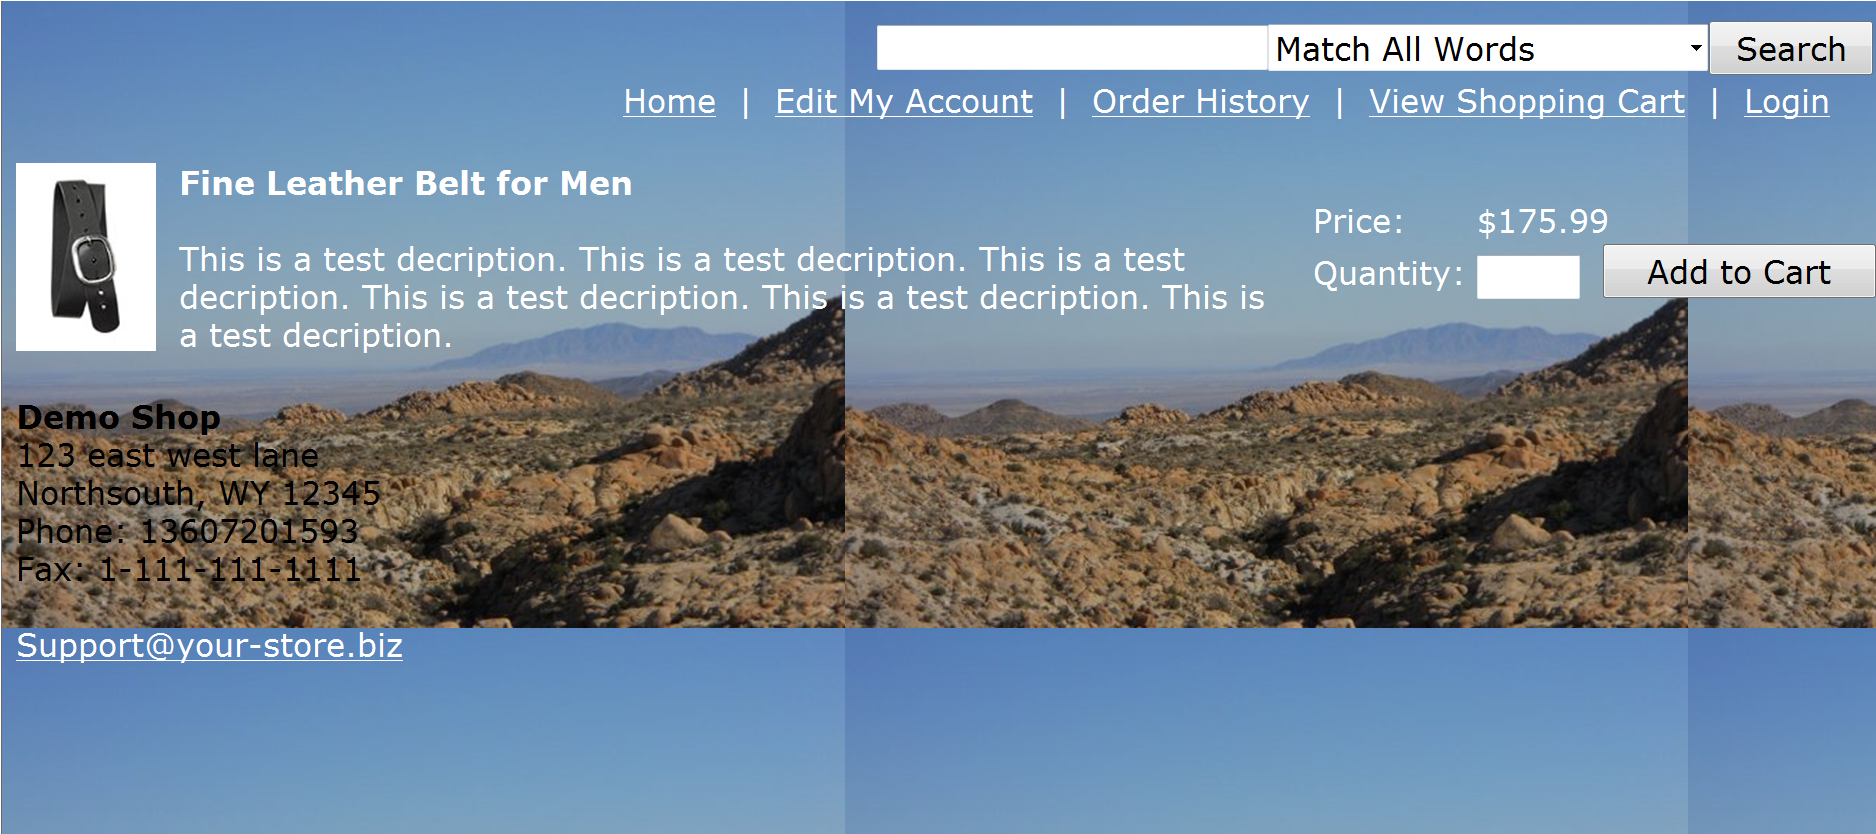
The page to the left is how your shop would appear to your customers if you
chose the color scheme depicted below. The image below shows how one would need
to enter the color codes for the different sections in order to alter your shop
apperance. The font and font colors would be over-written. The last 3 fields
will not be over-written though.
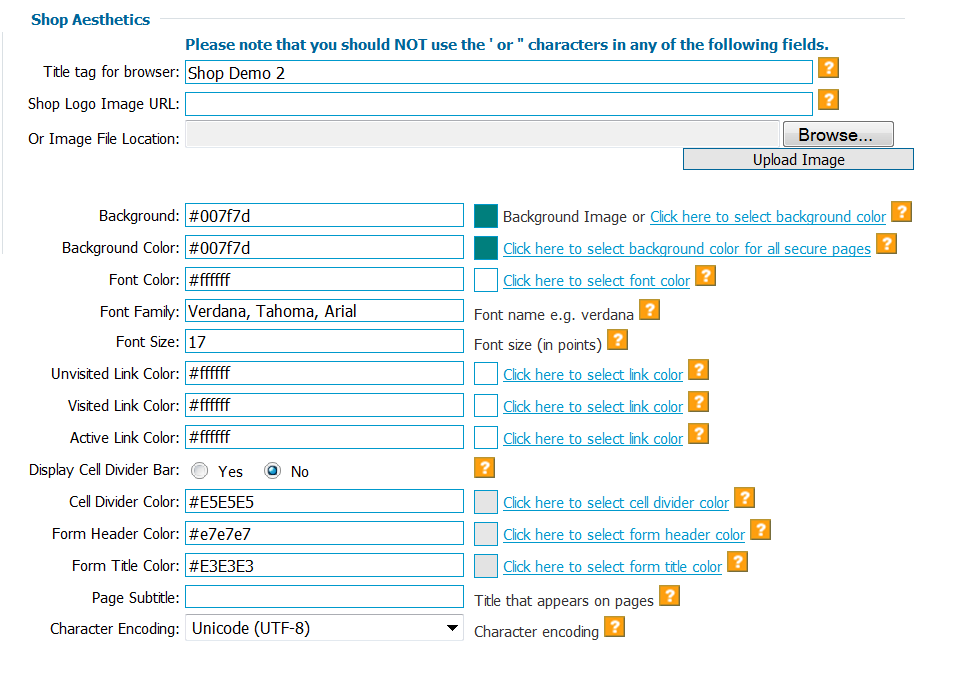
Shop Aesthetics Under the Shop Aesthetics, there are many
fields which help you customize your shop look. The shopping cart
is customizable so your shop has a unique look and feel. There are many
different sections here that you can use, or if you choose, you can leave blank.
The shopping cart uses the "Title tag for browser" when displaying the shop
categories and items. It will display this text between the tags on the shop
page that is being displayed. Since the title tag is a critical factor used by
search engines in determining the relevance of a page to a specific search, then
you should make sure to use a relevant title tag.
When displaying a category of items, the shopping cart will automatically
propagate the category name to the title tag in order to increase the relevance
of the title tag. Similarly, when the shopping cart displays one specific item
it will automatically
propagate
the item name to the title tag in order to make the title tag as relevant as
possible to the information being displayed.
The title tag field value is not used if you are using the "Custom HTML Header".
If you are using the "Custom HTML Header", then within that area you would want
to include the HTML for a title tag. The shopping cart will automatically
propagate
If you are using the URL field,
then the steps to update your logo image are:
Browse to a page on your site that contains the image you would like to use
as your logo.
Right click on the image.
Select "Properties", that will popup a window showing the image properties
including the image url.
Click your left mouse button and hold it down while you drag it across the
image url text.
Once you have selected all the text of the url, then hold down the Control
button on your keyboard and hit "C" key. That will copy what you have
highlighted to your clipboard.
Go to your shop/owner General Settings page and paste that image url into
the field for your logo.
Scroll down to the bottom of the General Settings page and click the Save
button.
If you are using the "File Image
Location", then the steps to update your logo image are:
Click the Browse button and browse to the image on your computer’s hard
drive.
Select the image and then click the Upload Image button.
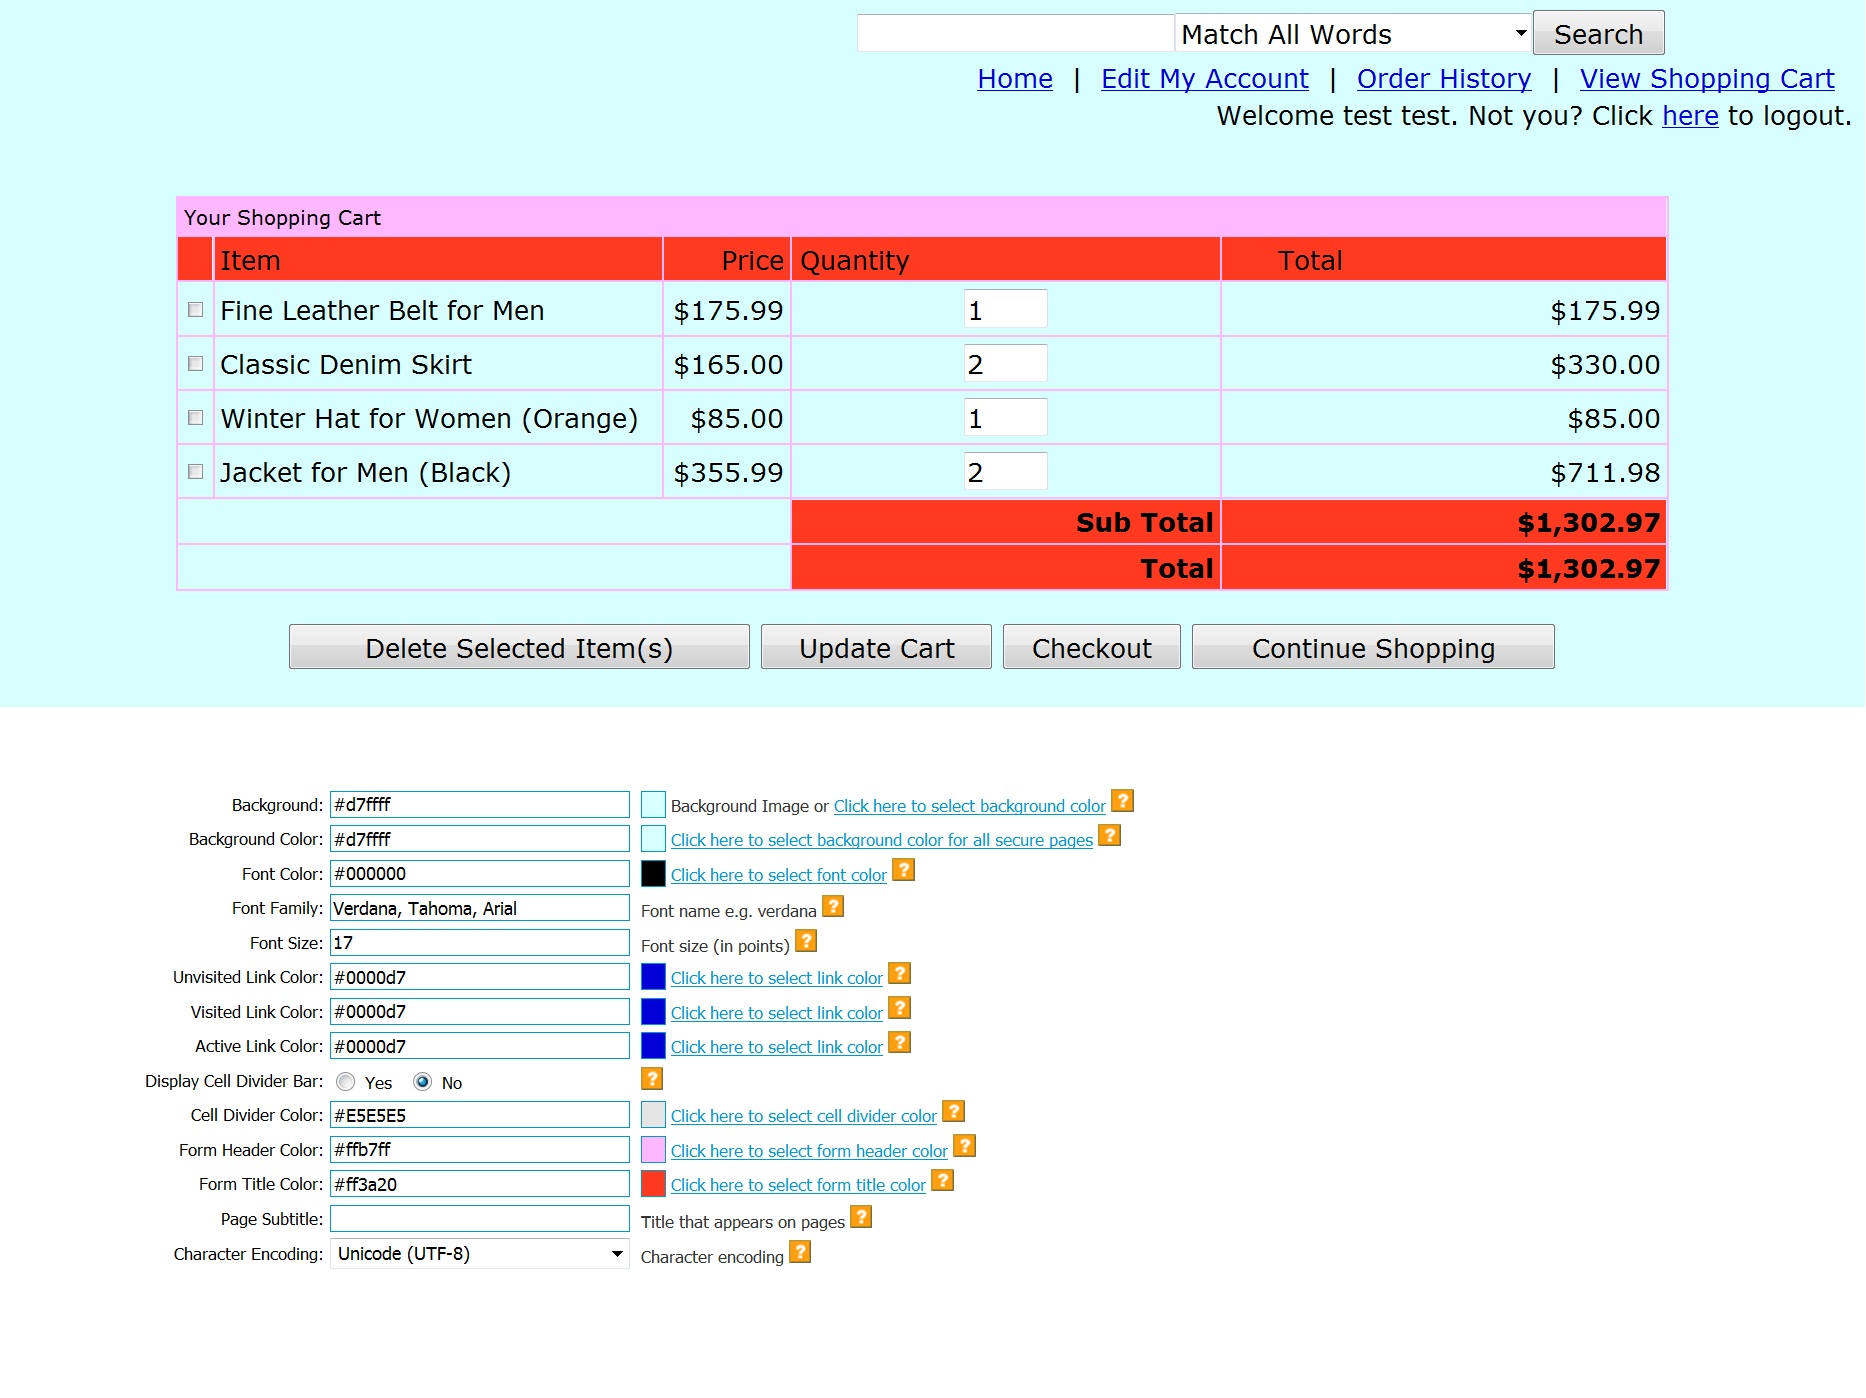
You can use the "Background" field in order to specify the background color or
image to use when displaying your items within the shop. The "Background" value
is used in the shop pages when there is nothing in the "Custom HTML Header"
field, and it is used on the secure pages which do not use the "Custom HTML
Header".
Using a Background Image
To use a background image you would insert the
complete url ( beginning with http:// ) of the image that you’d like to use as a
background.
The image to the left is called background.jpg. If I set it as my background
image it would create the page that looks like what is displayed to the right.
Using a Background Color
To set a background color you would click the "Click
here to select background color" link and then select your desired background
color from the color map. Alternately, if you know the color code for the color
you would like to use, you simply type it in.
Using a Background Color for Secure Pages
The next field is ‘Background Color’ for the secure pages where your customers
will enter their credit card information. Since this is a secure page, your
background image cannot be displayed there because it is not secure (http:
address vs. https: address). In this example, I set the background color to
#666666 (grey) (see picture to the right) and the result is the checkout screen
displayed at the right.
It is IMPORTANT TO NOTE that most of this information is overwritten by
entering custom header information. SO, if you plan on using the custom header
and footer information, the information entered in these fields will not matter.
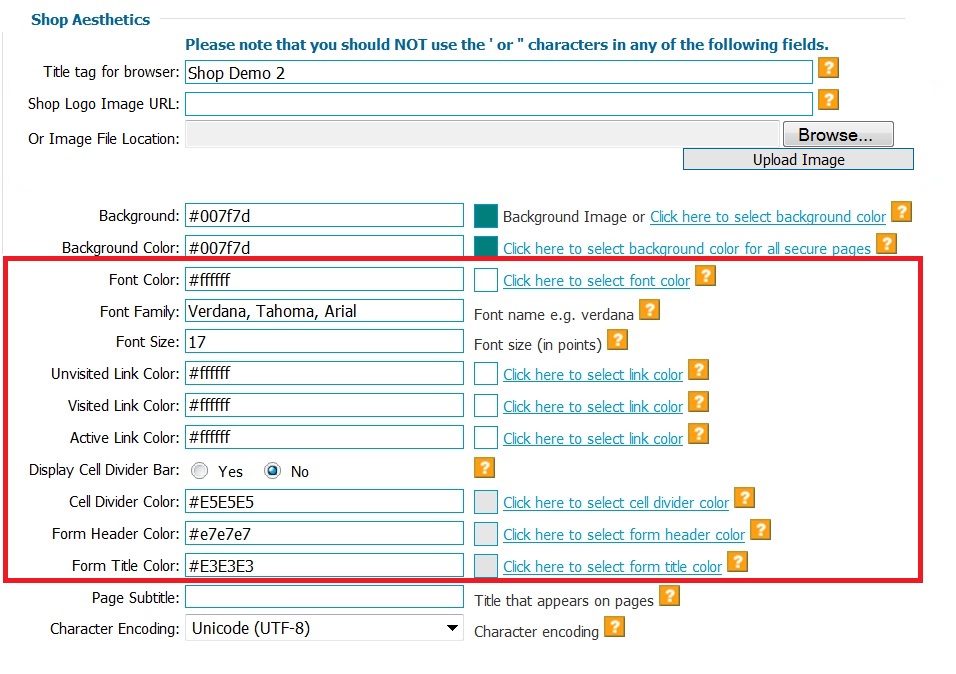
To the right of the color fields are links that state ‘Click here to select link
color’. When you Click on them, a color pallet will ‘pop-up’ as shown to the
right. Simply Click on the color you wish to use and it will enter that info the
appropriate field for you. Or, if you know the color code you wish to use,
simply type that into the field directly.
To the left is a visual of how the colors correspond to an
actual shop.
A few tips: The Form Header Color does not appear on the item pages, but
rather on the checkout and following pages. It is important to note if you
choose a color for the Form Header Color similar to the Font Color that the type
in the Form Header Field will not show up and your customers may be confused.
Finally, the Form Title Color is the secondary row on the forms. Again, it is
important that this color is not closely matched to your font color.
Page Subtitle
The "Page Subtitle" field appears on your shop page. It is on the same line as
the "Home" and "View Shopping Cart" links. The "Page Subtitle" appears on the
Billing Information and Checkout pages, and, if you are not using the "Custom
HTML Header" field, then it also appears on the item display pages, and the Cart
page (the page that shows up after you click the "Add To Cart" button for an
item). You could use the subtitle line for text like "The best selection of
…", etc. Or, this field can be left blank.
Character Encoding The "Character Encoding" field is used
to specify the character encoding for the shop display. A good selection for the
Character Encoding is "UTF-8" as this will work with almost all languages and
special characters: e.g. the copyright character.
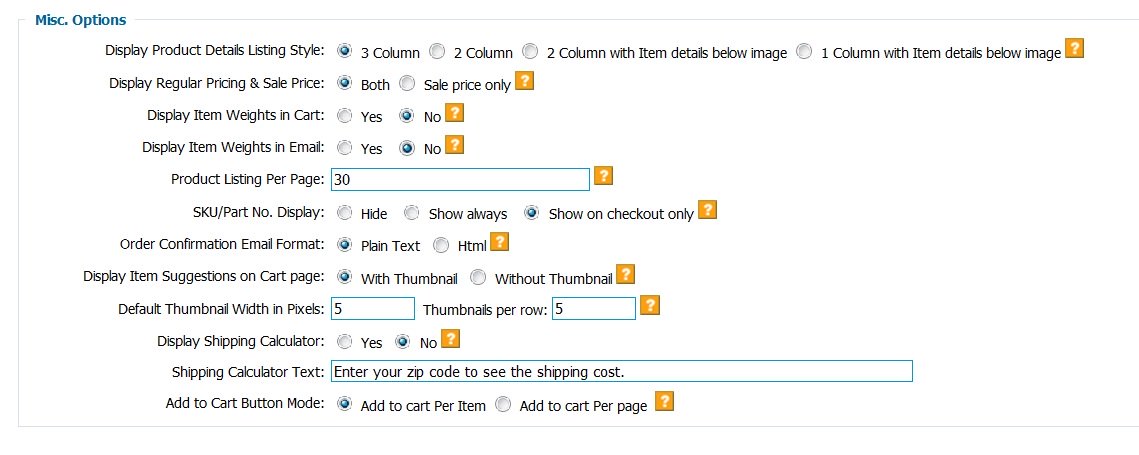
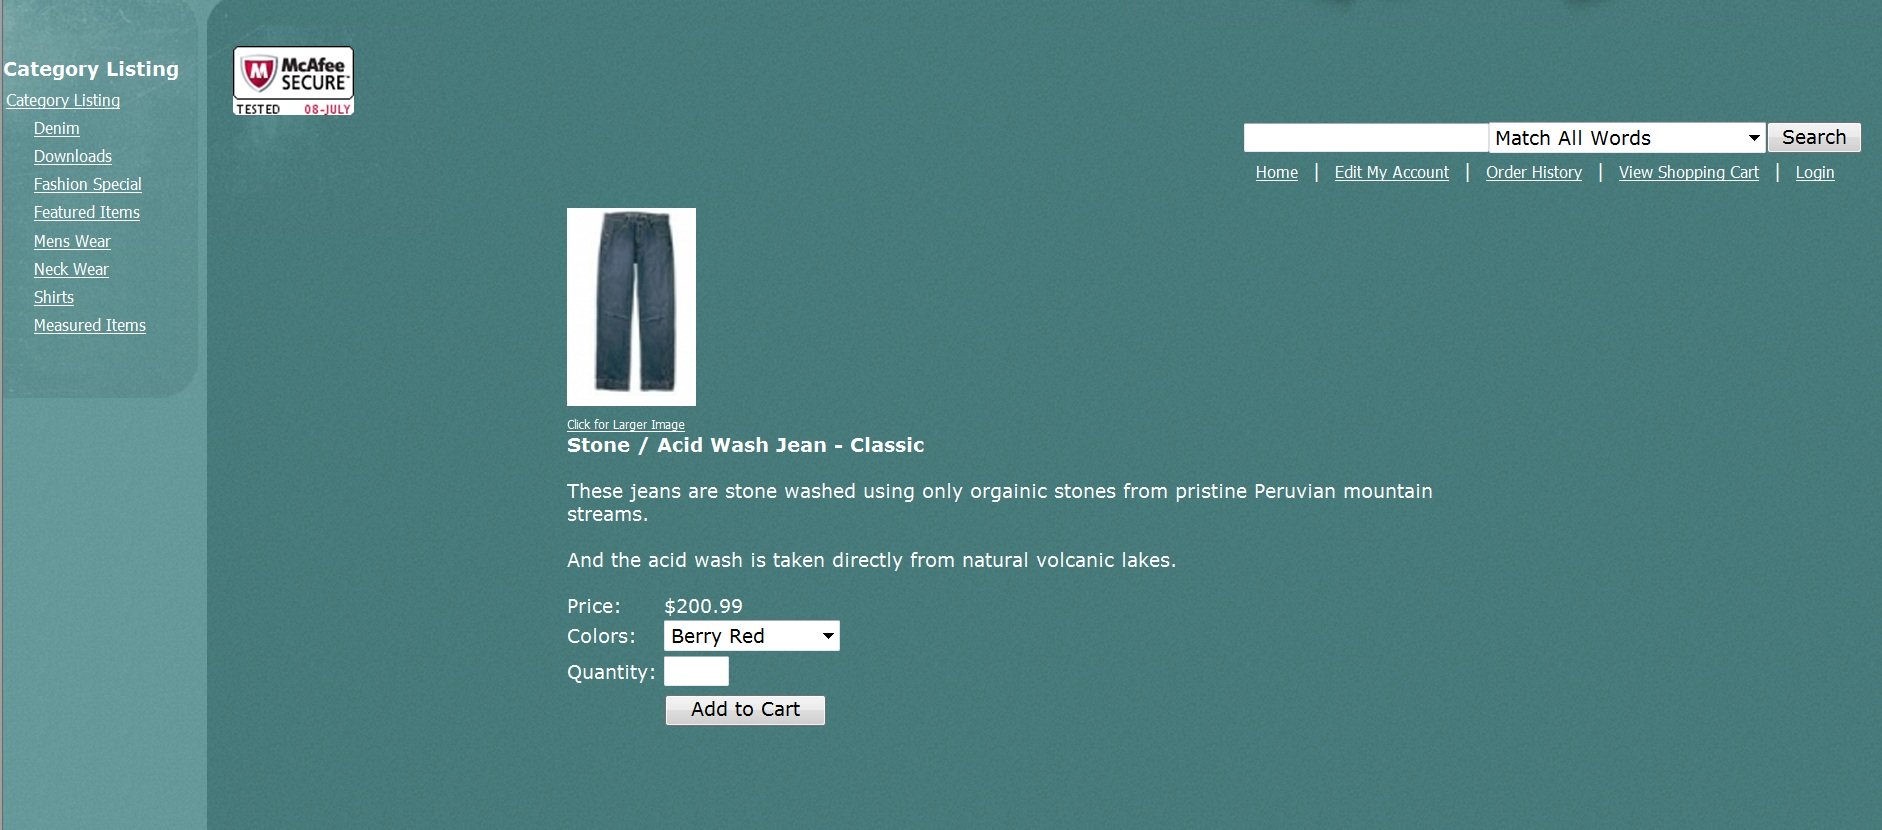
Display Product Details Listing Style If ‘3 Column’ is selected, the item page will be divided into 3 columns
(Picture/Descriptions/Price & Add to cart button).
If ‘2 Column’ is selected, the item page will be divided into 2 columns
(Picture/Descriptions, Price & Add to cart button).
If ‘2 Column with Item details below image’ is selected, the item page will be
divided into 2 columns (Picture/Descriptions, Price & Add to cart button)
The item details would be under the image instead of to the right.
If ‘1 Column with Item details below image’ is selected, the item page will be
divided into 1 column (Picture, Descriptions, Price & Add to cart button)
The item details would be under the image. The only difference between
this and the 2 column below image is that this one has the ‘Add to Cart’ button
underneath the Quantity.
Here there are options to edit whether to show a regular price & a sale price,
or just one price. You’ll also be able to choose whether to show the
weight of an item, and you can also choose whether to display the SKU/Part No.
for an item.
Product Listing Per Page For the category pages, this options allows you to set how many products
per page.
Order Confirmation Email Format Select the format for your Order confirmation emails. Html has a
more updated look, while text is plain.
Display Item Suggestions on Cart page This option allows you to select whether to use thumbnails or full size
images for your item suggestions. (This option only works if you suggest
items for a particular item)
Item Suggestions – Default Thumbnail Width in Pixels
Changing the Thumbnail Width in Pixels changes the width of the columns, while
changing the thumbnails per row changes how many links/thumbnails there are per
row.
These options allow you to display a shipping calculator link & the text to
display on the Shipping Calculator page.
Add to Cart Button Mode Configure the shop to show "Add to Cart" button for each product or
single button "Add Products to Cart" for all products available at the page.
This is where you will dictate 3 things: 1st, whether your customers will
create an shopping ‘account’ with your online store which is accessed with their
email addresses and passwords they create themselves; 2nd, whether your shop
will interface with one of the
7 real-time credit card gateways our shop interfaces with; and 3rd, if your
customers can have purchases sent to addresses other than their billing
addresses.
For a shop using the "No account setup on checkout. " Format ,
on a reorder at a later date by a customer who had previously ordered , the
shopper would still need to enter in their address information again (image to
the right). If you choose to have your customers create accounts, all billing
and shipping addresses are saved and the customers must only enter their email
addresses and passwords to check out. If you have many return customers, having
them create their own accounts may be convenient and helpful. If many of your
customers are one-time customers, there is probably no need to have accounts
created.
Next you will find a drop down menu that allows you to choose
which merchant gateway you will interface the shop with
(for real-time credit card processing) or if you will have the information
stored securely with the ‘Secure Checkout’. Everyone who wishes to accept
payment by credit card will need a way to process the cards, be it in real-time
through a gateway, or with a traditional terminal utilizing the ‘Secure
Checkout’.
If you choose ‘Secure Checkout’ (which stores the complete order with credit
card information securely in the ‘View Pending Orders’ section of your shop
owner’s panel) you will not need to fill any other fields and you may move on.
If you choose to utilize any of the real-time checkout options, you will need
to sign up for an account
(click here to learn how).
If you have an Authorize.net account
Click here to learn about the simple setup.
If you have the VeriSign PayFlow system,
Click Here to learn about the simple setup.
If you have the CardService Int’l Basic LinkPoint system,
Click Here to learn about the simple setup.
If you are using PayPal,
Click Here to learn about the simple setup.
If you use the Echo Online, Ion Gate, WorldPay Jr. or Transact Secure
solution, simply choose the appropriate Type from the drop down menu and enter
your Username from their company in the ‘Credit Card System Username/ID’ field.
That is all there is to it; the other fields do not apply to you.
Some people have limited quantities of products, like antique dealers. Our shopping cart allows you to set quantities of products and control the shop’s response when inventory is low. There are 5 separate options for your shop.
Most users will use the ‘None’ option. This does not manage or reduce products quantities. For those of you who will use this, here are the other 4 options:
Transparent – don’t let the customer know anything about stock, but email "admin" when stock is low. This option will reduce the quantity of your items but will not stop anyone from buying a product which is out of stock.
Visible – Show customer when they are ordering more than is in stock and display a custom message, ALLOW THEM TO ORDER, also email "admin" when stock is low. This option, similar to ‘Transparent’, will always allow customers to order products, but unlike ‘Transparent’ will inform the customer if he or she is buying a product which is out of stock.
You can see in the image to the right, the message states ‘The item ‘Electric Train Set’ has less in stock than the quantity you ordered – SOLD OUT’. You can see the left, the ‘SOLD OUT’ part is the custom message we have entered.
Restricted – Show customer when they are ordering more than is in stock and give custom message but DO NOT PERMIT THEM TO BUY the out-of-stock product, also email "admin" when stock is low. As you can see in the image to the right, the ‘Add to Cart’ button no longer appears. The customer sees the custom message, which is ‘SOLD OUT’ from the general settings.
Restricted Hidden – Do not show out of stock items to customers, also email "admin" when stock is low.
This option will simply not show any out of stock items on your site.
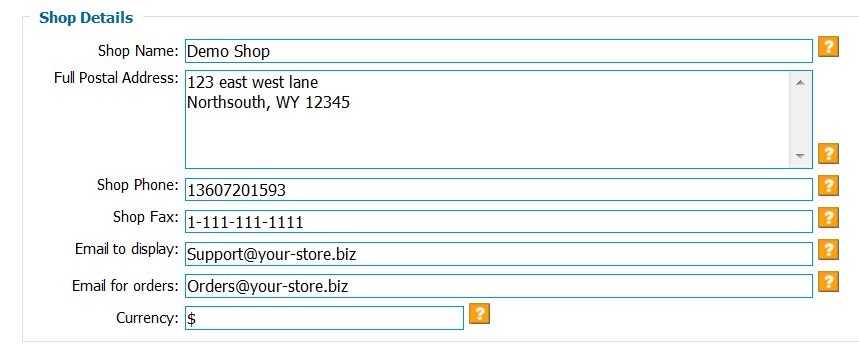
This section of your settings configures the contact information for your shop.
You can choose to have this displayed at the bottom of the shop, and you can
also select a logo if so desired.
The "Shop Name" value is used in the subject line of the order confirmation
emails that are sent to your customers. It is also displayed on the Offline
Order form (the order form that shoppers would use if they want to mail or fax
in an order) if you have the offline order form enabled. It also shows up on the
shop/owner login page.
The address, phone, & fax values are displayed at the bottom of your shop pages.
However, if you have anything in the Custom Footer field, then only the Custom
Footer field HTML will be displayed; the text in address, phone & faxe
fields are ignored in that case. These values are also displayed on the offline
order form.
The Administration Email address does not appear in your shop. This email is the
address where order confirmations are sent when someone purchases something from
your shop. It will also receive notifications concerning stock quantities if you
choose to have the shop monitor such things.


