Blog

Archive for shopmanual

Search Box Options

Search Box Options
This section of the general settings
allows you to modify your search box options.

Manage > General Settings

Shop Control Panel

Search Box

The search box allows customers to search for items in the shopping cart. 
You have the ability to turn this search box on or off.  You can also
generate html code to place on your web pages that are not part of the shop (ex.
www.yoursite.com)

Display Categories In Search Box
Choose whether to display the categories in a separate box as part of the
search.

Search Display Style
After the search is completed, this option allows you to adjust how that display
is viewed.  It can be set to either "Full Item Display" or just "Text
Links". Full Item display is the default setting.  Text links include a
link to the item and also a link to the item’s category.

Show Searched Terms
Typically it is a good idea to show searched terms, but sometimes the Web
Security Scan registers this as a problem.

Banned Searches
Banned Searches allow you make certain terms 

Posted in: general_settings

Leave a Comment (0) →

Shipping Options for an Individual Item

Shipping Options (Item)

Navigation:
Inventory Control > Edit Item > Shipping
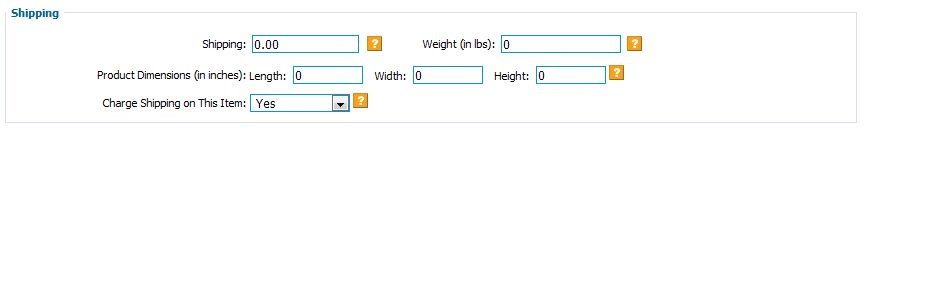


There
are other shipping options for all of your items under Manage > Shipping. 
This section is separate but related to that section as it allows you to set
different shipping options for individual items.

Examples
If you want a standard way of shipping most of your items, but you have a few
items which need to have different shipping dimensions, you are able to edit
those individual item dimensions here.  (Product dimension are used with
the "Base + Calculate Rate" option found on the main shipping options page).   

If you would like to charge shipping for most of you items, but have a few items
you would not like to charge shipping for, you are able to edit  those
individual items under these options.

Options


Shipping


This shipping value is only used if you have
specified the "Base + Rate Specified by Items" in the Manage shipping section. 
This allows you to charge different shipping prices for different items.


Weight


The weight needs to be specified in pounds. For example,
1 ounce = .0625 lbs.
2 ounces = .125 lbs.
1/2 pounds = .5 lbs.


Product Dimensions 


Enter the product dimensions you would use for shipping the
product. Typically you would use the box dimensions for shipping that particular
product


Charge Shipping Option


If you would like to charge shipping for this item, click ‘Yes’.

Posted in: setupinv

Leave a Comment (0) →

Suggested Items Feature

View Suggested Items Section


Navigation:
Inventory Control > Edit Item > View Suggested
Items Selection


View
Suggested Items Section 

Suggesting Items to your customers is a great way to let
your customers know about other products that they may be
interested in. An example would be if you had an item like a
pair of shorts, you could recommend the matching t-shirt. Your
sales for the matching t-shirt are likely to increase.

To begin, click the ‘View Suggested Items Section’ to
suggest items to your customers which will be seen on the
/shop/cart.php and/or on the item page itself. You can suggest
items manually by product ID, or you can add them by searching
by category. The best way is usually to find the category
containing the product you would like to select, and then
click ‘Show Items In this Category.’ You would then click on
the item desired. To suggest more than one item, repeat this
process, and then when finished click ‘Update Item Data’.

Options
HTML to Display on
Cart Page When This Item is Purchased

This is the
text or HTML that the customer will see on the cart page after
adding this item to cart. Example: Thank you for purchasing
this book.


Item IDs

The Item IDs field allows you to manually
suggest items through the ‘View Suggested Item Ids’. *
Suggested Ids should be comma separated like 1,3,25,100 
Typically this field is used for viewing purposes only, as it
is usually easier to add items through the ‘Show Items In This
Category’ button below.

Item Names 
The ‘Item Names’ field is for viewing purposes only. You will
see this updated automatically if you add the items via the
‘Show Items In This Category’. If you enter the items manually
under the Item IDs field, this field will not be updated until
you click ‘Update Item Data’ below.

Item Suggestion
Options:
Items listed here will appear on the cart
page after a shopper adds this item to their cart. To create a
suggested items list, select a category from the dropdown,
then click the "Show Items In This Category" button. Then
click the links of the items you wish to suggest. The item IDs
of the clicked items will automatically appear in the
suggestion list text box.

You have the option to select
where the suggested items are seen:
– Just the cart.php
page
or
– Both the item details page and cart.php page

Posted in: setupinv

Leave a Comment (0) →

Google Product Search

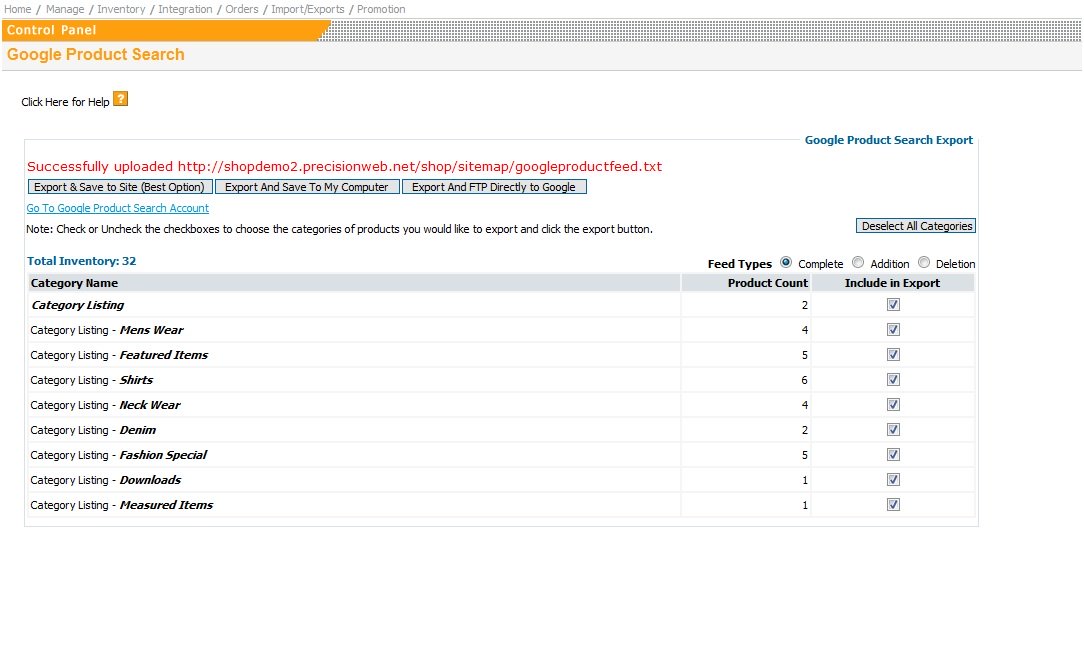
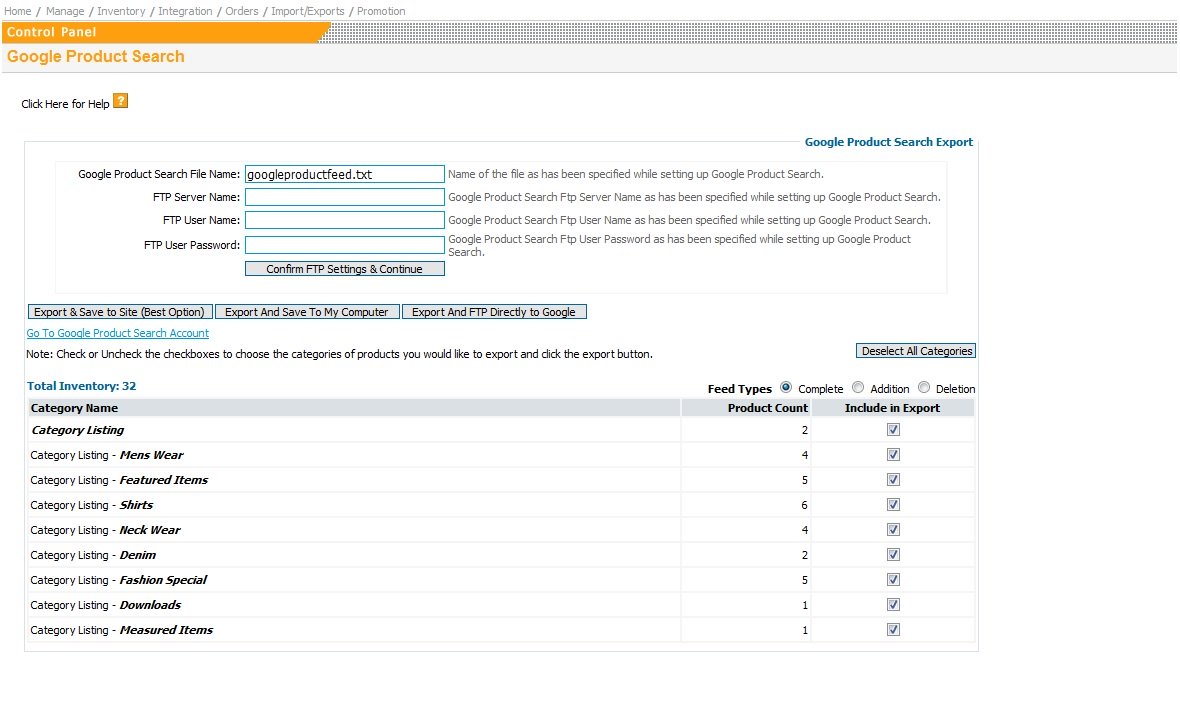
Google Product Search
A great way to increase visibility on
the Google search engine is to set up a Google Product Search data feed. It’s a
free service from Google.


Navigation:
Promotion > Export Google Product Search

The steps to set your Google Feed up
are:
1. On your item pages, fill in the Brand, Condition, and Product Type
fields for your Products. For more information on specifying your "Product Type"

click here

2. On this page, make sure all your categories are selected, then click the
"Export & Save to Site" button (preferred method). That will create a product
listing at [http://shopdemo2.precisionwebhosting.com/shop/sitemap/googleproductfeed.txt
] 

3. From the Google page at

http://www.google.com/intl/en_us/products/submit.html
, click the "Start A
Data Feed" button. (You will not need to start a new data feed each time). That
will take you to the New data feed page.

4. On that New Data Feed page
type in your data feed name ( We suggest googleproductfeed.txt ), and then click
the Save Changes button.

5. Now you will be at their "Data feeds" page
which will list your feed(s). Under the "Upload schedule" column click the
"Create" link (This is easier than the manual upload or FTP methods). That will
pop up a small window where you can specify the frequency and url of your feed.
We suggest a weekly frequency. In the url field paste in the following url: 
To save the information you just input click the "Schedule" button.

6.
Now as you save an item you will want to occasionally select the option to
update your Google Product Search feed. Or come to this page after a large
number of updates and resave your feed file to the site.


Save
to Site Option 

This option allows you to pull your Google feed from a file saved on a webpage
(the url is given after you click save to site).  Once you have saved a file to
this URL, you are able to use this URL in your Google Feed Settings.  This is
the preferred method to use.


Save to FTP
This option allows you to FTP directly to your Google
Feed.  Once you have entered the appropriate settings, you are able to connect
with your Google Feed.

Save to My Computer
This option allows you to pull your Google feed from a file saved on
you computer.  Once you have saved a file to your desktop, you are able to use
this file in your Google Feed Settings.


Posted in: export

Leave a Comment (0) →

Custom Header and Footer

catetgory 1

catetgory 2

catetgory 3

catetgory 4

Search Our Inventory!:
INSERT CART HERE

[email protected] 1-800-555-TOYS � For pre-sales questions call: 1-800-555-TOYS
� ABC TOY SHOP � 121 Main Street, Suite 1 Candyland, CA 90001


Posted in: shopmanual

Leave a Comment (0) →

Downloadable Items

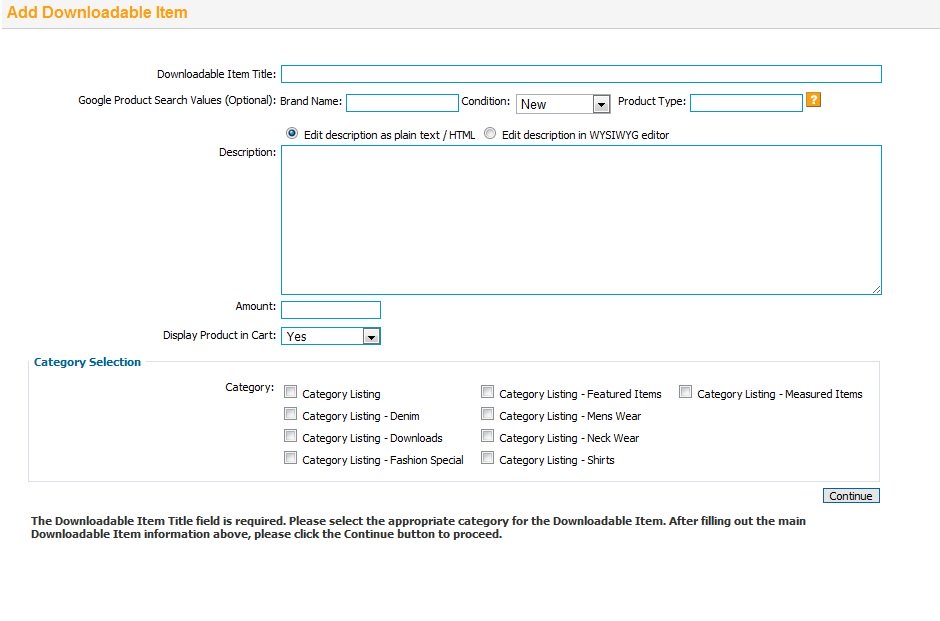
Add Downloadable Item

On the Add Downloadable Item page
you can create downloadable items for sale. Some example file types are: MP3
files, e-books, PDF files, images, zip files, and more. 

When a customer
buys the downloadable item file, they are given a link to the php download
script along with a password. From there they can download the file for a
limited time. The customer will not know the file’s actual location on your
site.


Inventory > Inventory Main > Add Downloadable Items


Options


Downloadable Item Title


Create the item title.


Description


Enter the description of your product this field. The plain text / HTML option
will allow you to enter plain text or HTML code. The WYSIWYG editor give you the
option to edit the text in HTML format.


Amount


The price for your downloadable item.


Display Product in Cart


If set to ‘No’, this item is 
– Not searchable
– Not
in the item’s category
– Available if people have the link
– Available if the link shows up in search engine
– Available if the item
html shows up elsewhere on the site

If option is set to ‘Yes, this item is available throughout the shopping
cart software.


Category Selection


Select the category(ies) you would like to associate with your item.  Categories
are helpful for the customer to locate your items. 


Google Product Search Values


For help on Google product search:

http://www.google.com/support/merchants/bin/answer.py?hl=en&answer=160081

Posted in: setupinv

Leave a Comment (0) →

View Order Page


View Order Page

Navigation:
Orders > View


Overview
of the Orders Page

Viewing an
order allows you to see all the customer’s information relating to an
order including Order Details, billing address & shipping
address,
payment information, shipping options, & products on the order.

If you are using the "Secure Checkout" method for payment to manually
process cards, please take note that the payment information is
truncated after 30 days.

Posted in: shopmanual

Leave a Comment (0) →

Shopping Cart View subscription Form HTML

Customer Newsletter 
View subscription Form HTML

Navigation:
Promotion > Customer Newsletter > View Subscribers
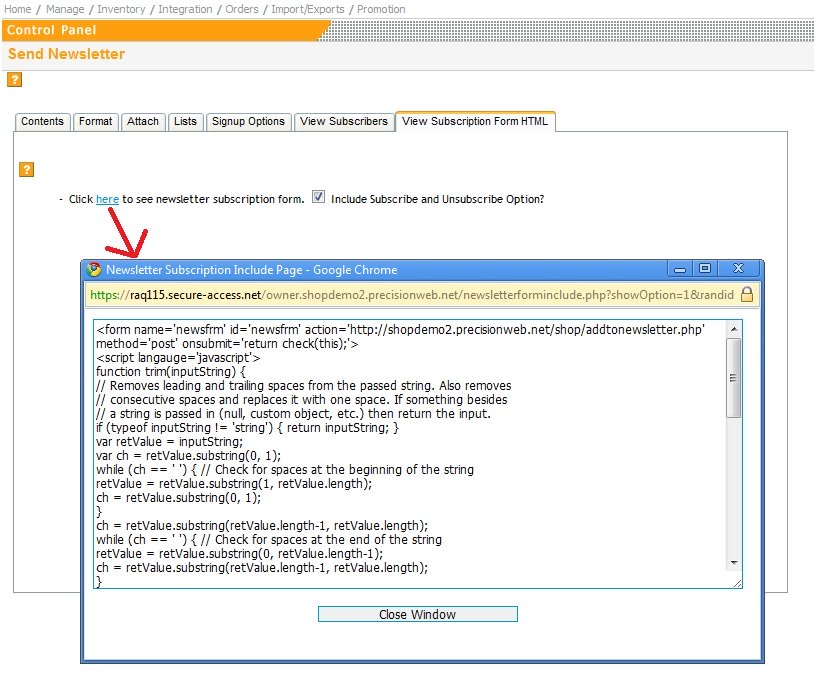


View
Subscription Form HTML

This option allows you to view the html
code for the newsletter subscription. The HTML code can be included in your
email or in your website. This is a good way to put the Newsletter subscription
form in more places in your website.

Posted in: newsletter

Leave a Comment (0) →

Promotional Codes

You may wish to offer special coupons through different advertising your company does, or would like to sell coupons on your web site. This section will allow you to have a field where those options may be accepted.

To get started, simply click on the 'New' Button

The image to the left show how one sets up a promotional code. In the example, the code has been entered, called 'MagAD223'; this code gives a discount of 10 % off. As you can see, there are 3 separate discount options: % Discount, Flat-rate Discount and Free Shipping.

To the right you see that the 10 % discount code has been entered and applied. The discount is on the products only, not the shipping.

As you can see to the left, you may modify the codes by clicking on the 'Edit', 'Delete' or 'New' buttons once you have created a code.

Posted in: general_settings

Leave a Comment (0) →

Shop Newsletter


A shopping cart newsletter is an important part of your marketing mix. Use
your shopping cart newsletter, and this newsletter management, to keep your
customers up to date on your shop and offer them valuable

coupons

so they will be encouraged to shop with you again.

IMPORTANT TO NOTES:

1. This is strictly an Opt-In newsletter. You customers choose to be added to
future newsletters the first time they checkout.

2. Precision Web offers a
newsletter script
that can be run outside the shopping cart in addition to
this one. You may find information about this in your Web Site Settings Email.

INSTRUCTIONS:

Once you have customers who have opted in to your list, you can go into the
Shop Owner’s panel and into the Shop Newsletter section. You will see something
similar to the following.


As you see, you may click on the ‘All
newsletter subscribers
‘ link to see what email addresses this will
newsletter will be sent to.

This is the message your customer would receive if the information to the
right was sent:


(click here for larger
image)

You may send either a TEXT MESSAGE or an HTML MESSAGE. If you simply type in
text in the ‘Message Body:’, choose ‘Plain-text’ as is done here. If you
designed an HTML page, paste the complete HTML code in the ‘Message Body:’ field
and choose HTML.


Posted in: newsletter

Leave a Comment (0) →
Page 6 of 9 «...45678...»