Blog

Archive for shopmanual

Alternative Shipping Options

You may wish to choose to give your customers additional
shipping options. If, for instance, you use ‘Base + fixed amount per item’ as
your shipping option you may wish to add an alternate shipping option for
‘Priority Service’ which costs an additional $10.00 per order. Or, you may have
your shipping options based on national service and you know you have occasional
international customers. You may add an alternate shipping options that includes
a markup for packages shipped out of the country.

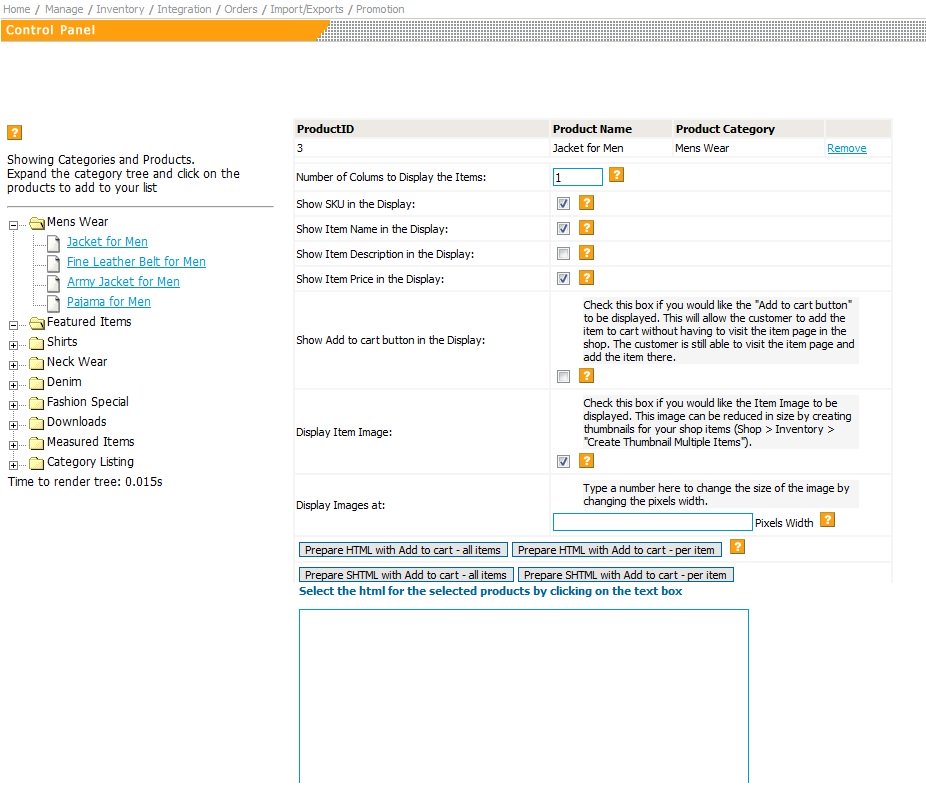
There are 2 fields in this section:

Define Options is where you will add, delete or edit your different options.

Alternative shipping default text is the text which appears at the top of the
drop-down menu.

The screen capture to the right shows the ‘Edit’ or ‘Add’
screen to setup each option. As you can see, there are 3 fields: ‘Option Name’
where you enter the shipping option, like ‘International Orders’ or ‘Next Day
Delivery’. You next choose from the drop down menu if the Option price is Added
to the previous shipping total, if it Overrides (replaces) the previous shipping
total, or if it subtracts. The final field is the amount to change. In this
example, we have decided that Next Day Air orders get a flat markup of $15. You
can see how it adds this amount in the image of the check-out screen provided to
the right.

Posted in: general_settings

Leave a Comment (0) →

Checkout choices

1. No Account setup on check will take the customer from
the 'cart' view to the personal information view to the checkout page.


So, the customer goes from the above to here, the customer fills in his or her information
and clicks 'Proceed with Checkout'


The customer arrives at the final screen. This
shows items, sub-total, tax, shipping and total. It has the field to enter
the credit card information.


2. With the account set up, 1st time customers will:


go from here and click 'Checkout'


To here, where the customer would click the
'Proceed With Checkout'.


To here, where the customer will enter:

1. His or her email address

2. Create a password

3. First Name, Last Name, billing and shipping information

4. The customer will also be asked if he or she would like to be added
to your shop newsletter. The newsletter is administered in your shop owner's
panel and is explained in shop manual.

After that information is entered, the customer clicks the 'Proceed With
Checkout' button and is take to the order completion screen.


Then the customer arrives at the final screen.
This shows items, sub-total, tax, shipping and total. It has the field to
enter the credit card information.

3. When an existing customer returns to your cart, he or she will follow
the first two steps above, but instead of clicking the 'Proceed With Checkout'
button, he or she will simply enter his or her email address and password
and click 'Login & Checkout'. He or she will then be taken directly to the
order completion screen. Please note, if he or she forgets the password,
the email the customer may enter his or her email address and simply click
on the 'forgot password' link, and it will immediately be sent to him or
her. Also, if he or she needs to update any information concerning his or
her account (like his or her address) the customer would simply need to
enter his or her email address and password and click 'Edit Account'.

Posted in: general_settings

Leave a Comment (0) →

Setting Discounts

Setting Discounts
This section allows you to customize
discounts for your shop.  This is seperate from Coupon & Promo Codes.  

Navigation:
Manage > Discount Options


The
discounts are a tier system.  Starting with 0, you can apply discounts
between certain amounts or quantities.  The last discount will have an
upper limit value of "999999999".

You may wish to entice customers to BUY by offering volume discounts. You
will see the following discount options in our Shopping Cart:

(a) None Do not provide discounts.
(b) Numeric Discount Based On Dollar Amount Provide dollar amount discounts on the total value of purchases.
(c) Numeric Discount Based On Quantity Provide dollar amount discounts based on total items ordered.
(d) Percentage Discount based on Dollar Amount Provide discounts based on a percentage of the total value of purchase.
(e) Percentage Discount based on Quantity Provide discounts based on a percentage of the items ordered.


As an example:
If you wanted customes to save $1 for
purchases between $10 and $50, follow these steps:
1.  Select ‘Numeric
Discount Based On Dollar Amount. 
2.  Specify the discount between
$0 and $10.  The ending value would be 10, and the discount amount would be
0.  You would probably use a discount amount of ‘0’.   
3.  You then could input the ending value of 50, and the discount of 1 (for
$1). 
4.  You could then enter other discounts for orders more than $50 if you
wished. 

Posted in: general_settings

Leave a Comment (0) →

Inventory Count

Inventory Count Control
The Inventory Stock Control allows you to monitor inventory
counts and notify customers: 


Inventory > Inventory Main > Inventory Count Control


Stock
Control Modes

When your inventory stock gets low
or runs out, the shopping cart has several different options
to edit what the customer sees.  This is a good to notify
customers of inventory availability.  


None
 
Has no stock control monitoring at all. The shopping cart will
still keep track of the amount of stock for each item, but the
customer will not see a difference regardless of the amount of
inventory in stock.


Transparent 

The customers won’t know anything about stock, but the
administrator of the shop will still be emailed when stock is
low.

Visible
 
This option shows customer when they are ordering more than is
in stock and display a custom message, This option does ALLOW
them to order, and the administrator also receives an email.


Restricted 

This option shows customer when they are ordering more than is
in stock , and then the shopping cart gives a custom message.
It DOES NOT PERMIT THEM TO BUY the out-of-stock product. The
administrator does receive an email. 


Restricted Hidden 

This option does not show out of stock items to customers, and
the administrator does receive an email.


Out
of Stock Message

This message is the custom
message that customers will see depending on the inventory
control option selected.


Set Limit (in Units
)
This is the limit for the shopping administrator to receive an
email. 


Show Inventory
Counts to Shoppers

This allows you to show
customers the inventory count. One nice feature is to show the
customer only when it is below a certain amount. Some shop
administrators use this to create a sense of urgency on the
part of the customer. Other shop administrators prefer to keep
their inventory counts hidden.

Posted in: setupinv

Leave a Comment (0) →

Tax Settings

IMPORTANT NOTE: none of the below information is Legal Advise. It is your responsibility to review any applicable Federal and/or state law regarding the selling and shipping of product. The information below is for the sole purpose of explanation of how the shopping cart software can be utilized.

HOW TO USE THIS SECTION:

This section looks like this:

As you can see, there are 4 separate options:

1. If you are not charging any taxes, choose None

2. If you wish that any taxes you set up in the Edit Location to be based on the address you are Shipping your products to, then choose Shipping.

3. If you wish that any taxes you set up in the Edit Location to be based on the billing address of person ordering, then choose Billing.

4. If you wish to charge taxes on any orders having either their origin or destination in a location where you charge tax, choose Either Shipping or Billing.

AN EXAMPLE: It seems most online business tax on the Shipping address. So, if your business is located in California and you fulfill and order and it ship it to a California address, and you wanted to charge tax, you would choose Shipping.

The other option that some use is ‘Either Shipping or Billing’. In this example, let’s assume your business is based in Florida and you have setup the appropriate tax rate Edit Location. You receive an order from a customer in Miami, FL who is sending the product to a grandson in Atlanta, GA. If you have chosen ‘Either Shipping or Billing’ then the customer would be charged tax. Similarly, if the grandson in Atlanta, GA turns around and purchases a present for his grandmother in Miami, FL, he would be charged tax as well.

Posted in: general_settings

Leave a Comment (0) →

Shopping Cart Affiliate Program

An Affiliate Program is an important way to drive traffic to
your site.The shopping cart provides a simple affiliate system.

The steps to implement it would be:

1. Find sites that are willing put a link to you on their web site.

2. Create an affiliate link for that site. For every unique domain you will
advertise on, you will need to ‘Add a new Affiliate’ code in order to track
them.

You will see a screen like this:

The first affiliate is ‘hobbyshop’, and a second affiliate is being added:
toyreview. Assume the Name of Source: hobbyshop is for www.hobbyshop.com. If hobbyshop agrees to
place a link on their site for www.abctoyshop.com, we could send them the
‘Sample link url’ . That would link directly into the shopping cart. Notice
though, the column is titled ‘Sample link url’, so there are a number a links
that could be sent, the ONLY NECESSARY PORTION OF THE LINK is
‘source=hobbyshop’; the first variable after a page name is preceeded by a ?,
everyone after that is preceeded by an &. For instance, if we know that the
hobbyshop visitors are really interested in Electric Trains, then maybe a more
appropriate link would be:


http://www.abctoyshop.com/shop/index.php?shop=1&cat=4&source=hobbyshop

So, the link above is directly to the ‘Train Sets’ category in the shop (Click
here
for information about obtaining links from the cart).

3. Have the link placed on the affiliate site.

4. When you receive an order, and you view the order in the View Pending
Orders section, the Affiliate code will be at the bottom of the page:

5. Send the agreed upon commission to the affiliate.

Additionally, the shopping cart can work with affiliate software
provided by outside vendors. Normally the process involves having a coded image
displayed on the shopping cart confirmation page. The field for inserting the
HTML for this is on the shop/owner General Settings page


Affiliate program top
.

Posted in: shopmanual

Leave a Comment (0) →

How do I import data into my shopping cart?

How do I import data into my shopping cart?
The easiest way to do create an importable file is to:

  1. From the shop/owner Categories page, create a few categories.
  2. From the Inventory page, create a few items for sale
  3. Now proceed to the item Export Item Data page, select the categories containing your items and then click the Export Checked button. This will save a file named export.txt. To make it easy to find, save it directly to your desktop. Or Click here for an example file to save to your desktop.
  4. Start up Microsoft Excel, or Open Office, or any other popular spreadsheet software; and open up the export.txt file you have just exported from the shop.
  5. Using this file as a template will help you to create the file in the correct format, add the items that you’d like to import by typing or pasting the information into the correct fields.
  6. After you have finished adding the item information to the spreadsheet, select to Save it as a text file.
    If you are using Open Office select Save As “Text CSV”, select the option to “Edit Filter Settings”. When you proceed the “Edit Filter Settings” window will come up; in that window leave Character Set at the default; Field Delimiter should be Tab; Text Delimiter should be blank (not “); Fixed Column width should not be checked.
  7. From this import page, browse to the file on your local hard drive, upload, preview, and import it. Sometimes your Excel software may still have the file open when you are trying to upload it; this will cause an incorrect file type error. If you get the “wrong file type” error, open up the file using WordPad, then use the Save As to save it as a text file under another name. Or, FTP the file (in ASCII mode) to your site and specify the url to import it from.
Additional file format information:

The product database file you would like to import should be seperated by a tab , and should have the following values in the following order:

  1. ID –  [ANY NUMBER]
  2. SKU NO – [TEXT VALUE – Leave blank if none]
  3. PRODUCT NAME –  [TEXT VALUE]
  4. PRODUCT DESCRIPTION –  [TEXT VALUE]
  5. IMAGE URL(Note image urls should be fully specified and begin with http://) –  [TEXT VALUE – Leave blank if none] to add: Use a comma between multiple images.
  6. PRICE (in $) –  [ANY NUMBER]
  7. REGULAR PRICE(in $) –  [ANY NUMBER]
  8. CUSTOM TEXT (Specify multiple custom texts separated by ‘:’) –  [TEXT VALUE – Leave blank if none]
  9. PRODUCT SEQUENCE –  [ANY NUMBER]
  10. TAXABLE –  [(0,N,No) / (1,Y,Yes)] (case insensitive)
  11. IS GIFT CERTIFICATE –  [(0,N,No) / (1,Y,Yes)] (case insensitive)
  12. CHARGE SHIPPING – [(0,N,No) / (1,Y,Yes)] (case insensitive)
  13. DISPLAY PRODUCT IN CART –  [Y,N]
  14. CATEGORY –  [PARENT CATEGORY TEXT VALUE&CATEGORY1 TEXT VALUE&&PARENT CATEGORY TEXT VALUE&CATEGORY2 TEXT VALUE]
  15. STOCK QTY –  [ANY NUMBER]
  16. SHIPPING –  [ANY NUMBER]
  17. WEIGHT(in lbs) –  [ANY NUMBER]
  18. PRODUCT LENGTH –  [ANY NUMBER – Leave blank if none]
  19. PRODUCT WIDTH –  [ANY NUMBER – Leave blank if none]
  20. PRODUCT HEIGHT –  [ANY NUMBER – Leave blank if none]
  21. PRODUCT BRAND –  [TEXT VALUE – Leave blank if none]
  22. PRODUCT CONDITION –  [new,used,refurbished]
  23. PRODUCT TYPE –  [TEXT VALUE – Leave blank if none]
  24. PRODUCT OPTIONS & LEVELS –  [TEXT VALUE – Leave blank if none]
  25. ITEM IDs TO SUGGEST AT CHECKOUT –  [TEXT VALUE – Leave blank if none] to add: Use a comma between multiple IDs
  26. HTML TO DISPLAY ON CART PAGE –  [TEXT VALUE – Leave blank if none]
  27. ALTERNATIVE DESCRIPTION FIELD 1
  28. ALTERNATIVE DESCRIPTION FIELD 2
  29. ALTERNATIVE DESCRIPTION FIELD 3
  30. MPN
  31. ISBN
  32. UPC
  33. GENDER
  34. AGE
  35. COLOR
  36. SIZE
  37. MATERIAL
  38. PATTERN
  39. LOCATION

Posted in: import

Leave a Comment (0) →

Multiple Product HTML page

Multiple Product Integration allows you to put items from your
shopping cart into your actual website pages.

Navigation:
Integration > Multiple Product HTML


Using
the following steps, you will be able to generate code which
can be used in your website programming code.

1. 
Expand the category tree from the panel on the left hand side.


2. 
Select the items you would like to include. To the right, you
can see the items that have been selected.
3.  Select the
options you would like to display. The options selected will
change what the code displays.
4.  Generate the code by
choosing either the HTML or SHTML options.


5. 
The code is now ready to be integrated into your site (copy &
paste).

Posted in: shopmanual

Leave a Comment (0) →

Shopping Cart Login Page

The administration for the shopping
cart is found at:
http://www.yourdomain.com/shop/owner/

(where ‘yourdomain.com’ is replaced with your actual
domain name).

The Shop Owner’s control panel is a
simple, web-based interface where you can add items and
configure your shop.


(click here for
larger image)


Login Page
When
you go to the shop control panel, you will come to a
Login Page that looks like the image provided. You will
need to enter the password in the box marked ‘Password’.
Your password will be listed in your ‘Web Site Settings
Email’ sent to you when you created your account. 

You will also see the ‘User Login’ button to the
upper right.  If you have multiple users set up in the
shop, you can use this function.  If not, you will not
have to worry about it.

Posted in: shopmanual

Leave a Comment (0) →
Page 7 of 9 «...56789