Blog

Archive for shopmanual

Location

Import State, County and City tax rates from CSV file

‘Import tax rates from CSV’ allows you to add tax rates for your state, county, or city faster than adding the rates one by one on this page. Click import to the left to navigate to the screen which allows you to import using a CSV file format. 

Country, State, County, City Based Tax
This is a good place to add tax rates for your country, state, county, or city.
Format:
Country — Select from the drop down bar
State — Abbreviation, ex. AZ
County — Enter the county name
City — Enter the city name

‘Tax Name’ is the field that the customer will see on the checkout page next just to the left of the tax percentage.

‘Tax Rate’ is the field that determines the tax rate used. The customer will see this number on the checkout page. Enter this number as percentage.

Charge Tax Based On
None — will not charge sales tax.
Billing Address — will charge sales tax based on customer’s billing address.
Shipping Address — will charge sales tax based on customer’s shipping address.
Billing or Shipping Address — will charge sales tax based on customer’s billing or shipping address, depending on which address has the indicated city, state, etc.

Location Settings
Location settings are important for what addresses you will accept at checkout.  These settings are based on what states & countries arer listed at the bottom of the Sales Tax / Locations page.

Allow any valid country or state whether it is listed below or not.
This is a good option to accept orders worldwide.

Allow only countries and states that are listed below.
This is option allows you to specifically state which states and countries you prefer to sell to.

Allow only countries that are listed below, but any states within those countries
This option allows you to speficy the counties you would like to sell to without having to enter in the state/province information.


IMPORT COUNTY AND CITY TAX RATES FROM A COMMA DELIMITED / CSV FILE USING THE SHOPPING CART’S “SALES TAX / LOCATIONS” PAGE FUNCTIONS. ALSO YOU CAN MODIFY THE TAX RATES AND THE LOCATIONS YOU WILL SELL TO.

Click here for information on allowing/disallowing international shipping

Navigation:
Mange > Sales Tax/ Locations

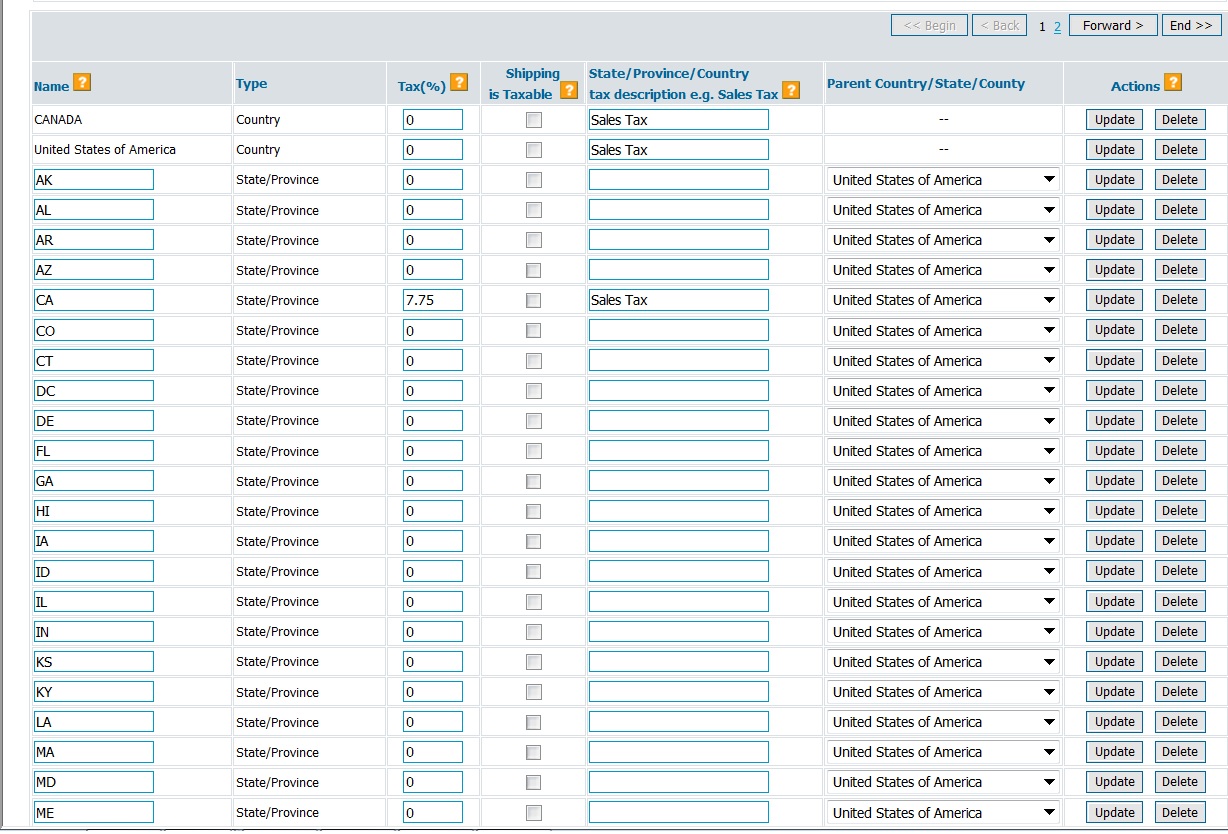
Sales Tax Rates
You are able to charge sales tax based on rates for a particular Country, State, County, or City.

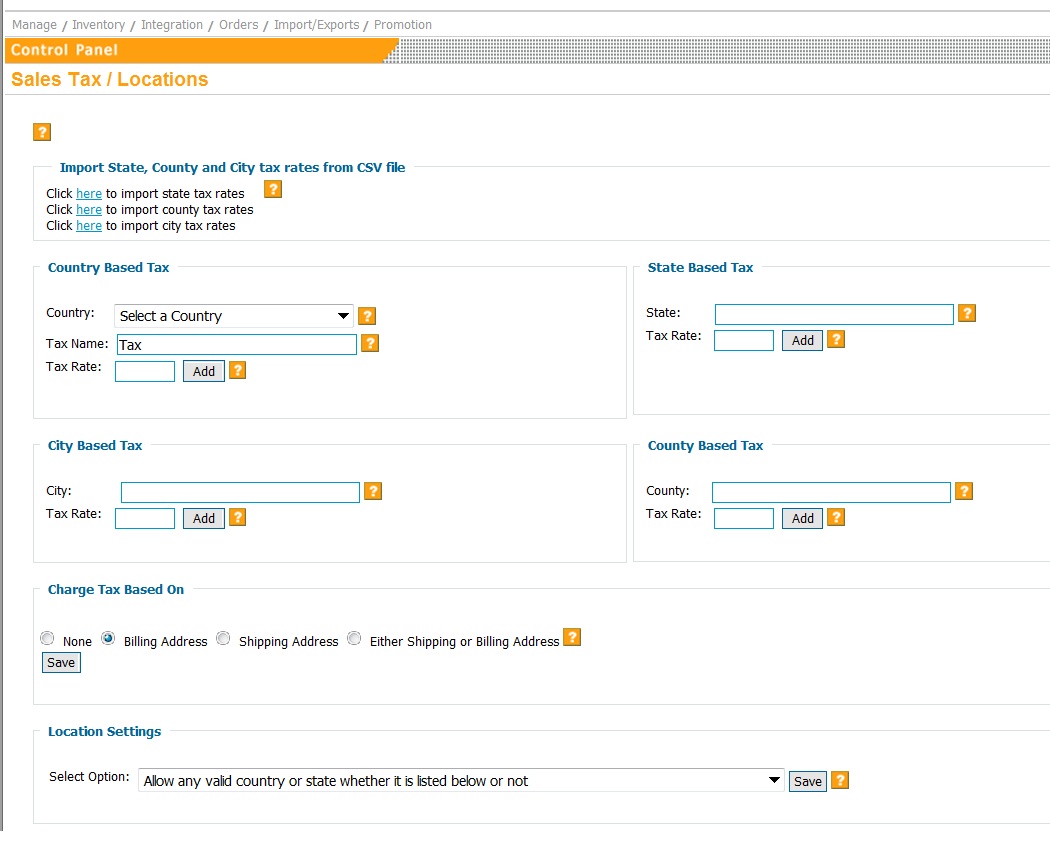
(click here for larger image)The sales tax rate used will be based on the information you input into the shopping cart system on this page. The shopping cart will then check the customer’s information for their City, County, State, and Country.  The shopping cart will use the “lowest common denominator” for the sales tax rate meaning if the customer’s city matches a city put in below, it will use that tax rate for the customer’s order. If the customer’s city doesn’t not match a city put it below, then the shopping cart will use the county tax rate. If the customer’s county does not match put in below, then the shopping cart will use the state tax rate. If the customer’s state does not match a state below, then it will use the country tax rate. If you do not enter a sales tax rate for a City or County, the system will use the state tax rate.

Example:
Let’s say,

United States has a 0% sales tax.
California has a 8% sales tax.
Californians in San Diego pay 9% (1% for the county)
Californians in Vista pay 9.75% (.75% for the city)

You would enter:
Country Based Tax (USA)
Leave blank

State Based Tax
State: California
Tax Rate: 8%

County Based Tax
County: San Diego
Tax Rate: 9%
(note — this will add an option for a customer to choose their county on the billing page)

City Based Tax
City: Vista
Tax Rate: 9.75%

Based on this information input into the system:
If a customer from Vista, CA orders they would pay 9.75% for sales tax.
If a customer from San Diego, CA orders they would pay 9% for sales tax.
If a customer from Sacramento, CA orders they would pay 8% sales tax.
If a customer from AZ orders they would pay 0% sales tax.

.

(click here for larger image)

(click here for larger imae)

(click here for larger image)

Current Rates in the Shopping Cart

This part of the page lists all the sales tax settings that you have created, and it allows you to go though and edit any of your settings.  To update, enter the new information in the field provided such as Tax % (entered in the example is 7.75% tax for CA), and then click on Update to the right.  Currently, you are only have to edit the sales tax one at a time.

The Shipping is Taxable field is not normally used for USA orders, but is often used in Canada.

The Parent Country/State/County is important to have correctly listed so that the customer will be charged the correct sales tax.


Posted in: shopmanual

Leave a Comment (0) →

Link & Button Display Options

Link & Button Display Options
This section of the general settings allows you to modify how
your links & buttons display.

Manage > General
Settings

Shop Control Panel  


Link Options

The shopping cart has a number of links that are
customizable.  These links appear toward the upper
right part of the screen and are separated by bars. 


Display ‘View Shopping Cart’ Link

View the ‘Shopping Cart link’
that appears on pages.


‘Home’ Link

Choose whether to display the
‘Home’ link that and also choose the URL for the Home link. 
The default for the home link iswww.yoursite.com/shop.


Display Account
Login Link in Shop
To
display the  ‘Login’ link in shop, select ‘Yes’ under
this option.  For this option to work, you must be
using Account Type Checkout. To change your checkout type
navigate to: Manage > Checkout type / Payment Options Then
change the Checkout format to ‘Customer sets up account on
checkout’


Show Paging on Top of the Cart

If you have a
category with multiple items, the this options allows you to
show or hide the page numbers for being displayed on top of
the cart pages.


Continue Shopping Button


Display Continue Shopping Button

The ‘Continue Shopping’ Button
is a button that is designed to help customers navigate your
shopping cart.

You are able to select whether it appears on the Cart,
Checkout, and Confirmation pages.


‘Continue Shopping’ Button URL

If this is not filled in, it
will default to shop main entrance.


Error redirector URL

This is the absolute url (eg
http://sitename/a.html) used to redirect in case of any
errors.


Continue URL on the Finished Secure
Page


The absolute url (eg http://www.sitename.com/a.html) where
the user will be directed by clicking continue shopping in
the finished secure page


Make Continue Button a History Button

This option affects the cart
page and is a helpful feature to have enabled.  After a
customer places an item in their cart, they will be taken to
the cart page.  If the ‘Continue button’ is a history
button, it will take them back to the page where they added
an item to cart (item or category pages). 

If the ‘Continue button’ is not a history button, the button
will default to shop main entrance.


Add to Cart Button


Use Image as the
Add to Cart Button: 
You can customize your
‘Add to Cart’ button by using an image.  


Add to Cart Image URL:

Enter the image url (Use
http://….) or alternatively specify an image name that
will be searched from the images dir

To find the
image url follow these steps:

  1. In your browser, browse to a page on your website
    that shows the image you want.
  2. Right click on the Image and select "Properties".
  3. Select the image url text from the popup by
    selecting it with your mouse. Then copy that selected
    url with <Control> C.
  4. On the newsletter page click the image insert icon.
  5. Click in the image url field, then paste the copied
    URL using <Control> V.
  6. Click the insert button on the popup.

Posted in: general_settings

Leave a Comment (0) →

Shopping.com Merchant Data Feed


Shopping.com
Merchant Data Feed Ftp Setup
There are two ways to link to you
shopping.com account.  


Method 1 

Use the Export & FTP.  Do use this method, please update the Ftp Server
Name, Ftp User Name, and the Ftp password as has been specified while setting up
merchant account (with Shopping.com).  Next you would check the categoies you
would like to export, and then you would click "Export & FTP".  


Method 2

"Export & Save".  First select the categoies you would like to export, and then
click "Export & Save".  This method allows you to save a file which you can then
upload into Shopping.com

Posted in: export

Leave a Comment (0) →

Item URL list


What’s
a good use of the URL list?
One good use of the URL list is Google
Sitemaps.  

You can download this list to a .txt format and use it for
your Google Sitempas.

Google Sitemaps is an easy way for you to submit
all your URLs to the Google index and get detailed reports about the visibility
of your pages on Google. With Google Sitemaps you can automatically keep google
informed of all your web pages. 
Login to google sitemap and copy the url you would like to add to sitemap and
paste it on the sitemap. 


Go To Google Sitemaps

Posted in: export

Leave a Comment (0) →

Shop Template


Shop Template
This section of the general settings allows
you to integrate your web design with the shopping cat software.Manage >
General Settings >

Click here to import / edit shop template (used on item pages and cart page)


Shop Import Template Video


(click here to Watch Instructional
Video)

To create a template for your shopping cart to use you can either:

1. Create the page directly in the WSWYG editor.

2. Switch to HTML View by selecting “Edit template in plain text / HTML” and
then type or paste in the HTML

3. Or, the easiest way would be to use the import feature to import a page to
use as a template. 
– To use the import feature, you would type or paste a url into the “Import web
page to use as template” field. The web address/url would be the location of the
page that you’d like to use as a template in the shopping cart. 
– Once you have the url in that field, click the “Import Page / Template”
button. That will import the page and will attempt to change all the relative
image urls, css urls, etc. to fully specified urls. 
– After the page is imported select and delete any unwanted items 
– Copy and then remove the [displayshopitemshere] placeholder from the top of
your template field, and then type or paste it into the location on your page
where you’d like the shop information to appear (generally in the center portion
of your page).

Shortcuts
Some of the shortcuts that you may want to place
within your shop template are:

[displayshopitemshere] – Display Shop items

##view cart## 
– Displays the
View Cart link.
##search form## 
Displays the Search Form.
##current total## 
Displays the current order total. 
##category links## 
Displays the category links.
##include external file
##complete
url## 
– Include data from
external file.
##some text##affiliateid## 
Displays the shoppers affiliate ID (if any).

If you already have a logo within your shop template then you will not want to
upload a logo image from the General Settings page.

Posted in: general_settings

Leave a Comment (0) →

Remove Category

This section allows you to remove categories.

Navigation:
Manage > Categories > Remove Category
or
Inventory > Manage Categories > Remove Category


Remove
Category


Remove Category Name Only

This will remove the category name, and will
disassociate the items with this category. Category will be set to None for
items that only apear in this category. 


Remove Category Name and Items

This will remove the category name, and will delete
the items that only appear in this category. If items appear in more than one
category, then they will be disassociated with this category but will not be
deleted. 


Remove Items Only – Do not Remove
Category Names

This option allows you to delete all the items in a
particular category without deleting the category itself.

Posted in: category

Leave a Comment (0) →

Add Category

This section allows you to add categories for your shopping cart page.

Navigation:
Manage > Categories > Add Category
or
Inventory > Manage
Categories > Add Category


Add
Category

Categories are a good way to organize your items to make it
easier for you customers to find. This page allows you to add categories. You
are also able to create categories through the Import function found at Import >
Import Item Data.

To get started, select the main shop as a parent
category, and then create a category under ‘Enter Category Name’. This will
allow you to create a subcategory of the Main Shop parent category. You will
then be able to create further subcategories of each category that you create.
For example: You create a Shirts category. After creating that category, you
will then be able to create subcategories t-shirts and dress shirts, etc.


Enter Category Name

Subcategory of the parent category list above.


Enter Category HTML
Allows you to input custom HTML that appears before the items in a
particular category.


Enter Category Title Tag
Normally is automatically generated to match the name of the category. If
you input anything in this field, it will overwrite that automatically generated
title tag.

Category Image
This field only applies if you have ‘Display
subcategory links as thumbnails’ set to yes. This option is found in the
Category Display Options under Manage > General Settings


Image File Location: 
To load an image that is on your hard drive, click ‘Browse’, find the
file, and click open. When you click ‘Add Image’ below, you will upload the
image.


Create Thumbnail with Pixel width
You are able to create a thumbnail of the image which is typically a
smaller version of the image.

Posted in: category

Leave a Comment (0) →

View Order Page


Order Display Options

Navigation:
Orders > Order Display Options


Templates
for order display

Using this feature, you
are able to edit the following order displays:

Standard packing List
Standard Shipping Label
Standard Inv 10Pt
Standard Inv 11Pt
Standard Printable Invoice

Diplay Options
The display address info in upper
case and display copy buttons control what you see on the ‘View Orders’ page.

Posted in: shopmanual

Leave a Comment (0) →
Page 1 of 9 12345...»